Table of Contents:
- Efficient Libraries for Developing Telegram Bots in Python
- Key Aspects of Aiogram to Consider Before Coding
- Creating an Echo Bot for Telegram
- Installing Python: A Step-by-Step Guide
- Creating a Virtual Environment for Your Project
- Creating a Bot in Telegram: A Step-by-Step Guide
- Connecting with the Aiogram Library for Developing Telegram Bots
- Creating the Code for an Echo Bot in Python

Creating a Telegram bot: 5 steps to Success in Messengers
Learn MoreEfficient Libraries for Developing Telegram Bots in Python
Creating Telegram bots using Python has become a pressing task for developers. There are many libraries available on the market for this purpose, each with unique functionality, varying levels of community support, and popularity. In this review, we will analyze the most popular libraries for developing Telegram bots in Python.
Aiogram: An Asynchronous Library for Developing Telegram Bots
Aiogram is one of the most modern libraries for creating Telegram bots and is quickly gaining popularity among developers. Thanks to asynchronous code execution, Aiogram ensures high responsiveness of bots, even when waiting for responses from users. The library offers wide functionality and detailed documentation, which makes it a suitable option for both beginners and experienced developers. An active Russian-speaking community facilitates the exchange of experience and provides support, further simplifying the development process. Choosing Aiogram for creating Telegram bots allows developers to effectively implement their ideas and projects. Python-telegram-bot: A Classic of the Genre Python-telegram-bot is one of the first and most stable libraries for developing Telegram bots, remaining popular due to its simplicity and reliability. Unlike Aiogram, Python-telegram-bot uses a synchronous approach, which can lead to code execution being blocked while waiting for user responses. This library is ideal for developers who prefer traditional programming methods and want to create functional and effective Telegram bots. Python-telegram-bot lets you quickly implement features such as message handling, user management, and integration with external APIs, making it an excellent choice for building high-quality bots.
TeleBot is a versatile library that gives developers the flexibility to choose between asynchronous and synchronous approaches. This makes it ideal for small projects and simple bots. The library's documentation provides everything you need to get started, making TeleBot an accessible tool for beginner developers. Thanks to its ease of use and rich functionality, TeleBot allows you to create effective chatbots without unnecessary complexity.
Key Aspects of Aiogram to Consider Before Coding
Before you start developing a bot for Telegram, you should familiarize yourself with the main features of the Aiogram library. This library provides a convenient interface for working with the Telegram Bot API, allowing you to create highly efficient and scalable bots. Thanks to its asynchronous architecture, Aiogram allows you to process multiple requests simultaneously, significantly improving application responsiveness. The library also supports many useful features, such as message handling, user management, and integration with external APIs. Understanding these key aspects will help you create an effective bot that can meet user demands and increase engagement with your audience.
One of Aiogram's main advantages is its complete asynchronicity. This library uses the async/await syntax, which enables the parallel execution of multiple tasks and efficient code execution management. Aiogram's asynchronous approach allows developers to create high-performance Telegram bots capable of handling a large number of requests simultaneously. This approach significantly improves application responsiveness and speed, which is especially important for users who expect an immediate response from the bot.
Let's present a simple example of a function implementing the async/await mechanism:
Each command in Telegram is managed by its own handler, known as a handler. This handler is responsible for processing messages received from users. Each handler defines the actions the bot will perform in response to specific messages. Properly configuring handlers enables effective user interaction and improves the overall bot experience.
Decorators are used to associate commands with the corresponding handlers. These decorators receive the command name without the leading / character. This allows for efficient command processing and organization of application logic, improving its code structure and readability. Using decorators simplifies the process of adding and managing new commands, making development more flexible and convenient.
The async keyword tells the interpreter that a function will run asynchronously. This allows the interpreter to continue executing other instructions rather than waiting for the function to complete. When the await keyword is encountered, the interpreter pauses execution of the current code until a result is obtained, allowing for efficient management of asynchronous operations and improving application performance. Using async and await simplifies writing asynchronous code, making it more readable and maintainable.

We recommend paying attention to the following topic:
Asynchronous programming: the basics of the processor
Asynchronous programming is an approach that allows you to execute tasks in parallel, which significantly improves the efficiency of applications. In the first part of our article, we will look at how the processor functions and its impact on asynchronous operations.
The processor, or central processing unit (CPU), executes program instructions, processing data and managing other computer components. It consists of multiple cores that can process commands simultaneously, making parallel execution possible. Asynchronous programming takes advantage of these capabilities to perform operations without blocking the main thread of execution.
By using asynchronous methods such as callbacks, promises, or async/await, tasks can be initiated, and the processor continues working on other tasks while waiting for the operation to complete. This is especially useful when working with I/O, such as database or network resource queries, where latency can be significant.
Therefore, understanding how the processor works and its architecture is key to effectively implementing asynchronous programming. In the following sections, we'll dive into specific techniques and best practices that will help developers leverage asynchronous approaches in their projects.
Aiogram offers a comprehensive set of tools and hooks, making it easy to add new features and tailor the bot to the specific needs of developers. This library provides full access to all Telegram API capabilities, including sending and receiving messages, managing the keyboard interface, and working with media files such as photos, videos, and documents. This makes Aiogram an ideal choice for creating feature-rich Telegram bots, allowing you to implement a variety of ideas and improve the user experience.
To deepen your knowledge of the Aiogram library and keep track of its updates, the following resources are useful. The official Aiogram documentation is the primary source of information, providing a complete guide to installing, configuring, and using the library. It's also worth checking out the forums and developer communities, where you can share experiences and get advice on solving any issues that arise. Regularly reading the Aiogram developer blog will help you stay up-to-date with the latest news and updates. It's also helpful to follow the GitHub repositories to stay up-to-date with changes and new features. These resources will not only help you improve your Aiogram skills but also help you use the library more effectively in your projects.
- Official Aiogram documentation
- GitHub repository
- Russian-language Telegram chat dedicated to Aiogram
- English-language chat for discussing Aiogram
- Channel with the latest news about the library
- Test bot based on Aiogram
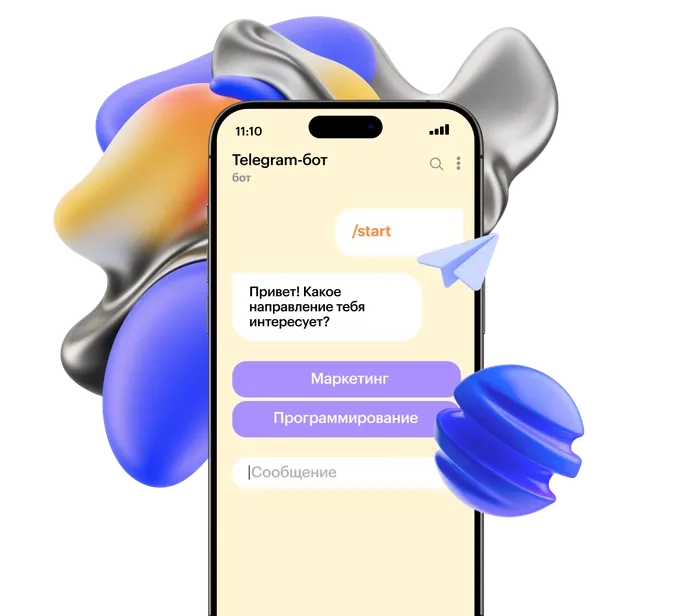
Creating an echo bot for Telegram
Let's start developing a Telegram bot. In this guide, we will look at the process of creating a simple echo bot that will echo user messages. This is a great way to learn the basics of Telegram bot programming and understand how to interact with the platform's API. Creating an echo bot is the first step toward more complex projects and will help you develop your software development skills.
To successfully create an echo bot, you need to follow certain steps. First, decide on the platform your bot will run on. This could be Telegram, Discord, Facebook Messenger, or any other messaging platform. Then, choose the programming language to use for development. Popular options include Python, JavaScript, and Java, as they have extensive libraries for working with messenger APIs.
After choosing the platform and language, you need to register your bot with the corresponding messenger and obtain a token to access the API. Next, you need to develop the bot's logic. The echo bot should receive messages from users and send them back. Implementing this process involves setting up message handlers and creating a function responsible for sending responses.
Remember to test the bot to ensure it correctly processes incoming messages and responds to them. After testing, you can add additional features, such as command processing or integration with external APIs, to enhance the functionality of your echo bot. Finally, host your bot on a server or cloud platform so it's accessible to users at all times.
- Install Python and set up a virtual environment to manage dependencies;
- Register your bot through the dedicated @BotFather Telegram channel, which will allow you to receive a unique token for API access;
- Install the Aiogram library, which will make working with the Telegram API much easier;
- Write code for your echo bot using the received token to communicate with the Telegram API.
Installing Python: A Step-by-Step Guide
For macOS or Linux users, Python is often already installed by default. To check if Python is installed on your device, open a terminal and enter the following command:
If Python is installed, you can check the interpreter version in the terminal. For example, the output will look like this:

Installing Python on a Windows operating system is an important step for developers and users who want to work with this programming language. By following our detailed instructions, you'll be able to complete all the necessary steps and recommendations for a successful Python installation. This process will provide you with access to a variety of libraries and tools needed for software development and various tasks.
Creating a Virtual Environment for Your Project
After installing Python, a key step is creating a virtual environment. For this, a tool called virtualenv is convenient, as it isolates dependencies between different projects. This allows you to install libraries and packages independently, which is especially important when developing multiple applications simultaneously. Creating a virtual environment helps avoid conflicts between library versions and simplifies project management, which contributes to more efficient software development and testing.
To install virtualenv, open a terminal and enter the command:
After installing virtualenv, you need to create a directory for your project. This directory will serve as a storage location for your virtual environment and all project-related files. Creating a separate folder for a project helps organize the structure and simplifies dependency management, which is especially important when working on multiple projects. Make sure to choose a clear and descriptive name for the directory to easily identify the project in the future.
Create a folder for your Telegram bot by running the mkdir telegram_bot command. Then, use the cd telegram_bot command to navigate inside this folder. This will contain all of your project files needed for developing and configuring the bot.
Now, while in the telegram_bot directory, create a virtual environment using the command:
After creating the virtual environment, be sure to activate it. This step is critical, as without activating the environment, you will not be able to access installed libraries and packages. An activated environment ensures that all dependencies and tools required for your project are available and won't conflict with other projects.
Your virtual environment has been successfully activated, and you can proceed to the next stage of bot development.
Creating a Bot in Telegram: A Step-by-Step Guide
To create your own bot in Telegram, you need to use the special bot @BotFather. Open the Telegram app and enter its name in the search bar. Once you find @BotFather, start a conversation with them, following the instructions to create and configure your bot. This process involves obtaining a token to access the Telegram API, as well as setting up a name and description for your bot.
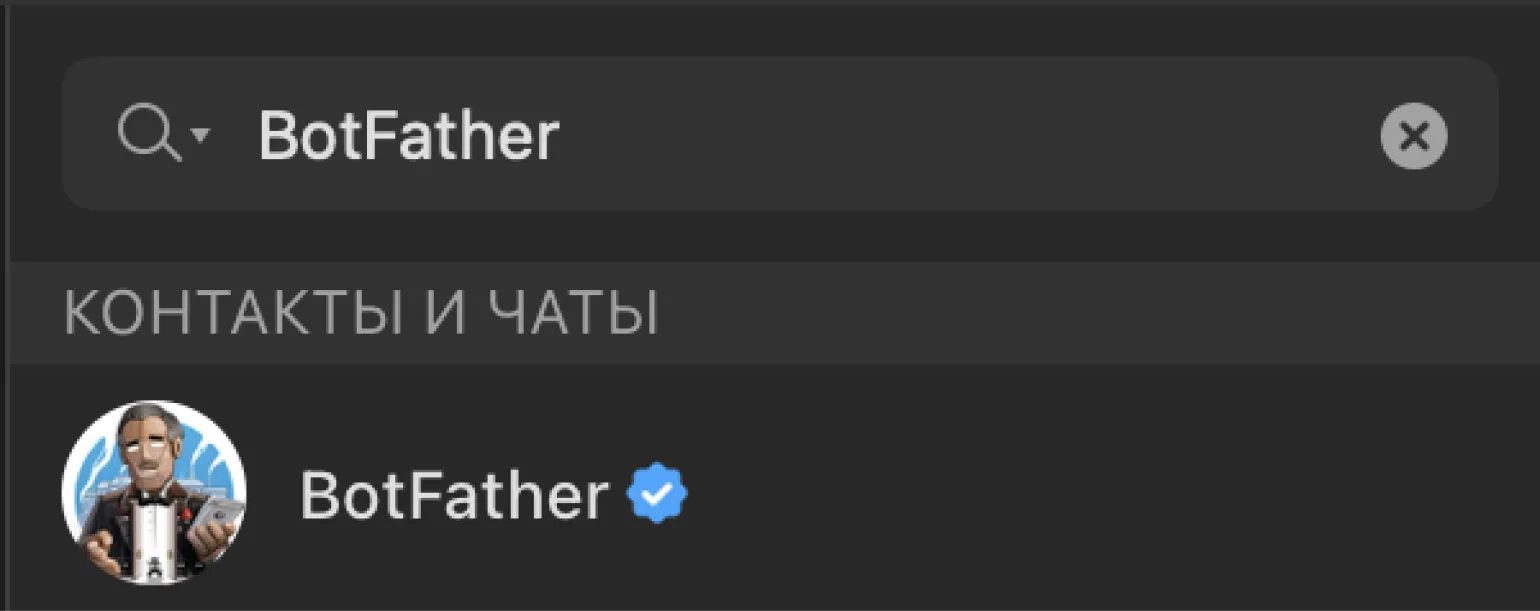
Open @BotFather and click the "Launch" button. After that, enter the /newbot command to begin the process of creating your new bot.
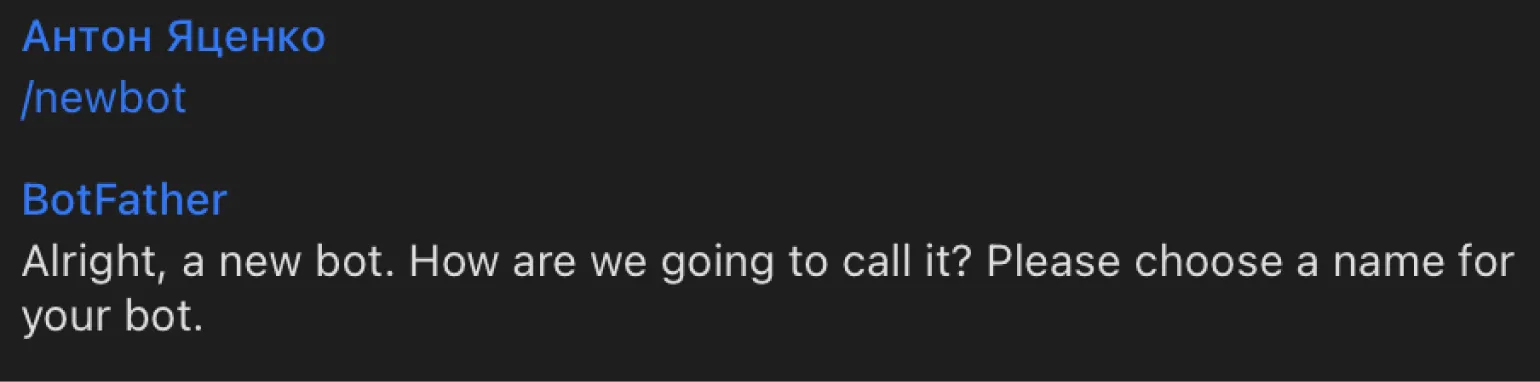
To create your bot in Telegram, you need to come up with a unique name and username. For example, you could use a name like echo_skillbox_bot, but keep in mind that this name may already be taken, so choose your own. After choosing a name, you'll need to contact @BotFather, who will send you the token needed to connect to the Telegram API. This token is the key to managing your bot and its functionality.
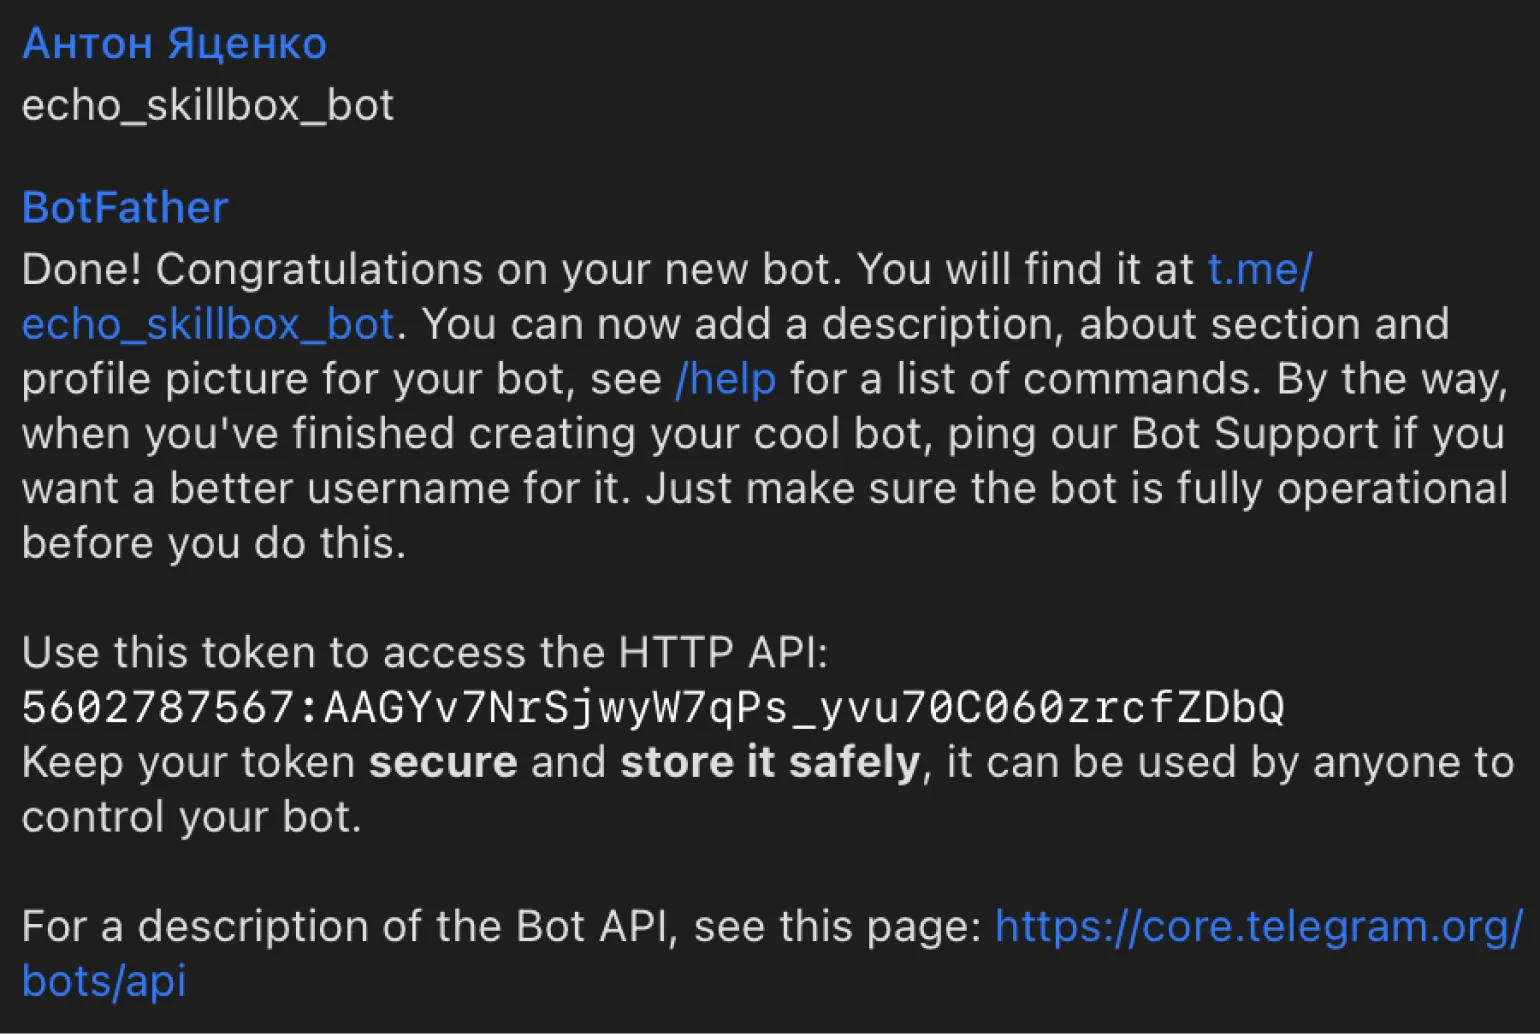
Save this token, as it is necessary for further work with your bot. Without this token, integrating the bot into your projects will be impossible. Make sure you store it in a safe place to avoid issues with accessing your bot's functionality.
Including the Aiogram Library for Developing Telegram Bots
When installing Aiogram, you will use the PIP package manager, which simplifies the management of Python libraries. To begin the installation process, open a terminal and enter the following command:
It is important to remember that the library must be installed in a previously created virtual environment associated with your project, for example, in the telegram_bot folder. If you plan to create a new bot in a different directory, you should reinstall Aiogram to prevent potential compatibility issues. Proper installation and configuration of the environment will ensure the stable operation of your bot and simplify dependency management.
Creating Code for an Echo Bot in Python
When developing Python code, we recommend using an integrated development environment (IDE), as it greatly simplifies the process of writing and debugging programs. In this project, we use the free Visual Studio Code editor, which offers many useful features, such as syntax highlighting, code completion, and built-in tools for working with Git. You can choose any other editor that suits you, but Visual Studio Code is an excellent choice due to its flexibility and large community.
Let's create a main.py file in your development environment. This file will become the basis for our echo bot. To get started, we'll import the necessary classes and modules from the Aiogram library. This will allow us to use the functionality for creating and managing a bot in Telegram, as well as processing incoming messages.
Let's look at the functions performed by these classes. These classes play a key role in organizing and managing the content structure. They ensure proper formatting and styling of elements, which contributes to a better user experience. In addition, these classes help optimize the page for search engines, improving the visibility and accessibility of content. Effective use of classes allows you to create responsive and interactive elements, which improves the overall user experience and helps increase the time spent on the site.
- Bot is a class responsible for processing commands from users and generating responses.
- Dispatcher is used to track updates from the Telegram API.
- Executor is used to launch the bot and manage the necessary functions.
We use the types module, which includes the main classes for processing messages. For example, the types.Message class allows you to effectively work with text messages from users. For more detailed information, please refer to the official Aiogram documentation.
We'll import a token that will act as a link to the Telegram API. This token is necessary for interacting with Telegram and allows your application to send and receive messages, manage channels and bots. Proper use of the token will ensure a reliable connection to the service, allowing you to effectively implement the functionality of your project.
For the code to work correctly, you must initialize the bot and Dispatcher objects by passing the token to the bot object. This initialization is a key step, without which the program will not function properly. Make sure the token is specified correctly to avoid errors during startup.
Let's create a welcome message for new users, which will be displayed when entering the /start command. To do this, you need to define message_handler and implement a function that responds to the command. It is important that the message is informative and helps users understand how to use the bot. Make sure the welcome message includes the main functions and capabilities your bot offers and suggests next steps for the user. This will improve the usability of the application and enhance the user experience.
Now, when the user clicks the "Start" button or enters the /start command, they receive a welcome message from the bot. This message serves as the first step in interacting with the bot, allowing the user to become familiar with its features and capabilities. The welcome creates a positive first impression and helps establish rapport, which is important for further interaction.
In this section, we will take a closer look at the key points of the code. First, we will focus on its structure and the main elements that affect functionality. By analyzing the code, we will highlight important aspects such as the use of variables, functions, and logical operators. We will also discuss how to properly organize the code to improve its readability and maintainability. Understanding these details will allow you to not only improve your programming skills but also create more efficient and optimized solutions.
- message_handler is a decorator that responds to incoming messages and contains a response function. It allows you to change the behavior of a function without changing its source code.
- commands=[‘start’] — This command binds the decorator to the function that will be executed when it is called.
- async def send_welcome — Creates an asynchronous function that accepts a user message as an argument, defined by the Message type. The function can be named arbitrarily, but we chose the name send_welcome for clarity.
- await message.reply — Sends a response to the user using await for asynchronous operation of the library.
Let's create an event handler for processing text messages coming from users. This handler will be responsible for analyzing and responding to messages, ensuring interactivity and ease of communication. By implementing this handler, the system will be able to effectively process incoming text messages, providing users with relevant responses and support.
To ensure the bot can respond to any text message, we leave the parameters in the @dp.message_handler decorator empty. The message parameter performs the same function as the one used previously. This allows the bot to process messages without content restrictions, providing more flexible interaction with users.
This response uses the message method, which returns the text stored in the message variable. This allows for efficient processing and display of the necessary information in the response.
Configuring the receipt of messages from the Telegram server is an important step for the full functionality of the bot. Without this configuration, the bot will not be able to send responses to users. To implement the function of receiving updates, we use the polling method. It allows you to regularly poll the server for new updates and receive them in Telegram. To activate polling, you only need to add two lines of code.
Our bot code is complete and ready to run. We have reached the stage at which all functions and capabilities are implemented. The bot can now perform its tasks without errors or glitches. It's important to test its operation to ensure all processes are running smoothly. The prepared code allows for effective interaction with users and execution of planned operations. The next step is to integrate the bot into the work environment and use it to achieve your goals.
Save the file in the telegram_bot directory with the name main.py.
Creating a Telegram Bot: 7 Steps to Successful Promotion
Want to create a successful Telegram bot? Learn 7 proven steps for promotion in instant messengers!
Learn more