Contents:
- Efficient Camera and Lighting Setup in Blender
- Creating a Path Stroke for Static Renders in Blender
- Stroking an Object's Path Using an Additional Mesh
- Voxel Generation: New Horizons in 3D Modeling
- Mass Object Transformation: Secrets of Creating Unique 3D Forms
- Generating Vegetation on Objects in Blender
- Creating a Winter Atmosphere with Real Snow
- Converting Text to 3D Objects in Blender
- Converting a Vector Image into an Object: A Step-by-Step Guide
- Animation Technology: Transforming Objects in Blender
- Animating Individual Sections of a Mesh in Blender

Game Dev: 3 Professions and Your First Game in the Course!
Learn MoreBlender is a powerful tool for creating 3D art and animation, suitable for both beginners and experienced users. In this article, we will look at useful techniques and tips that will help you effectively master Blender's functionality and significantly speed up your work process. You will learn how to use the program's basic tools, as well as receive recommendations for creating high-quality 3D graphics and animation.
Efficient Camera and Lighting Setup in Blender
Before you begin exploring Blender's new features, it is important to pay attention to effective methods of working with the camera and lighting. Beginners often drag and drop these elements manually, which can be quite time-consuming. However, there are a number of more efficient methods that significantly speed up the process of setting up the camera and lighting in a scene. Using hotkeys and special tools allows you to optimize your work and focus on the creative process, rather than technical details. Having mastered these methods, you will be able to achieve the desired results faster and improve the quality of your projects in Blender.
One of the effective control methods in the program is Walk Mode. To activate this mode, press Shift + ` (tilde). This will switch the controls to those used in first-person games. In this mode, the WASD keys control horizontal movement, while the E and Q keys control vertical movement. Holding Shift allows you to move at increased speed. This feature is also available in camera mode, which is activated by pressing Numpad 0. This approach allows you to quickly and easily set up the perfect angle for the final render, significantly improving the quality of your work.
To simplify the lighting setup, you can bind the light source to a specific object. To do this, select the light source and go to the Object Constraint Properties. Click on "Add Object Constraint" and select the "Track To" option. In the "Target" field, specify the object to which the light source will be bound, and then set the rotation along the axes. Select the Z Track Axis, and select X or Y for the "Up" parameter. This will ensure that the light source always points at the object, even if it rotates. This approach will ensure more stable and thoughtful lighting in the scene, which is especially important for creating high-quality visual content.
This method demonstrates high efficiency when using directional light sources, including sunlight, spotlights, and specialized lighting fixtures. Using such sources can significantly improve the efficiency and quality of work.
Now that you've mastered the basic camera and lighting setup, you can move on to more original approaches for rendering in Blender. It's important to use creative techniques to make your projects stand out. Experiment with different angles and light sources to create a unique atmosphere. Pay attention to textures and materials, which can significantly change the perception of your scenes. Also, consider using post-processing effects to add depth and expressiveness to your images. Using these innovative solutions will help you achieve impressive results in rendering in Blender.
Creating a Path Stroke for Static Renders in Blender
With the release of Blender version 2.93 and later, users have access to a powerful tool - the Line Art modifier. This modifier allows you to create crisp outlines on 3D models, giving them the appearance of a 2D drawing. This makes the Line Art modifier ideal for creating static renders. Its capabilities make it an indispensable tool for artists and designers seeking a unique style in their projects.
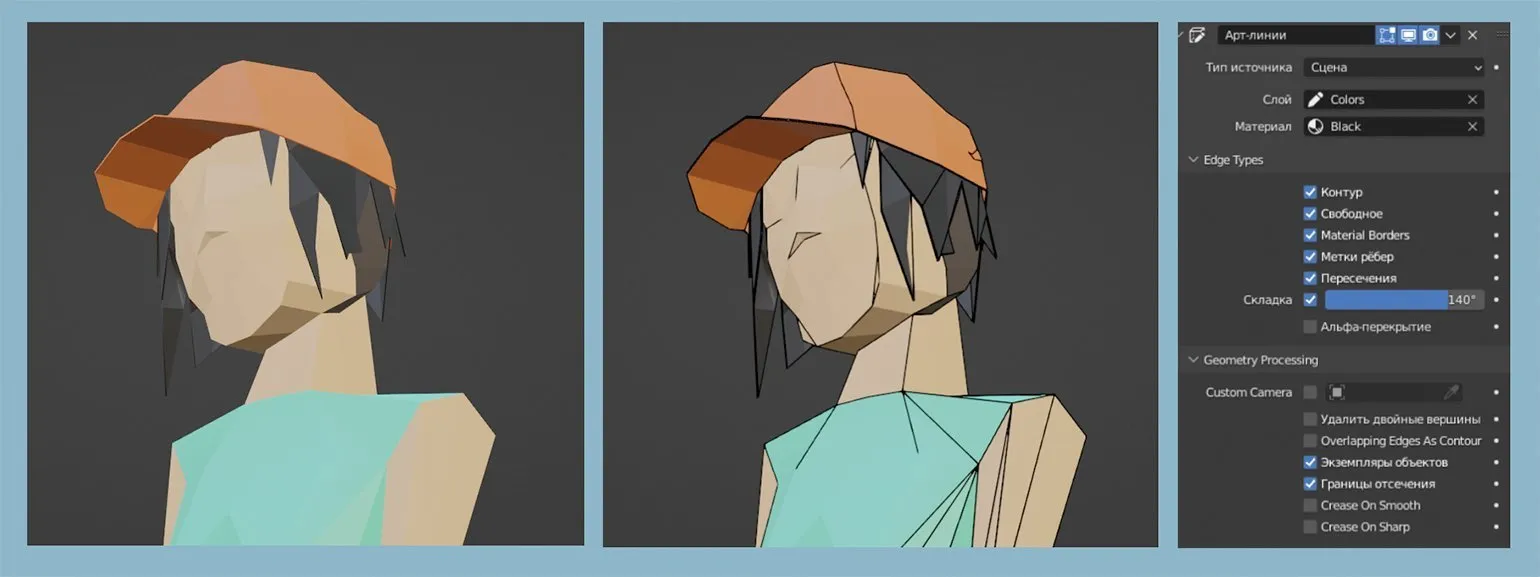
The first step in creating outlines is choosing a camera perspective, as this determines the scene's composition. Next, use the Shift + A combination to add a Stroke using the Grease Pencil. It is important to adjust the stroke scale, as this directly affects the thickness of the outlines. Then, move the stroke to the side so it is not in the frame, and proceed to the Modifier Properties. In this section, select the Line Art modifier from the available list. Correctly choosing and adjusting these parameters will help achieve a high-quality result in a graphic project.
In the modifier settings, set Scene as the Source Type. Next, select Layers -> Colors and go to Materials, where you can adjust the outline color. It's recommended to further adjust the resulting result in the modifier's parameters to achieve the best visual effect.
The Line Art modifier produces the best results when working with objects with clear geometric shapes. The quality of the original model is key, as any imperfections can become more noticeable during the outline creation process. Make sure your model is carefully crafted to avoid rendering issues and maintain high quality of the final result.
Outlining an object's outline using an additional mesh
This technique creates a clear outline around an object, making it an optimal solution for both static and animated visualizations. Unlike alternative methods, the result is independent of the camera angle, which is a significant advantage for animators and 3D designers. This ensures high-quality visualization and versatility across various projects, making this technique popular in computer graphics.
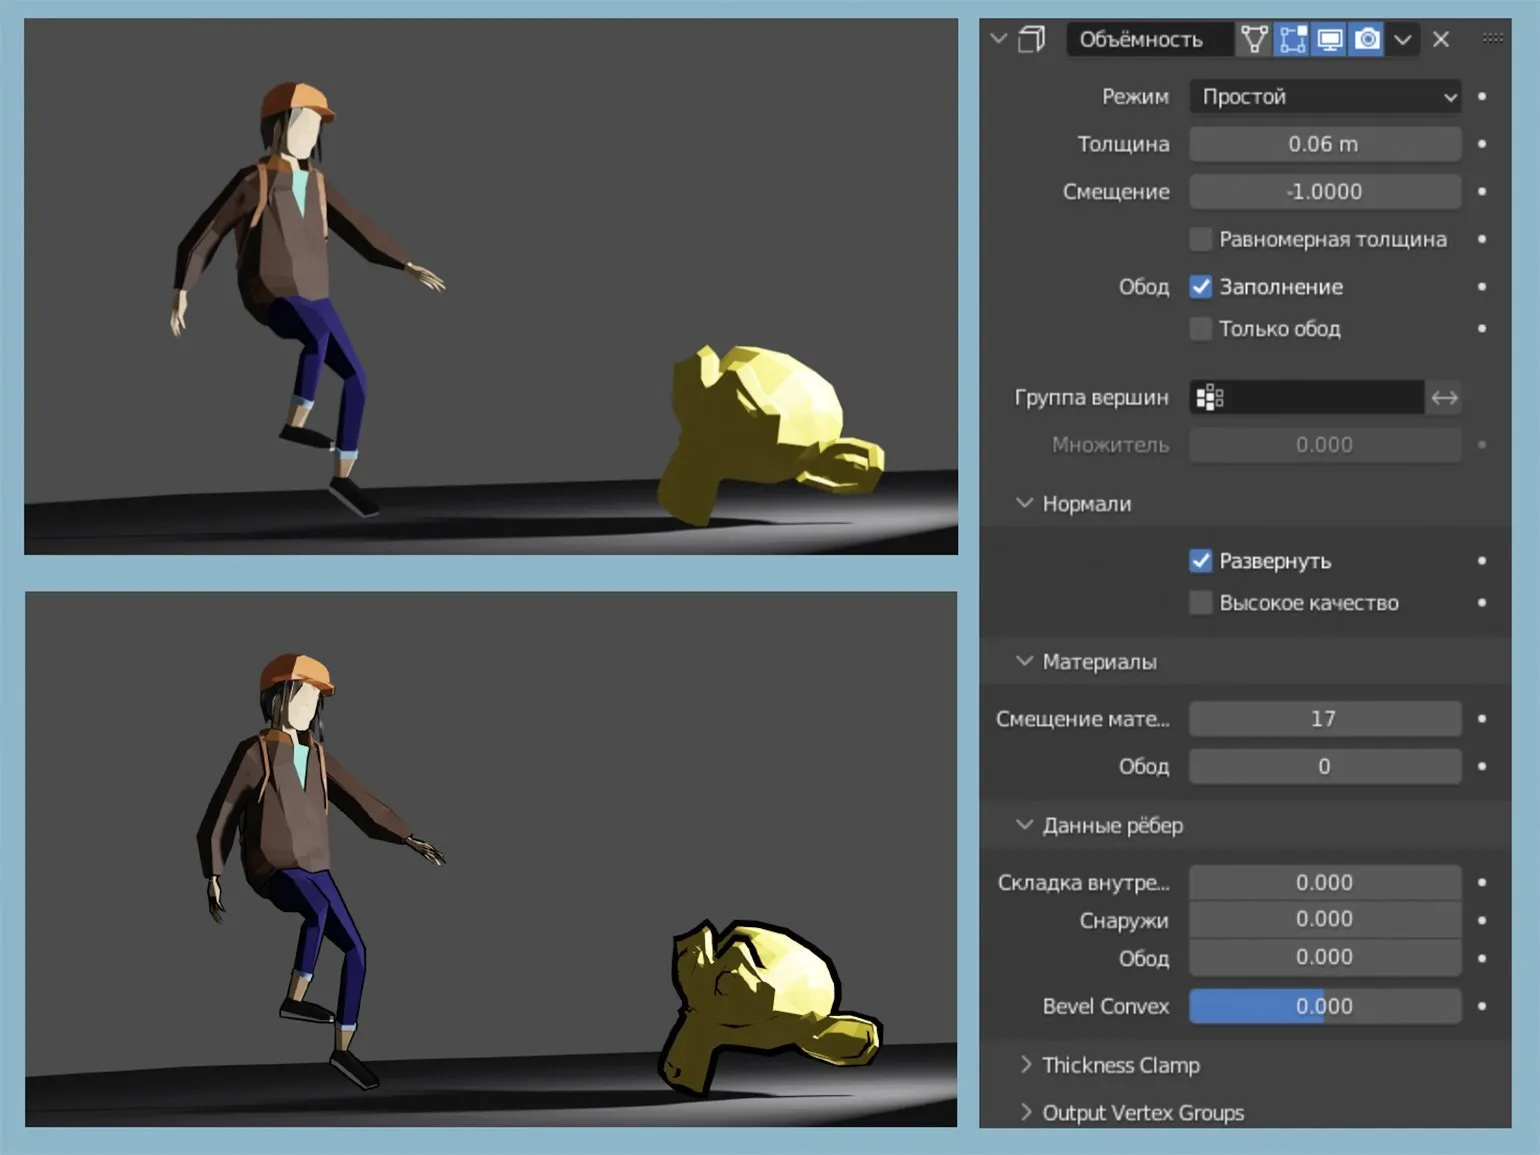
To begin, create a new material with the Emission surface type and set its color to black. Be sure to enable the Backface Culling option in the material settings. This will avoid unwanted artifacts and improve overall visualization. Proper material settings will help achieve higher-quality results in your 3D scene.
The next step is to add the Solidify modifier. In this modifier's settings, pay attention to the Normals tab and enable the Flip Normals option. It's also important to correctly set the Material Index Offset value, which should be one greater than the total number of materials used in the object. For example, if you have five materials, this value should be six. Properly setting these parameters will ensure the object displays correctly and optimize its visual characteristics.
After completing the steps presented, your object will have a crisp and expressive outline. You can adjust the line thickness by changing the Thickness parameter in the modifier settings. This technique is especially useful for cel-shaded visualizations and is also ideal for creating comics and animations. Proper use of outlines will improve the perception of your project and add expressiveness.
Voxel Generation: New Horizons in 3D Modeling
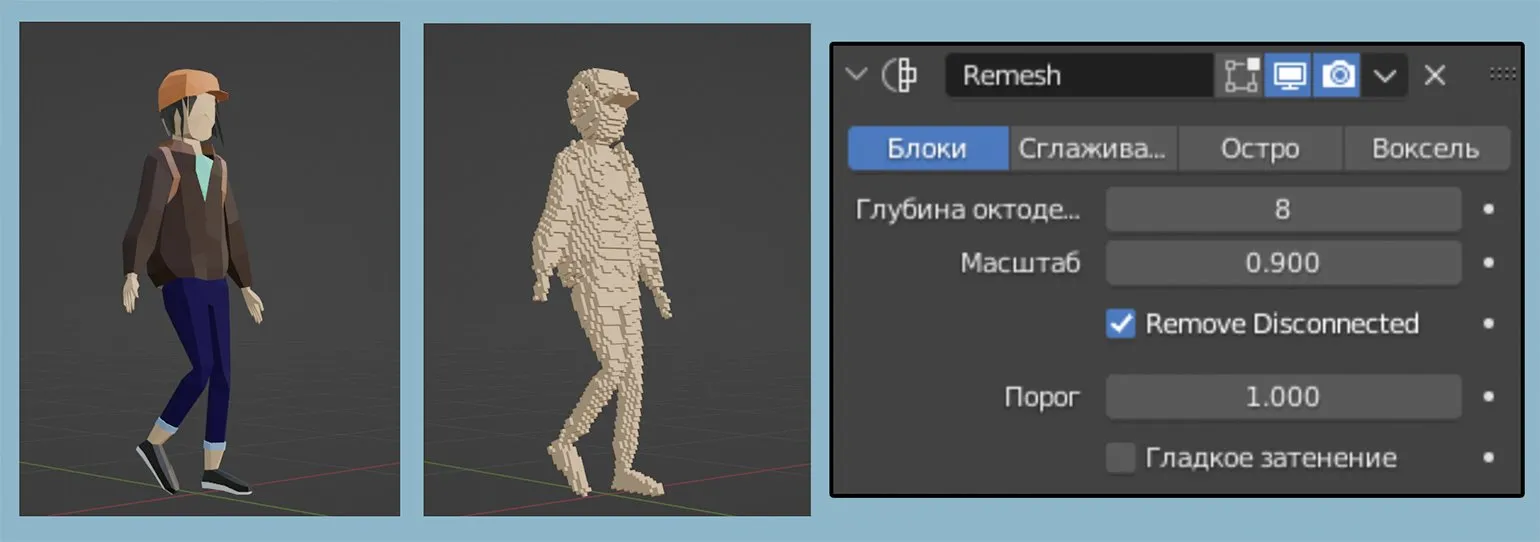
The Remesh modifier in 3D graphics is a powerful tool for converting objects into voxel structures. To use this feature, select the desired object and go to the modifiers tab. In the Generate section, select the Remesh modifier and activate the Blocks option. Be sure to adjust the Octree Depth parameter according to your requirements. This technique is ideal for creating visualizations in the style of Minecraft and other pixel worlds, opening up wide opportunities for creativity and experimentation in 3D design.
Mass Object Transformation: Secrets to Creating Unique 3D Forms
In previous lessons, we examined in detail the process of generating multiple 3D models from a single mesh. This technique demonstrates high efficiency due to the use of proportional editing, which allows you to work with groups of objects. For a more detailed understanding of the process and its capabilities, we recommend checking out our dedicated 3D modeling guide.
To begin, select all objects using the keyboard shortcut A. Then, go to the Object menu and choose Set Center Point, then click Center Object to Geometry. This procedure will set the center point for the objects, which will provide more precise control over their transformation and improve your work with them in the future. Properly determining the center point of objects is a key step in editing and animating them. By enabling proportional editing mode, you can move one or more objects, with adjacent elements following in the same direction. After moving, settings will appear, including the "Proportional Size" option, which allows you to adjust the radius of the surrounding objects. This allows for more precise and convenient editing, while maintaining harmony in the arrangement of elements. Using proportional editing is especially useful when working with complex compositions where visual unity is important. This technique allows you to create a variety of visual effects, including bubbles and explosive waves. By combining movement with scaling and rotation, you can form a group of objects into a vortex, significantly expanding your creative possibilities. Explore different combinations of these effects to achieve unique results in your project.
There are many methods that can improve the efficiency of the 3D modeling process. One of these methods is the use of additional plugins and tools for creating animations. Programs such as Blender and Maya offer a wide range of features designed for professional 3D designers. These tools not only simplify the creation of complex models but also allow for high-quality animation, which significantly improves the overall result of the work. Using these programs can significantly speed up the development process and improve the quality of the final product.
Generating Vegetation on Objects in Blender
Blender provides users with an extensive set of built-in add-ons that significantly increase the capabilities of the program. These add-ons are already included in the main package and do not require separate download. To activate the required add-on, go to the Edit menu, then select Preferences and in the Addons section enter the name of the desired tool in the search bar. After that, just check the box next to it to start using its functionality. Using add-ons in Blender allows you to optimize your workflow and improve the quality of your projects.

After activating the IvyGen add-on, open the Transform panel in the viewport. Go to the Create tab and select Ivy Generator. Then, select the object and place the 3D cursor in the area where you want to create the vegetation. Click Add New Ivy to generate. It is recommended to experiment with the settings in the lower left menu to achieve the optimal result according to your requirements.
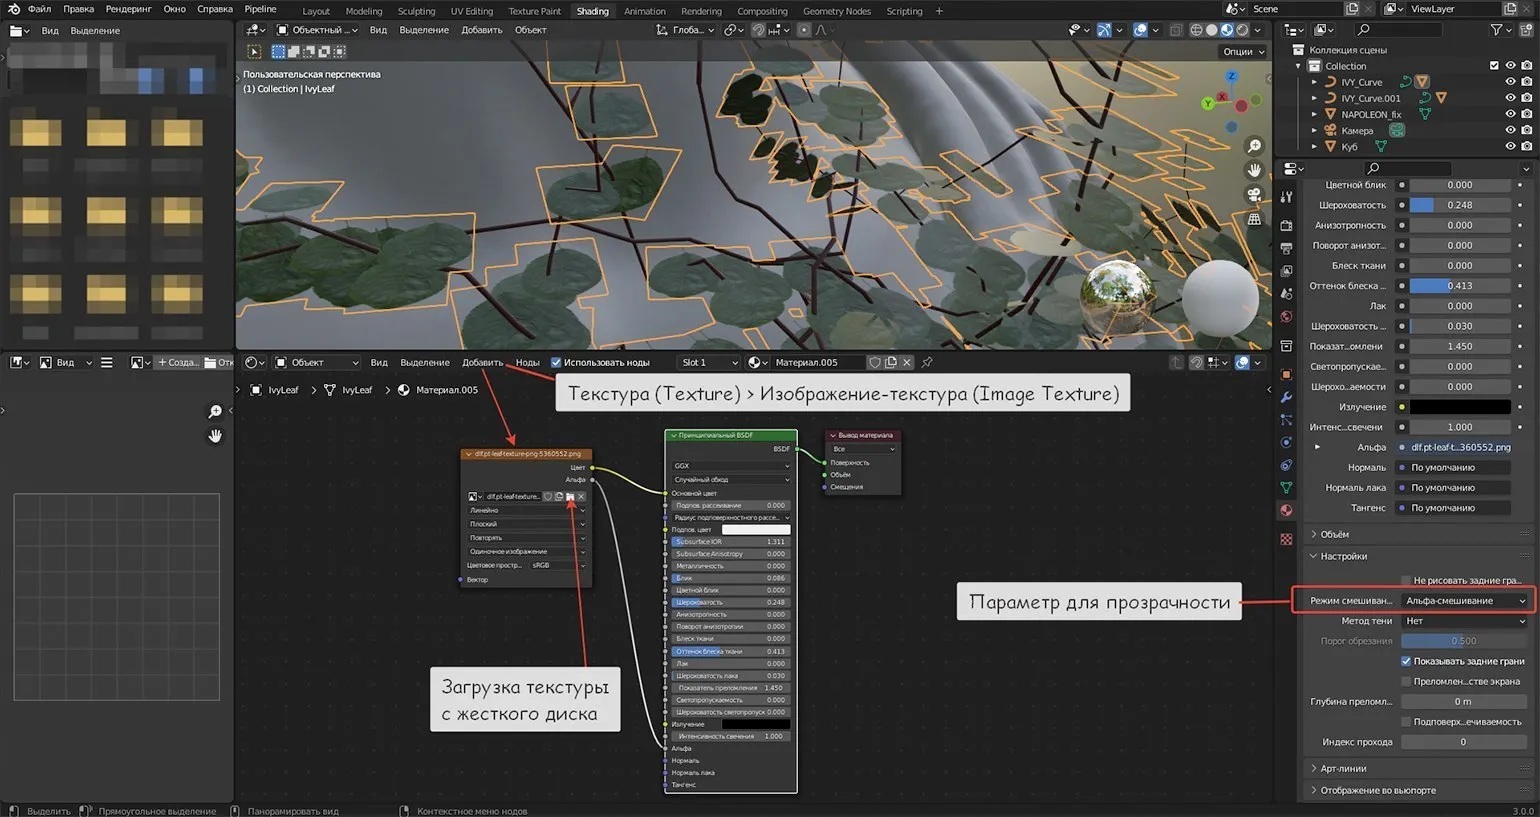
Once your ivy has reached the desired shape, it is important to properly set up the materials for the leaves and branches. Select the object in the outliner, go to the Material Settings section and create unique materials for each group. The choice of color and material characteristics should match your creative vision and style. This will create a more realistic and attractive appearance of the plant. Don't forget to consider lighting and surroundings, as they also affect the perception of materials.
To achieve a natural look for the leaves and avoid the flat-square effect, add a texture with a transparent background. We recommend using Alpha Blend or Alpha Clip, depending on how crisp you want the outlines to be. These techniques allow for a more realistic rendering, adding volume and depth to the leaves, significantly improving visual perception.
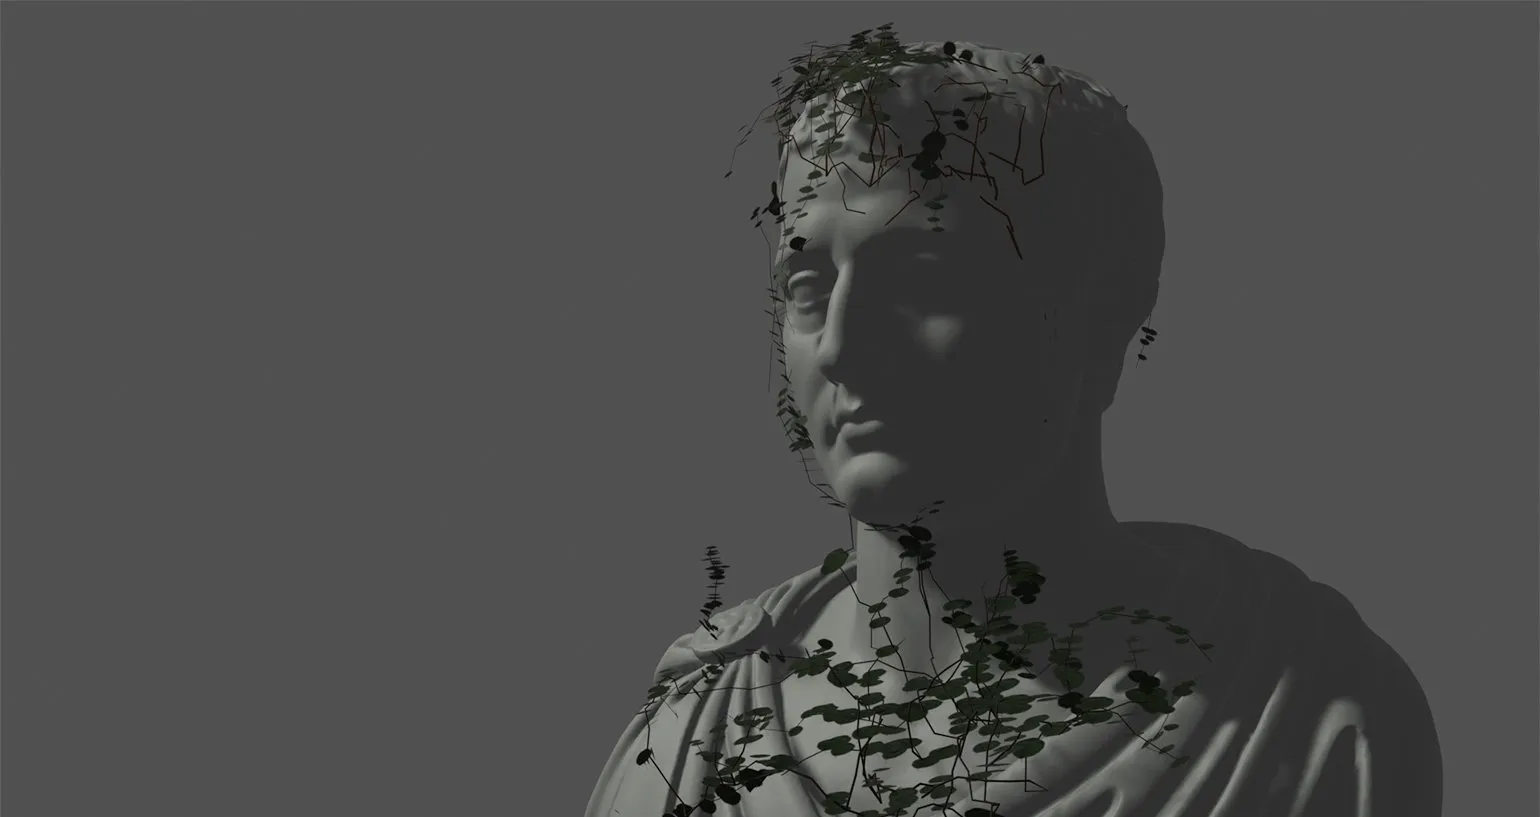
IvyGen is a key tool for architects and designers who want to effectively visualize building facades with vegetation or recreate the atmosphere of post-apocalyptic scenes. This add-on significantly simplifies the modeling process, allowing professionals to focus on the creative aspects of their work. With IvyGen, you can create realistic and expressive images, making it an indispensable tool for any architecture and design professional.
Creating a Winter Atmosphere with Real Snow
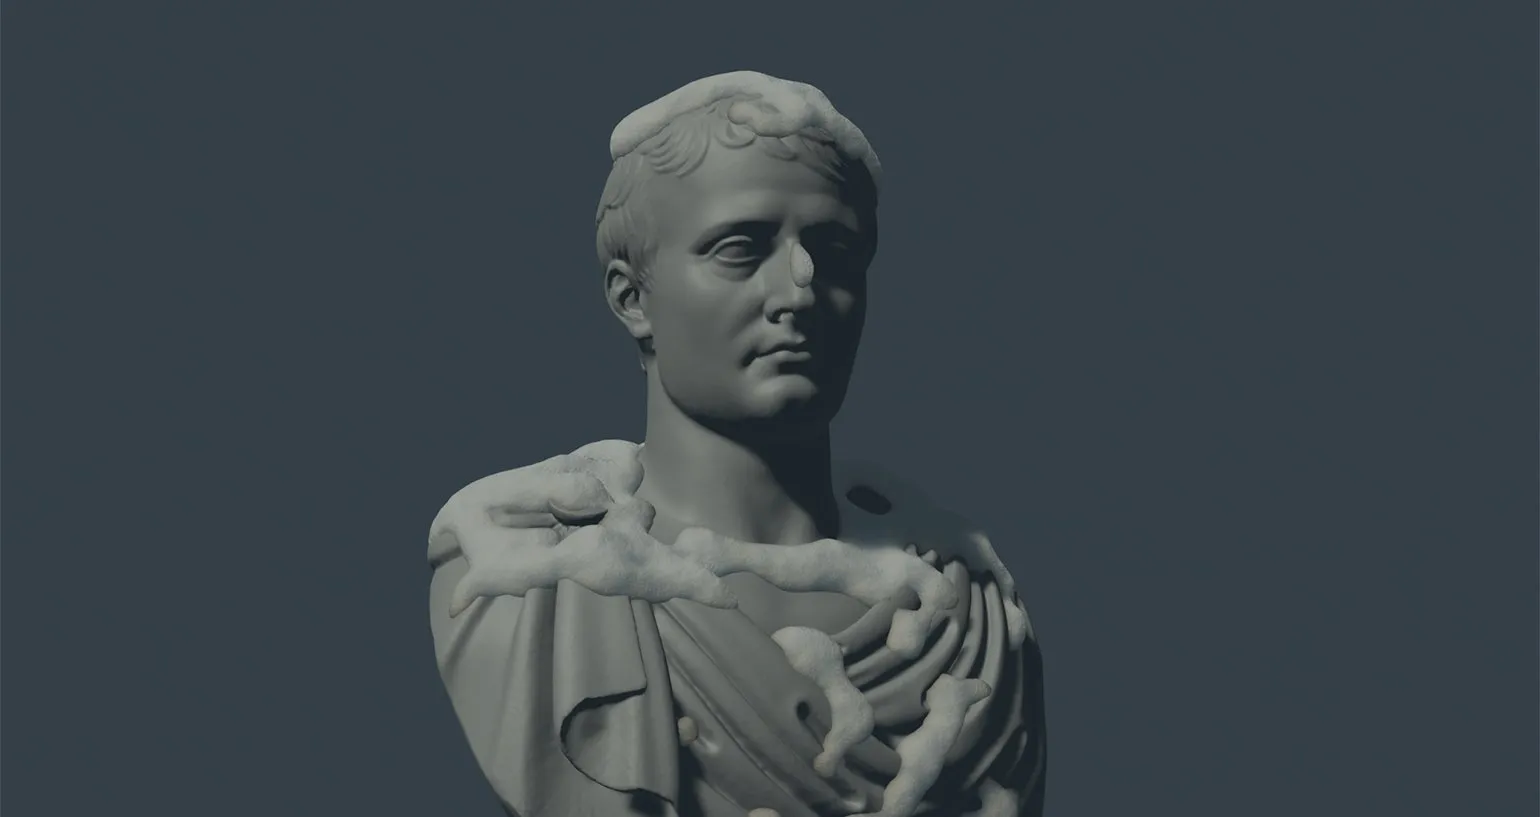
The Real Snow add-on is an effective tool for creating realistic snow layers on various objects, making it ideal for winter visualizations. Installation of this add-on is similar to that of IvyGen. Once installed, Real Snow will be available in a special tab in the Transform panel. Using this add-on allows you to significantly improve the quality of your winter scenes by adding natural and detailed snow, which attracts the attention of viewers and contributes to the creation of atmospheric visualizations.
Real Snow offers users a wide range of settings for precisely defining the coverage area and the height of the snow cover. In Edit Mode, you can manually select areas where snow will be applied. Afterwards, you can enable the "Selected Faces" option in the tool settings, allowing for maximum precision and control over the creation of the snow landscape. This makes Real Snow the ideal solution for creating realistic winter scenes in your projects.
The created snow mesh has a direct link to the original object: when moved, the mesh will follow it. This provides a high degree of flexibility during editing. In "Edit Mode", you can not only transform the mesh but also change its color and material properties. You can also experiment with nodes in the Shading section to achieve unique visual effects and settings.
Converting Text into 3D Objects in Blender
Blender provides extensive capabilities for working with text in its Text Editor. This tool not only allows you to create and edit Python scripts, but also convert text into 3D objects. This significantly expands the creative horizons for designers and animators, allowing them to integrate text elements into their projects and create unique visual solutions. Using the text editor in Blender can significantly improve the efficiency of your workflow and add new opportunities for creative expression.
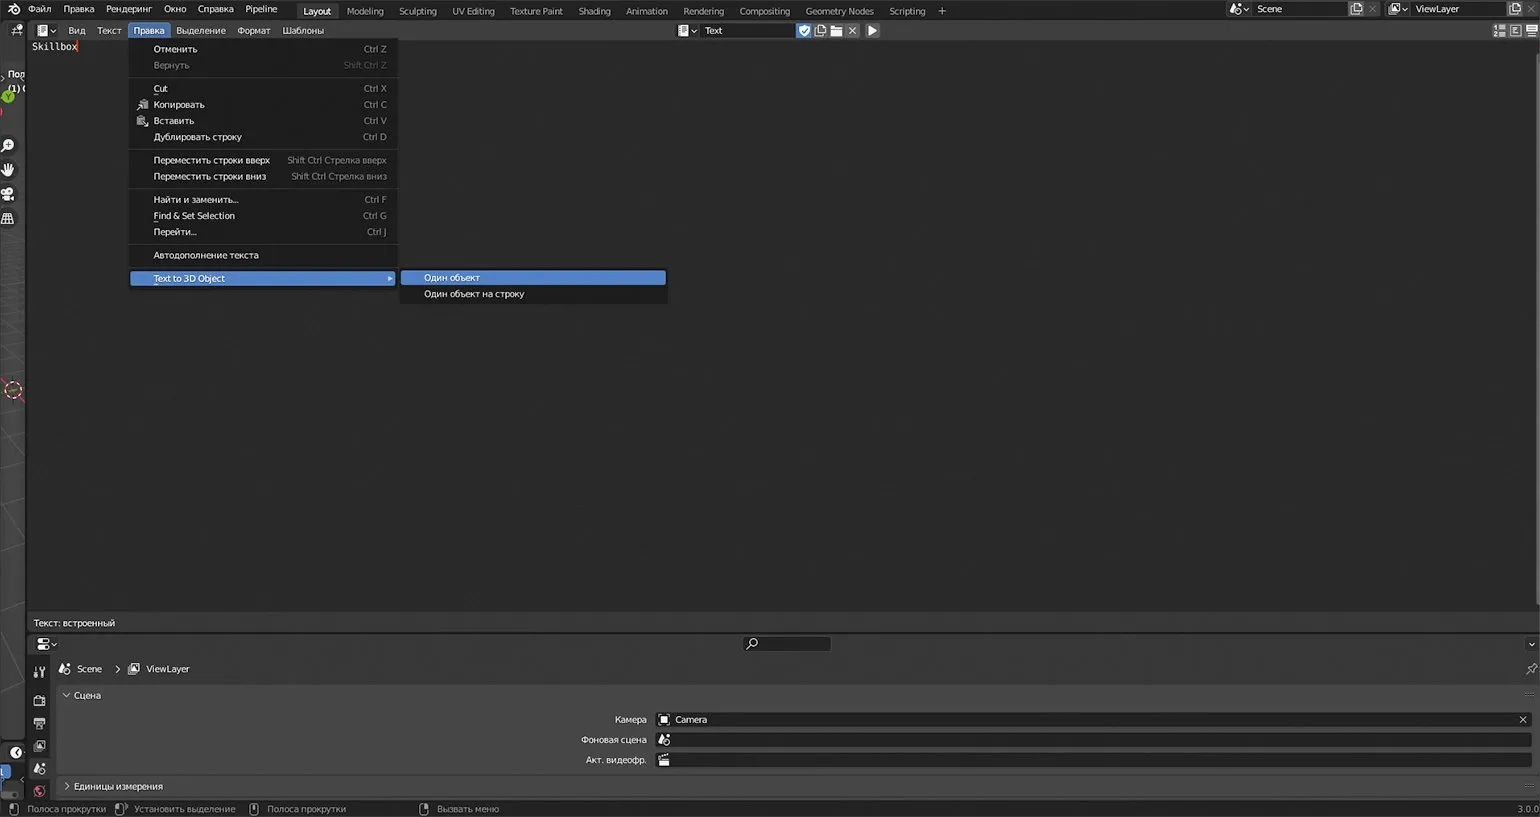
To begin, turn off line numbers and syntax highlighting in the View section. This will help you focus on the text. Then, go to the Edit menu. and select the "Text to 3D Object" option. In this menu, you can choose between creating a single object or creating one object per line, depending on your preference.
After conversion, the text becomes a fully-fledged 3D object. You can resize, rotate, and move it, as well as use various modifiers and materials to achieve the desired visual effect during rendering. For example, using the Solidify modifier will add depth and volume to your text, making it more expressive. Using these tools allows you to create unique and attractive 3D designs that attract attention and enhance the visual perception of projects.

To remove restrictions from the text geometry and convert it to a full-fledged mesh, switch to Object Mode. Right-click on the object and select Convert to — Mesh. You can also use the menu Object — Convert — Mesh. After performing these actions, the text will change its properties and become a standard mesh, which will allow you to perform any operations in Edit Mode. This allows you to work with the object more flexibly, including changing its shape, size and other characteristics.
Converting a Vector Image to an Object: Step-by-Step Guide
Blender offers the ability to import vector graphics, which greatly simplifies the design process. To do this, go to the menu «File», select the option «Import» (Import), then select the Scalable Vector Graphics (.svg) format and open the file. Importing vector images into Blender allows for precise paths and scalable elements, making it an ideal tool for working with graphics. .png files can be easily converted to .svg using a variety of online converters, including Convertio. Before starting the conversion process, it is important to ensure that the source image does not contain a background, as this can negatively impact the quality of the final vector image. Note that vector formats such as .svg provide higher quality when scaling, making them ideal for use in web design and graphics. After importing into Blender, the vector image may split into multiple components. In this case, select all the parts and merge them using Ctrl + J. Imported images are recognized as Curves, so they must be converted to a mesh, as described in previous materials. This transformation gives access to all operations with the object's geometry, which greatly simplifies the work.
Blender sometimes encounters problems when importing SVG files, which can lead to the loss of individual image elements. This is due to the peculiarities of the SVG format, which works best with simplified shapes. In such situations, it is recommended to manually edit the image in Edit Mode to eliminate possible defects and restore the integrity of the graphic.
If the option to import files with the .svg extension is not available in the menu, you can activate this function through the add-ons menu. To do this, simply enter ‘SVG’ in the search bar. This will allow you to easily import vector images in the SVG format, which will significantly expand your graphics capabilities. Make sure you have all the necessary add-ons installed to fully utilize this function.
Animation Technology: Object Transformation in Blender
Animation of object transformation is gaining popularity in modern 3D design. Blender offers a powerful tool for this task—the Shrinkwrap modifier, located in the Deform section. It allows you to create stunning visualizations by seamlessly transforming one object into another. Using the Shrinkwrap modifier greatly simplifies the process of creating complex animations and helps achieve a high degree of realism in your projects.
To understand how the modifier works, let's look at a specific example. We'll start by creating a primitive, which we'll then transform into an icosphere. To do this, place the primitive in the center of your main object and set the required size parameters. This approach will allow you to effectively use modifiers to create complex shapes and models.
Select the object you want to transform and apply the Shrinkwrap modifier to it. In the modifier settings, select the Icosphere as the target. You can then hide the icosphere, as it is no longer needed. In the modifier settings, enable the "Apply as Shape Key" option, which is available in modern versions of Blender via the arrow next to the modifier's delete icon. This process allows you to effectively create and save the shape of an object based on the selected geometry.
Go to the object settings and find the Shape Keys section. Here you will see the Shrinkwrap index. Using the Value slider, you can watch how your model gradually changes its shape. This process allows you to fine-tune the geometry of an object, which is especially useful when working with animation or model modification.
Using this technique, you can add a variety of objects and form several key shapes that will harmoniously transition into each other. To combine them into a single animation, go to the Animation section and set the start and end points of the transformation in the timeline. To do this, use the Animate Property icon next to the Value slider. This will allow you to create smooth and dynamic animations, adding a professional touch to your project.
Complex objects do not always correspond to the required shape due to the peculiarities of their geometry. When creating low-poly models, it is recommended to use the Subdivision Surface modifier for a more even distribution of vertices. However, it is important to take into account precautions: excessive use of this modifier can significantly complicate rendering and increase the load on the system. Proper use of Subdivision Surface will help achieve the desired level of detail while maintaining an acceptable performance level.
The Wrap modifier in Blender allows you to create original animations by transforming one object into another. This feature significantly expands the possibilities of 3D design and animation, giving you the tools to implement creative ideas and complex visual effects. Using the Wrap modifier, you can achieve smooth transitions and unique shapes, which makes it an indispensable tool for professional animators and designers.
Animating Individual Sections of a Mesh in Blender
Blender provides a wide range of animation options, including animating individual parts of a mesh without the need for armature bones. This feature is available thanks to the built-in AnimAll add-on, which allows you to animate various elements of a model, significantly simplifying the animation process and expanding users' creative possibilities. Using AnimAll gives animators more precise control over details, adding expressiveness and dynamics to their projects.
To activate the AnimAll add-on, go to the program's settings. In edit mode, select the vertices of your object that you want to change. Then press the N key to open the AnimAll add-on panel. In this panel, you can configure the add-on parameters according to your requirements. Using AnimAll significantly expands the possibilities for object animation, making your work more efficient and convenient.
When animating individual parts of an object, it is recommended to select the "Only Selected" and "Points" options. To begin, set the first keyframe by clicking the Insert button with the key image. Next, modify the shape of the mesh by adding additional keyframes to achieve the desired animation effect. Once the process is complete, switch to Object Mode and play the timeline by pressing Space to preview the final animation.
To enhance your animations, you can use the modifiers discussed in previous lessons. These tools, including the Noise modifier, can significantly enhance the appeal of your project. Using modifiers will help add unique effects and enhance the visual perception of your animation, making your project more memorable for viewers.
This animation method is ideal for creating vibrant and dynamic scenes in the style of Garry's Mod. It will add uniqueness and visual appeal to your projects, helping them stand out from the crowd. Using this approach allows you to create exciting gameplay moments and improve the overall experience of your content.
In conclusion, by applying the techniques outlined in this article, you can create captivating renders even at the beginning of your Blender learning curve. These methods are easy to learn and don't require a significant time investment, allowing you to give your projects a unique style and appeal. Use these approaches to improve the quality of your work and achieve impressive results in 3D design.

Reading literature is an important aspect of personal and professional development. It helps expand horizons, increase vocabulary, and develop critical thinking. Regular reading improves memory and concentration, which in turn has a positive impact on productivity. Books can also be a source of inspiration and new ideas, which is especially useful in creative professions. The choice of literature depends on your interests and goals, whether it's fiction, scientific articles, or business books. It's important not only to read but also to analyze what you read, which will help you gain a deeper understanding of the material and integrate new knowledge into your life.
Blender Tutorials: Animation Basics
Learning the basics of animation in Blender is an essential step for anyone who wants to create high-quality animation projects. Blender offers powerful animation tools that allow users to create both simple and complex animated scenes. In this course, you'll learn the basic principles of animation, such as creating keyframes, working with the timeline, and using graphic editors to adjust object motion.
You'll learn to apply various animation techniques, including character, object, and effect animation. Understanding concepts like interpolation and timing will help you create more natural and expressive animations. We'll also explore how to use Blender's modifiers and tools to enhance your animation projects.
After completing these lessons, you'll be able to confidently create animations in Blender and develop your skills in this area. Learning the basics of animation will open new horizons for you in the world of 3D graphics and animation.
Game Development for Beginners: Choose Your Role in the Gaming Industry
Want to learn about game design and game development? Take a free mini-course and choose your profession in game development!
Find out more