
Contents:

Game designer from scratch to PRO: 7 steps to success Career
Learn MorePreparing to Create an Object
Let's start with the basics by creating a simple object - a cube that we will move around the scene in Unity. To implement the movement logic, we will use the C# programming language, which is great for game development in this environment. C# allows you to effectively manage game objects and their interactions, which makes it an ideal choice for creating interactive elements in Unity. We will cover the basic methods and approaches that will help us implement the movement of the cube and lay the foundation for further development.
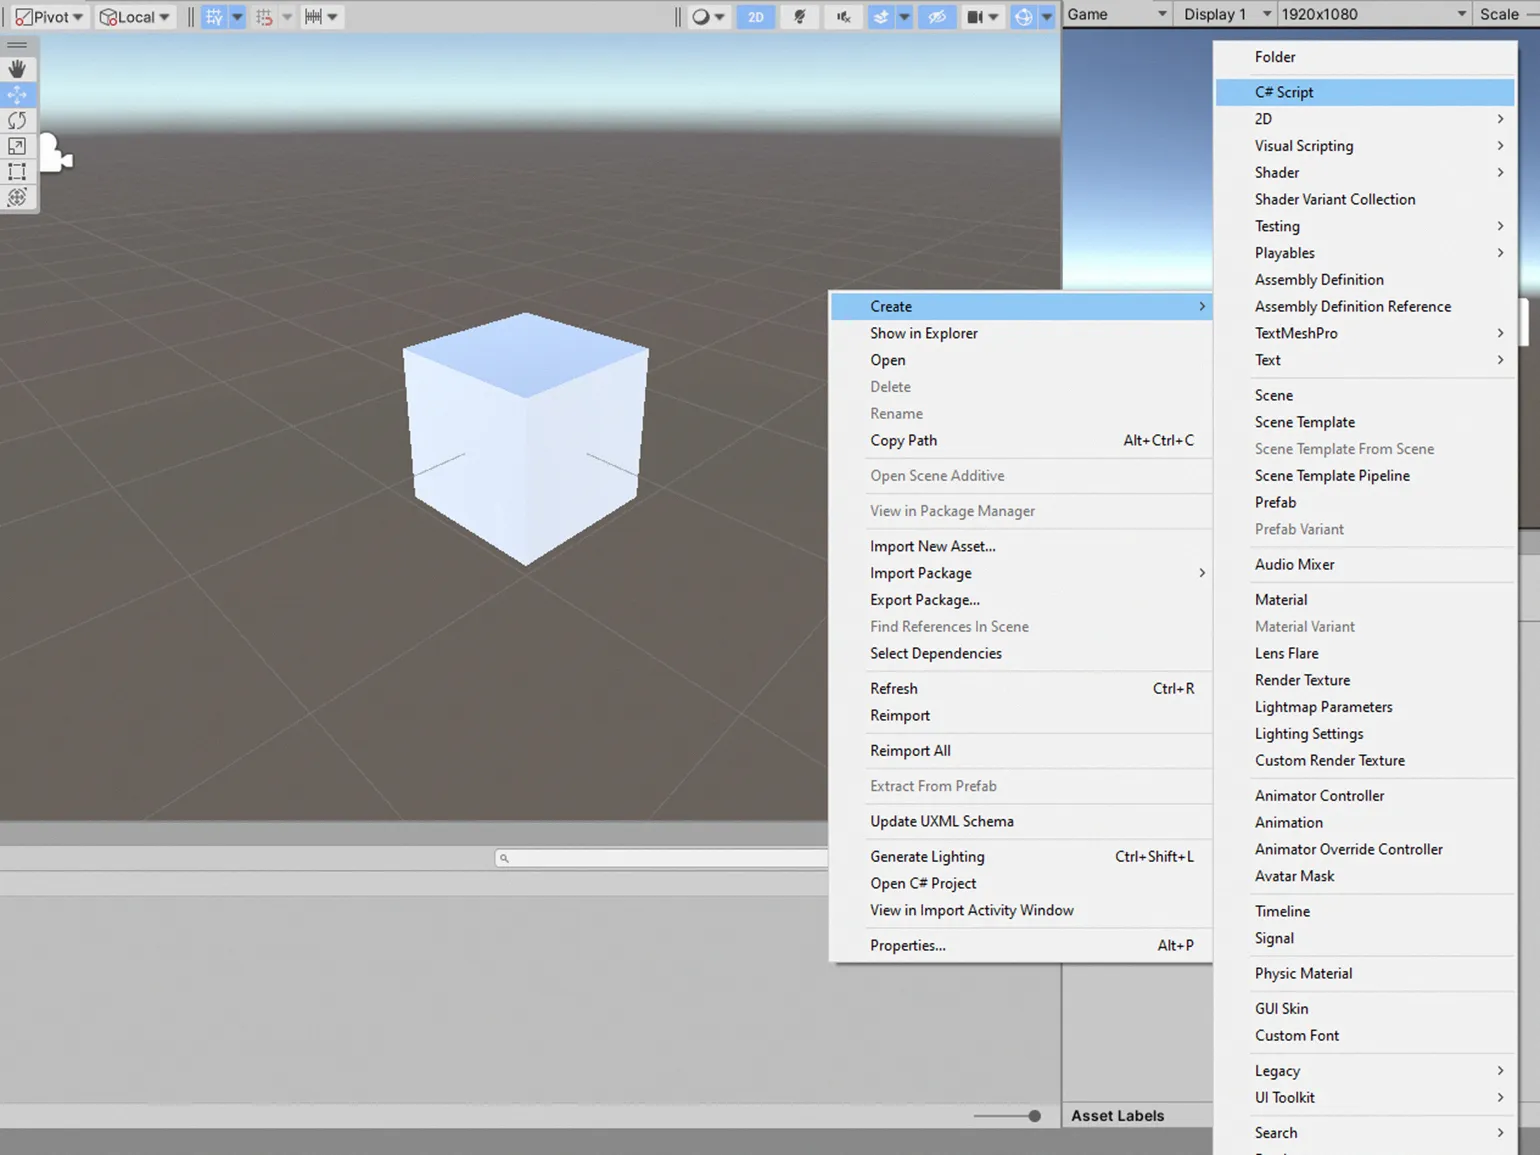
To create a 3D object in your project, right-click in the Inspector window and select the «3D Object» option, then click on «Cube». A white cube will appear in the Scene window, which you can customize and use in further interactions.

Create a script to control the cube. To do this, right-click on the field in the Project window, select "Create", then click "C# Script". Name the file, for example, "Moving". This script will be responsible for the movement of the cube in your project, which will allow you to control it using code.
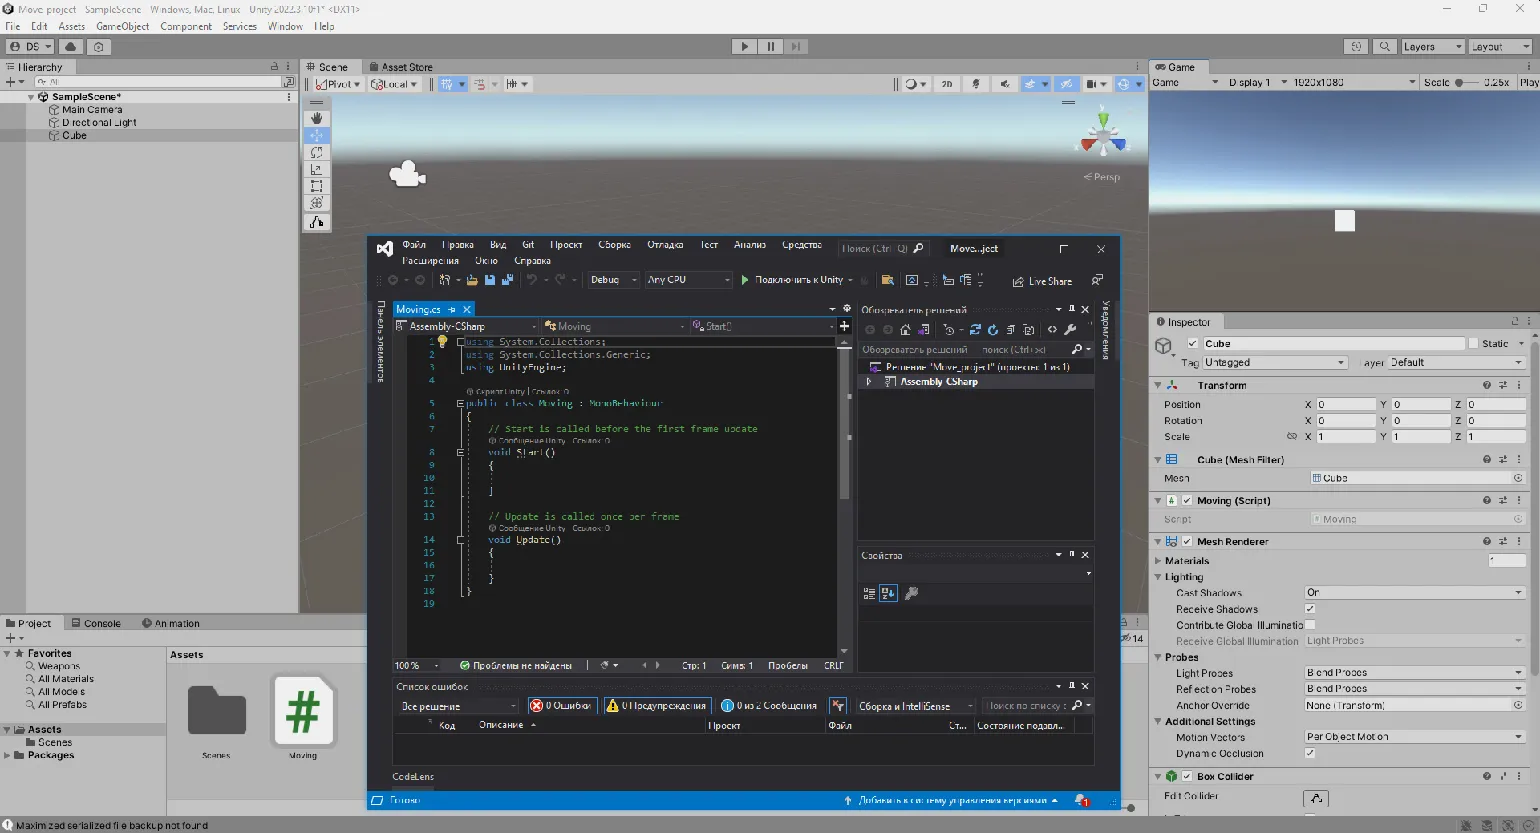
First, select the cube in the scene and drag Add the created "Moving" file to the cube's Inspector window. This will allow the cube to execute all commands defined in the script. After that, open the "Moving" file for editing and make the necessary changes.
We're ready to develop the movement logic for our cube using basic C# commands. This step is fundamental to creating an interactive game. Using C# will provide flexibility and power in implementing movement mechanics, which will allow players to interact with the game world.
Moving objects using transform.position in Unity
One of the main methods of moving objects in Unity is to change their coordinates in 3D space. Each object in the scene contains a Transform component, where the Position parameter determines its location along the X, Y, and Z axes. In this guide, we will take a detailed look at how to programmatically change these coordinates to achieve the desired position of objects in the game. We will discuss various approaches and methods that will help you effectively manage the positioning of objects, which is a key aspect of game development in Unity.
Imagine we have a cube located at the initial coordinates (0, 0, 0). To move it one unit along the X axis, we need to use a simple line of code. This allows you to easily change the position of an object in 3D space, which is the basis for working with graphics and modeling in 3D. Properly understanding the movement of objects in a coordinate system is a key aspect in game development and computer graphics.
This code changes the position of an object in 3D space. Using the transform.position method, we set a new position for an object by specifying coordinates along the X, Y, and Z axes. In the example, the value specified is (1, 0, 0), meaning the object will be moved one unit to the right along the X axis, while the Y and Z coordinates remain unchanged. This allows for precise control over the object's location within the game environment or scene. Proper management of object positions is a key aspect of game development and visualization in 3D graphics.
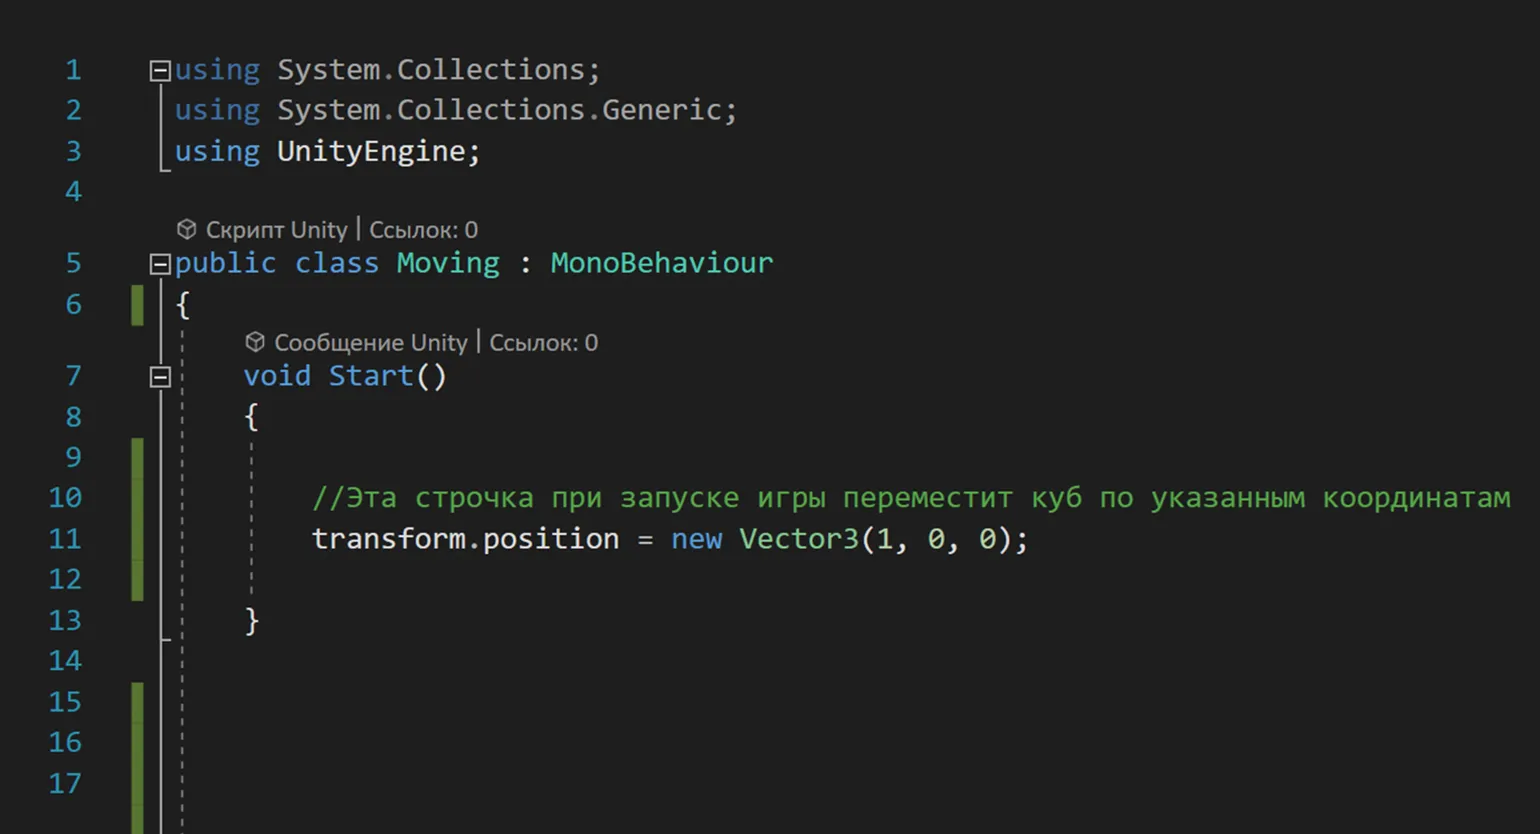
The code should be placed inside the Start function, as it is executed once at game startup. This will ensure that the cube moves to the specified coordinates, after which it will not move automatically.
The Update function differs from the Start function in that it is called on every frame of the game. If you move the code to Update, the cube will constantly return to the position (1, 0, 0) on each iteration. As a result, we will not see any movement of the cube, since its position will be reset with each new iteration. This is an important aspect to consider when developing animations and interactions between game objects.
If you try to move the cube manually in the Scene window during gameplay, you will find that it is impossible. Every time you try to change its position, the cube instantly returns to the set coordinates.

To create the effect of cube movement in the animation, you need to make changes to the code, Increasing the cube's position along the X axis by 0.01 units each frame. This will ensure smooth movement of the object, making the animation more dynamic and engaging for the viewer. Regularly updating the cube's position will ensure its continuous movement, creating a visually pleasing effect.
The code above changes the object's position in 3D space. Specifically, it moves the object by 0.01 units along the X axis, leaving the Y and Z coordinates unchanged. This action can be useful for creating motion animations or for moving objects in gameplay. Using this method, developers can easily manipulate the position of objects and create interactive elements in their applications.
Note the "+=" operator, which allows you to increase the current value by a specified amount. When using the "-=" operator, on the contrary, the value is decreased. These operators are the basic tools for performing arithmetic operations in programming and allow you to effectively manage variables in your code. Proper use of these operators optimizes data handling and simplifies program logic.
The letter "f" after the value 0.01 indicates that the number is represented in floating-point format (float type). Without this letter, Unity would not be able to correctly recognize and interpret this data type. This is an important aspect of programming in Unity, as the correct use of data types ensures the stable operation of applications and games.
By adding the value 0.01 in each frame, the cube's position along the X axis is constantly increasing. This effect can be used to create animations and dynamic scenes in 3D modeling. Each step of position change helps achieve smooth movement and improve visual perception. Using such small changes in animation can significantly increase the realism and expressiveness of objects in the scene.
Now we'll add a condition that will only increase the value along the X axis when the Right arrow key is held down. The increase rate will be set to 0.1, which will ensure smooth movement of the object. This will improve user interaction with the element, allowing more precise control over its horizontal movement.
If the Right arrow key is pressed, a specific action is performed. This condition in the code allows the program to respond to the key press, which can be used to control game objects or interact with the interface. Implementing this functionality is important for creating interactive applications and games that require tracking user input. Proper use of control keys improves the user experience and makes interaction with the program more intuitive.
Changing an object's position in Unity is accomplished with the following code: transform.position += new Vector3(0.1f, 0, 0). This code adds an offset of 0.1 units along the X axis, leaving the Y and Z coordinates unchanged. This approach allows for smooth object movement in space, which is useful for creating animations or dynamic interactions in gameplay. To optimize object positioning, it is recommended to consider physics and other scene parameters to ensure more realistic movement.
By adding additional conditions for the Left, Up, and Down keys, we can effectively control the cube's movement. Let's consider one possible way to implement this functionality. This will allow users to more precisely control the object's movement in space, making interaction with it intuitive and convenient.

This is the main method of moving objects in Unity, which is suitable for developing both 3D and 2D games. For 2D projects, it is sufficient to replace the Vector3 type with Vector2, which will allow changing the position of objects only along the X and Y axes. This approach provides ease and flexibility in controlling the movement of objects in the gaming environment.
It should be noted that this approach is not optimal for achieving smooth movement. In fact, we teleport the object, in this case the cube, to a new position with each iteration. At small distances, this creates the illusion of smooth motion. However, if the translation step is increased to 50, sharp jumps in the object's motion become noticeable. To improve the smoothness of movement, it is recommended to use finer steps or interpolation, which will achieve a more natural and consistent object motion.
The transform.position method is recommended for situations where you need to instantly move an object in space. Despite its simplicity, this method should not be used to implement smooth movement. This will avoid unwanted effects and provide more precise control over the position of objects in the game space.
Efficiently Moving Objects with transform.Translate
The transform.Translate method is an important tool for game developers, allowing you to efficiently change the position of objects in 3D space. It provides the ability to move objects according to their local coordinates, which significantly increases flexibility when working with rotating objects. By using transform.Translate, developers can more easily control the movement of objects, ensuring realistic interactions in the game world and simplifying the animation process. This approach is especially useful in situations where an object's orientation must be taken into account, making the method indispensable in modern game development.
To move the cube along the Z axis by a fixed amount, for example, 5 units, you would add the following line to the Update function. This command allows you to specify a specific offset, which is useful for animating objects or moving them during gameplay. Using the Update function ensures that the translation occurs on every frame, ensuring smooth and realistic movements.
The transform.Translate method is used in Unity to move an object in space. In this case, calling transform.Translate(0, 0, 5) moves the object by 5 units along the Z axis. This allows you to dynamically change the object's position during game runtime, which is an important aspect of developing interactive content. Using this method can be useful for creating animations, moving characters or objects, and manipulating game elements. Optimizing the movement of objects in the game world helps improve gameplay and user interaction.
Unlike the first method, which uses global coordinates, transform.Translate takes into account the current direction of the object. This means that if the object is rotating, its movement will correspond to its orientation in space. This approach allows for more natural control of the movement of objects in 3D space, which is especially important for creating realistic animations and interactions in games and applications. Using transform.Translate simplifies the process of moving objects, as developers can focus on game logic without worrying about coordinate transformations.
It is important to understand that the code placed in the Update method is executed every frame. This can cause differences in the speed of object movement on devices with different frame rates. For example, objects will move faster on powerful computers than on less powerful devices. To ensure consistent movement of objects, it is necessary to take into account the performance of the device and adapt the game logic accordingly.
To ensure uniform movement of objects in the game, regardless of the frame rate, it is important to use the Time.deltaTime value. This allows you to adjust the speed of movement depending on the time that has passed since the last frame. Therefore, the code to implement the first method will look like this:
This code moves the object in space. Specifically, its position along the Z axis changes by 5 units per second. This is done using the `Time.deltaTime` method, which ensures smooth movement, taking into account the time that has passed since the last frame. This way, the object will move uniformly and predictably, regardless of the frame rate. Using `Vector3` allows you to set the direction and magnitude of movement in 3D space, which makes the code universal for working with different objects in the game engine.
To use the transform.Translate method in Unity, the code will look like this:
This code uses the transform.Translate method to move the object in 3D space. Specifically, the object moves along the Z axis at a rate of 5 units per second, multiplied by the Time.deltaTime value, which ensures smooth movement, taking into account the time elapsed since the last frame. This is especially useful in games and applications where a stable movement speed is important regardless of the frame rate. Proper use of Time.deltaTime helps achieve harmonious and predictable behavior of objects in the scene.
It is important to note that in this case, we only multiply the Z value by Time.deltaTime. If you need to change the objects' positions along the X and Y axes, they should also be multiplied by Time.deltaTime. This emphasizes the need for a clearer code structure to make it easier to understand and maintain. Proper code organization facilitates more efficient management of object positioning in space and improves application performance.
To optimize the process, you can define a speed variable to which the cube's movement speed will be recorded via the Inspector. Multiplying this variable by Vector3.forward will give you the direction of movement along the Z axis. This will make controlling the cube's movement more convenient and flexible.
Vector3.forward is an abbreviation for Vector3(0, 0, 1). This notation is used in 3D graphics to indicate the forward direction. Similar abbreviations are used for other directions. For example, Vector3.back indicates the backward direction and corresponds to Vector3(0, 0, -1). Vector3.up indicates the upward direction, which corresponds to Vector3(0, 1, 0), and Vector3.down indicates the downward direction, equal to Vector3(0, -1, 0). Similarly, Vector3.left and Vector3.right define the left and right directions, respectively, corresponding to Vector3(-1, 0, 0) and Vector3(1, 0, 0). These shortcuts simplify working with vectors in 3D space and make code more readable and understandable.
Vector3.back sets the direction on the Z-axis, specifying coordinates (0, 0, -1). Vector3.up points along the Y-axis with coordinates (0, 1, 0), and Vector3.down points down the Y-axis with coordinates (0, -1, 0). Vector3.right denotes the right direction along the X-axis, specifying coordinates (1, 0, 0), while Vector3.left points left along the X-axis with coordinates (-1, 0, 0). These vectors are often used in 3D graphics and programming to determine the direction and movement of objects in space.
Remember to multiply the movement speed by Time.deltaTime. This will ensure stable and smooth object movement, regardless of the frame rate in the game. Using Time.deltaTime is an important aspect of game development, as it helps avoid jumps and sudden changes in motion, thus providing a better gaming experience.
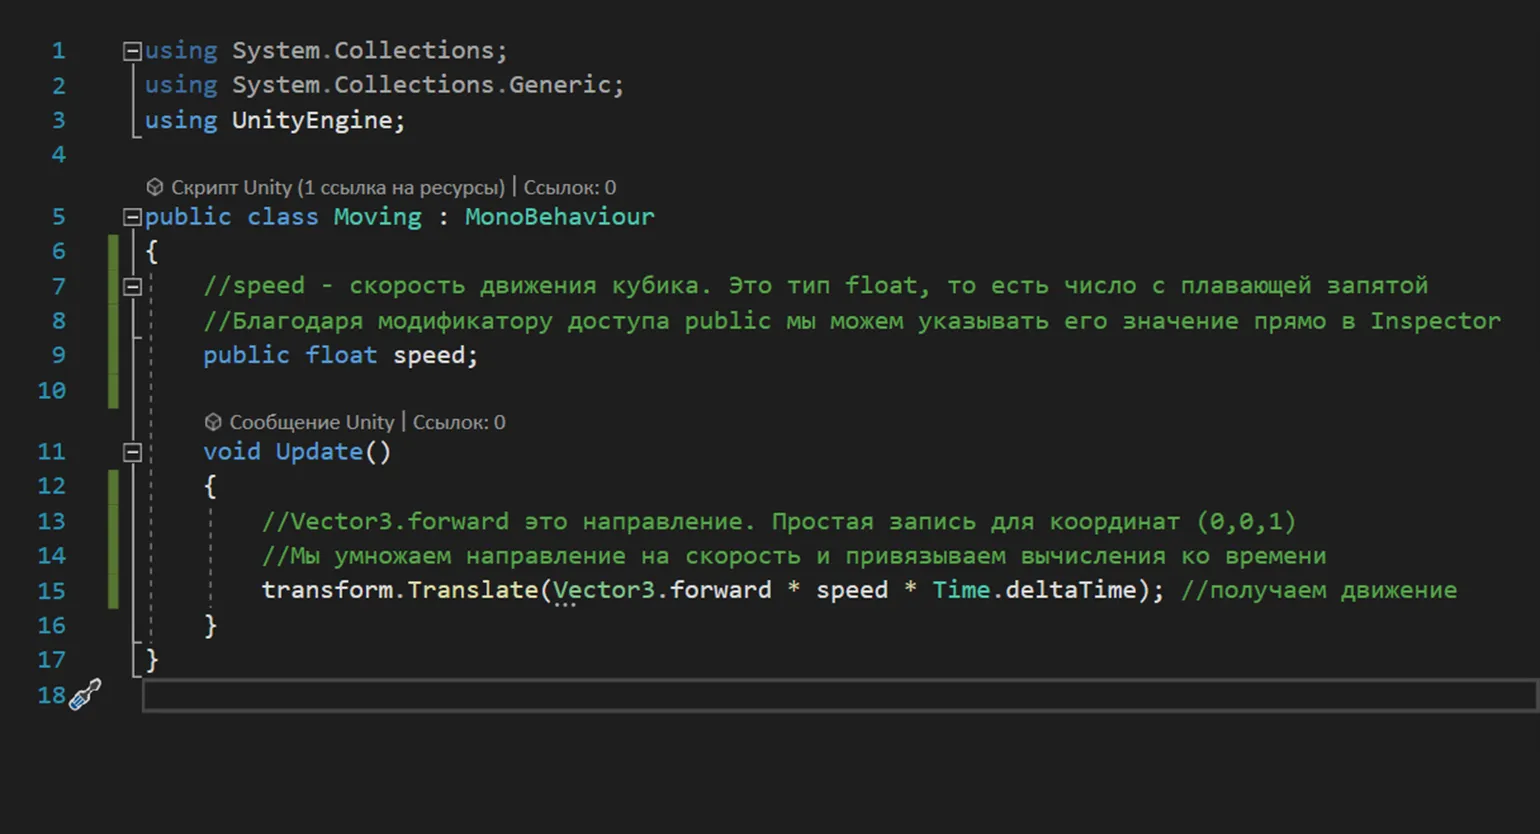
The public modifier allows you to change the speed value directly in the Inspector, which greatly simplifies the process of setting parameters. This improves usability and makes the process more efficient for developers.
The speed variable can also be used in the first method. To move in local coordinates along the Z axis, replace Vector3.forward with transform.forward. As a result, the code will look different.
To move an object in Unity based on its direction, use the following code: transform.position += transform.forward * speed * Time.deltaTime. This code allows you to move the object forward at a specified speed, correctly taking into account the time elapsed since the last frame, which ensures smooth movement. Using transform.forward ensures that the object will move in the direction it is "facing", which is especially useful for creating dynamic scenes and animations. Make sure the speed variable value is set to meet your project's requirements to achieve the desired motion effect.
When using the transform.Translate method, there's an important caveat regarding the physical interaction of objects. Objects moved using this method may intersect with other objects, which can lead to undesirable consequences, especially in games with realistic physics. For example, a character could pass through walls unimpeded, disrupting gameplay and impacting the overall user experience. Therefore, when implementing physics in games, it is recommended to use alternative methods of movement that take into account collisions and the interaction of objects in space.
When to use transform.Translate?
The transform.Translate method is a great tool for moving objects in a given direction, ignoring collisions. This is especially useful in games with simple mechanics, such as roguelikes, where characters only move left or right. Examples of such games include Darkest Dungeon and The Cat Lady. Using transform.Translate allows developers to easily control character movement, creating smooth gameplay without the need for complex collision logic.
Object Movement Dynamics Using Physics in Unity
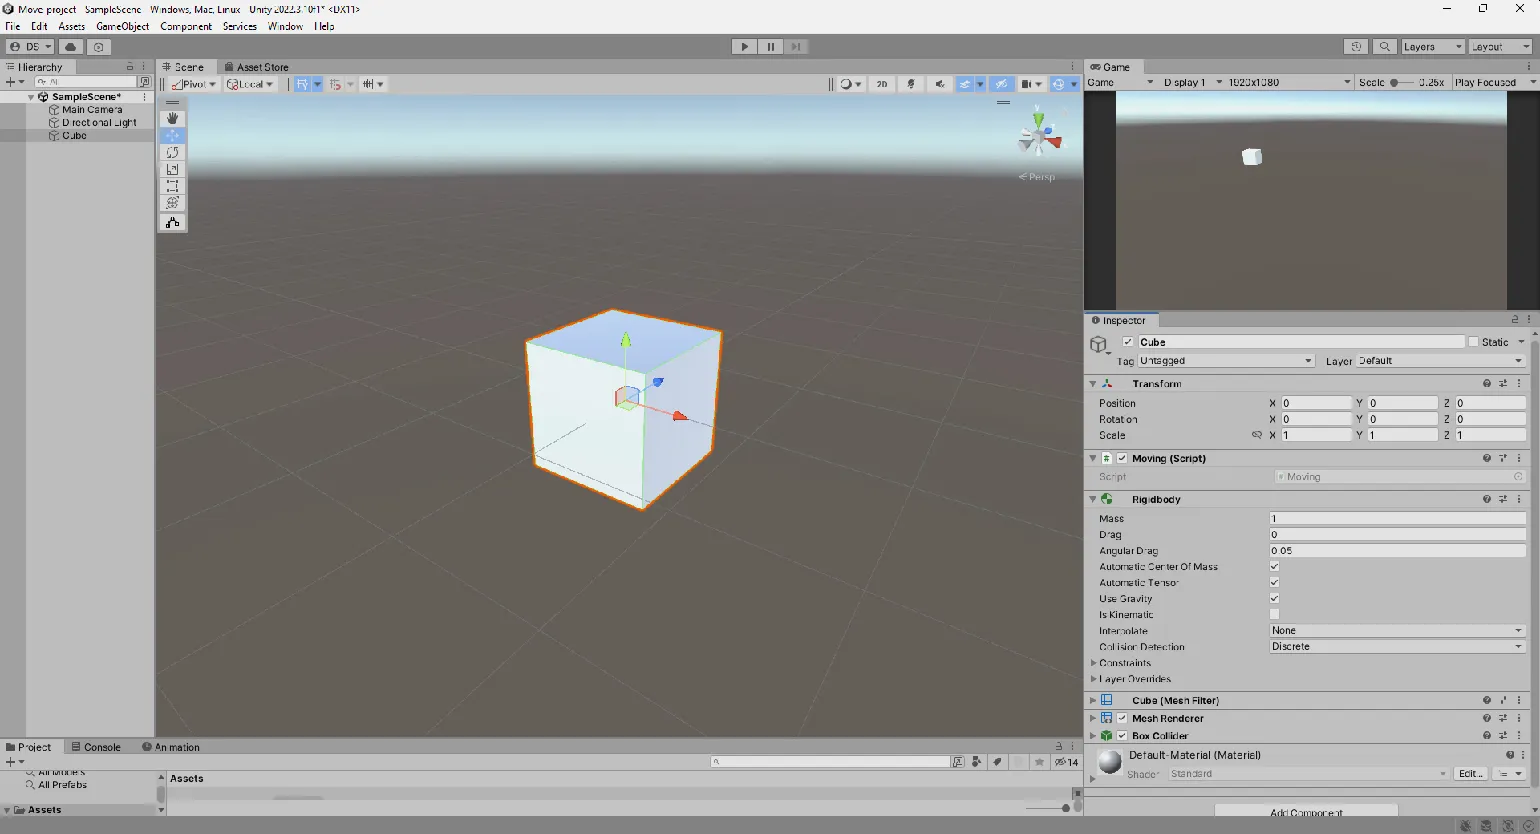
To provide physical movement of the cube in your 3D game on the Unity platform, you need to add a Rigidbody component. To do this, select the object in the Hierarchy window. Then, go to the Inspector, click the "Add Component" button, and type "Rigidbody" in the search bar. Make sure you select the standard Rigidbody component, not Rigidbody 2D, as it's designed for working with 2D objects. Setting this component up correctly will allow your cube to interact with the game's physics, providing realistic movement and collision responses.
When you start the game, you'll see the cube falling downwards. This is due to gravity in the game engine. If you disable the "Use Gravity" option, the cube will remain stationary. Gravity control is an important aspect of gameplay, as it affects the physics of objects and interactions with the environment.
To direct an object in a given direction using For physics, use the AddForce method. This method functions similarly to transform.Translate, allowing you to specify the direction of movement along the X, Y, and Z axes. Increasing the parameter values will result in a more significant force on the object, allowing you to precisely control its movement in space. Use AddForce to create realistic physics and dynamics in your project.
Code using the AddForce method should be placed in the FixedUpdate method. This is because FixedUpdate is designed to perform physics calculations and ensures stability when interacting with game physics. In contrast, the Update method is responsible for updating frames, which can lead to inaccurate results when working with physics movements. Using FixedUpdate provides more precise and predictable behavior of objects in the game world.
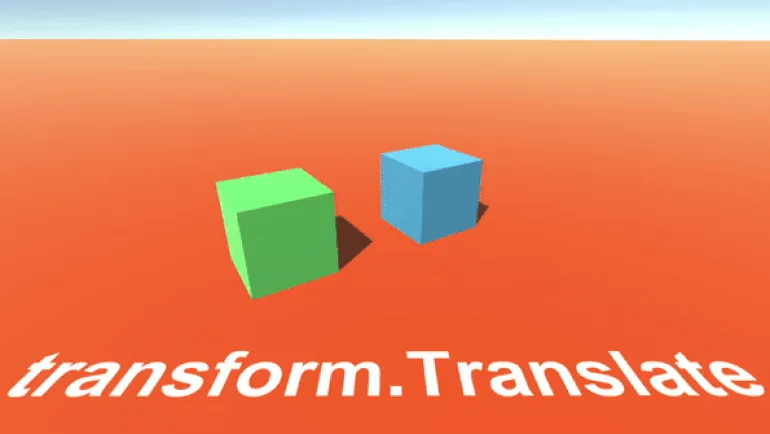
This video shows two cubes using identical code to move. The green cube executes the code in the Update method, while the red cube uses the FixedUpdate method. The results show that the red cube moves smoothly, while the green one moves abruptly and with delays. This clearly illustrates the importance of choosing the appropriate method for controlling the movement of objects in a game engine. The FixedUpdate method is more suitable for physics calculations and ensures a stable movement speed, whereas Update can lead to unpredictable results due to frame rate variations.
Adding a Rigidbody component enables control of the object's movement through the Unity physics engine. This allows physics calculations to be performed automatically, without the need for additional code. For example, if gravity is not disabled, the cube will fall when the game starts. Using a Rigidbody simplifies the process of creating realistic interactions in the game world and allows developers to focus on other aspects of the game.
The Unity physics engine operates on fixed time intervals. When physics calculations are called in the Update method, they may be performed at a higher rate than the engine can handle, which can lead to calculation errors. In contrast, code placed in the FixedUpdate method is executed before each update of the physics engine, which ensures the accuracy and correctness of physics calculations. Using FixedUpdate is key to ensuring stable and predictable behavior of objects in the game, especially when working with physics.
When processing player input, such as button presses, it is recommended to use the Update method. This prevents situations where the press is not registered. While the Update method is responsible for processing input, the FixedUpdate method should be used for performing physics-based movement. This approach ensures more precise player interaction with the game world and improves control responsiveness.
Code for tracking button presses and object movement can be implemented using the GetAxis function. This function allows you to determine which keys are currently active and control the object's movement based on this. Using GetAxis ensures a smooth and accurate response to user actions, which is critical for gaming applications and interactive interfaces. Optimizing this code can significantly improve performance and user experience.

The GetAxis function provides a value in the range from -1 to 1 depending on the press state of the buttons. For example, when the Right button is pressed, the function returns 1, when the Left button is pressed, it returns -1, and if no buttons are pressed, the result is 0. This function is useful for controlling the movement of objects in games and applications, allowing you to precisely determine the direction and intensity of user input.
In the FixedUpdate method, the AddForce function is called, which uses the values of the Horizontal and Vertical variables to move the cube. Setting the X axis to 1 will cause the cube to move to the right; setting it to -1 will cause it to move to the left. This mechanism allows you to control the movement of an object in space, ensuring smooth and predictable movement. Properly setting these variables is key to achieving the desired gameplay and interaction with the environment.
The cube will continue to move even after the buttons are released until an external force is applied that can stop it. This phenomenon is explained by inertia, as well as physical forces acting on the object. Inertia is the property of bodies to maintain a state of rest or uniform rectilinear motion until acted upon by other forces.
The AddForce method in Unity has a ForceMode parameter, which supports four modes: Acceleration, Force, Impulse, and VelocityChange. By default, Force mode is applied, which applies force to an object based on its mass. Selecting the correct ForceMode affects the object's physical behavior in the game and can significantly alter interaction dynamics. Acceleration mode applies force without taking mass into account, while Impulse applies an instantaneous change in velocity. VelocityChange also affects velocity, but without taking mass into account. Understanding these modes will help developers more effectively manage the physics of objects in the gameplay.
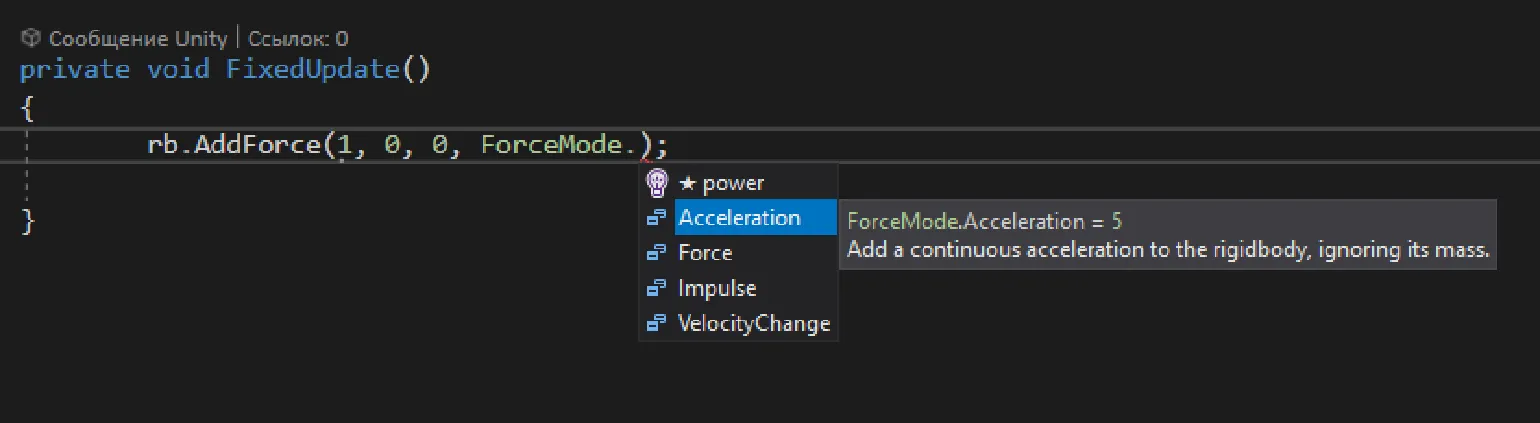
- ForceMode.Force — applied when necessary Force an object over time, taking into account its mass.
- ForceMode.Acceleration — similar to ForceMode.Force, but does not take mass into account.
- ForceMode.Impulse — a short-term force, such as a blow or explosion.
- ForceMode.VelocityChange — changes an object's velocity without taking mass into account.
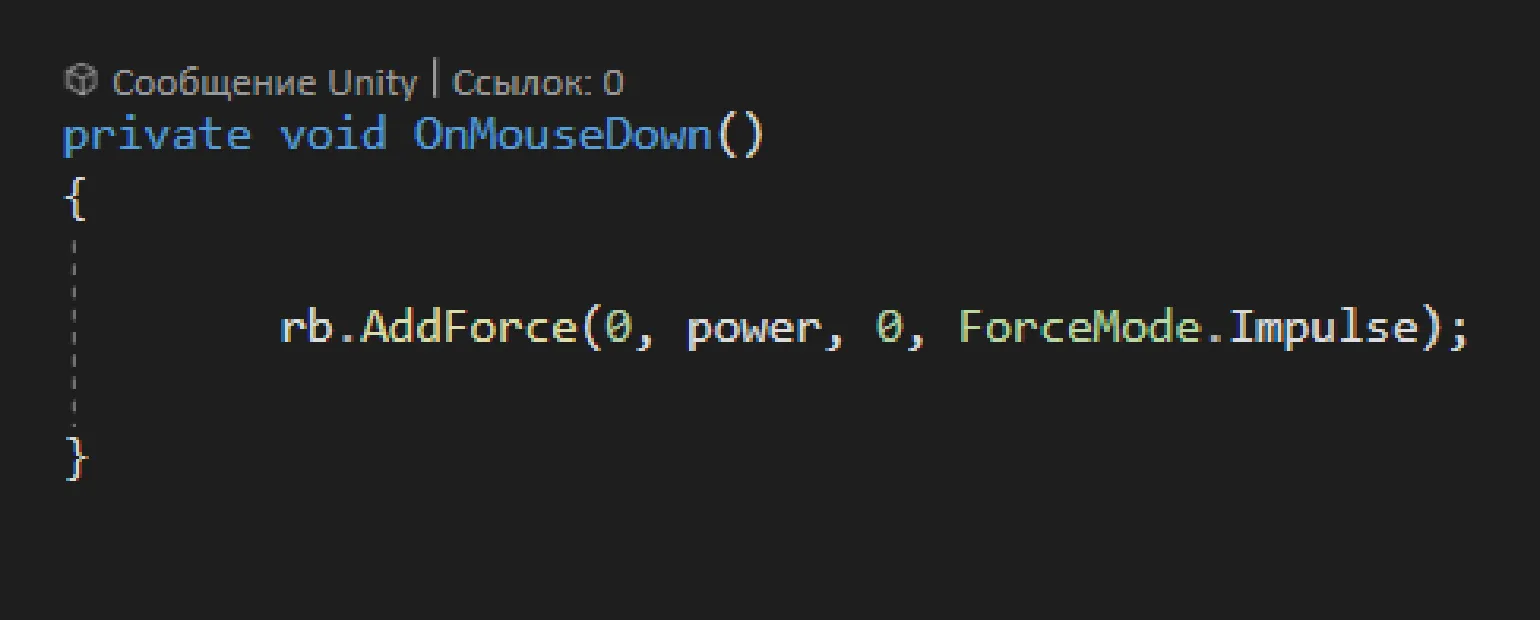
The following video demonstrates the difference between the Impulse and VelocityChange methods in the game engine. Both cubes have the same mass of 5, but the results of applying force vary depending on the selected mode. This clearly demonstrates how different approaches to physics affect the behavior of objects in the game space.
To achieve a higher jump of the cube in Impulse mode, you need to either reduce its mass or increase the applied force. In contrast, the jump in VelocityChange mode depends solely on force, and the mass does not affect the result. Proper control of the cube's parameters allows you to optimize its behavior in various game scenarios.
Furthermore, the object can be moved by directly changing the velocity parameter. However, this approach is not recommended, as it can lead to unrealistic spatial behavior. It is recommended to use more natural methods of movement control to ensure smooth and believable animation.
Rigidbody should be used in cases where you want objects in the game to simulate real-world physical behavior, reacting to gravity and interactions with other elements. A prime example of using Rigidbody is the Angry Birds game, where the physical properties of objects play a key role in the destruction of structures and the dynamic interactions between them. Proper use of Rigidbody allows you to create a more realistic and engaging gameplay experience that attracts users.
Moving Objects in Unity: From Idea to Implementation
Game development in Unity offers developers a wide range of opportunities to create exciting gameplay. One of the core mechanics is moving objects to a given target. In this article, we will take a closer look at two important functions — Vector3.MoveTowards and Vector3.Lerp. Each of these functions is designed to perform different tasks related to the movement of objects in 3D space and can be effectively used depending on the requirements of your project.
The Vector3.MoveTowards function is designed to set the speed of an object's movement toward a given target. This method is especially useful in situations where you want an object to move toward a specific point at a constant speed. Unlike Vector3.Lerp, which is used for smooth interpolation between two positions over a fixed period of time, Vector3.MoveTowards provides more predictable behavior, making it an ideal choice for tasks where speed stability and movement accuracy are important.
If you need to move an airplane on a global map from point A to point B in 3 seconds, then Vector3.Lerp will come in handy. This function provides smooth and efficient movement of objects in space. Let's consider how to correctly use Vector3.Lerp to achieve the desired result.
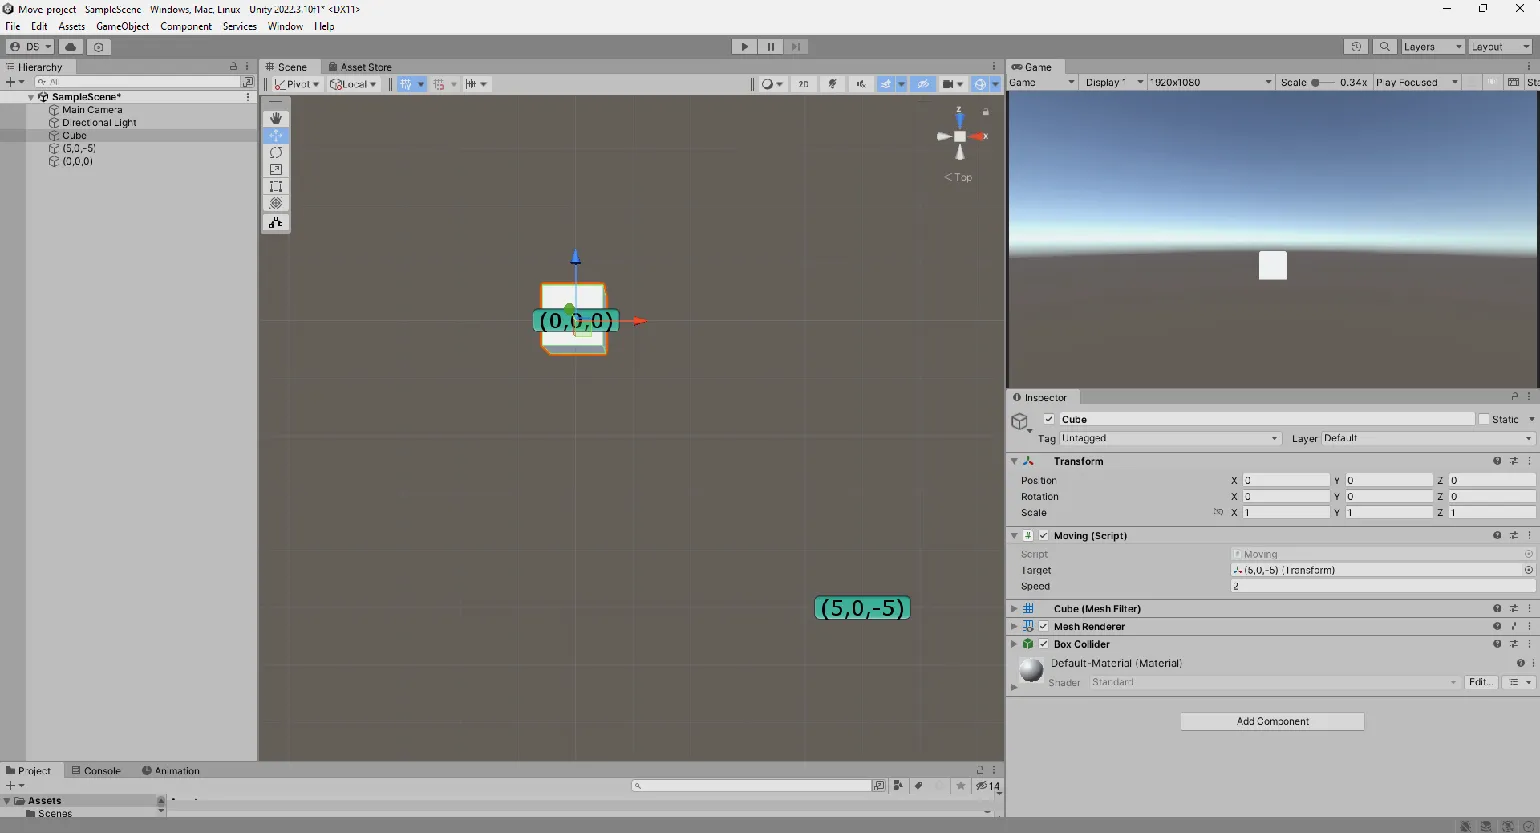
In this scene, there are three objects: a cube that will be moved, and two invisible target objects. The first target is located at the point with coordinates (0, 0, 0), and the second at the point (5, 0, -5). Our task is to move the cube from its initial position to the coordinates of the second target (5, 0, -5) with a specified movement speed of 0.1. This approach allows you to effectively manage the movement of objects in a 3D environment, which is especially important for game and animation development.
The code uses the Vector3.MoveTowards method to update the position The cube's current position is determined by transform.position, and the target position is set using the public Transform target variable. This makes changing the target simple and convenient, as you can simply drag the object in the inspector. This approach allows for easy control of the object's movement in 3D space, which is especially important for creating dynamic game scenes.
To ensure a stable object movement speed, we use multiplication by Time.deltaTime. This eliminates frame rate dependency and ensures that the cube moves toward its target at the same speed, regardless of the number of frames per second displayed. This ensures smooth and predictable movement in the game, improving the overall quality of gameplay.
Particular attention should be paid to situations where the object the cube is aimed at can change its position during gameplay. This is especially relevant for games where enemies actively pursue the player, such as in Vampire Survivors. In such cases, it is important to consider the dynamics of movement in order to adapt strategies and ensure effective interaction with game elements.
Vector3.Lerp, or linear interpolation, is used to calculate intermediate coordinates between the start and end points. This method allows you to create a smooth path of object movement. Unlike Vector3.MoveTowards, when using Lerp, the initial position of the object is fixed at the start of the game, which prevents it from changing during movement. This makes Lerp an ideal tool for creating animations and smooth transitions in gameplay.
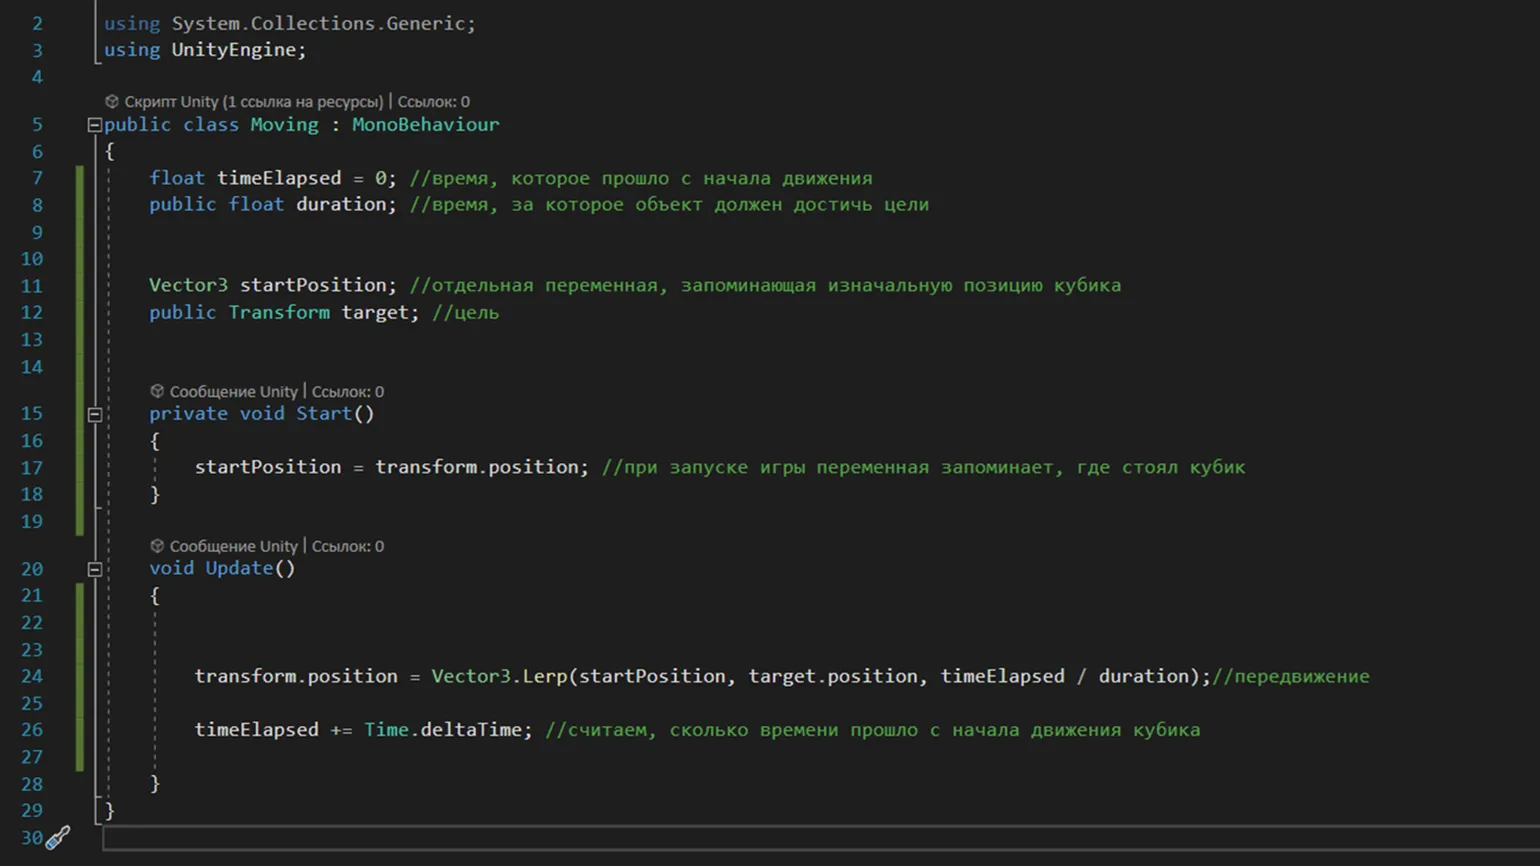
In this context, we also specify the target position through Inspector, similar to the MoveTowards function. It is important to note the third parameter of the function, which determines what fraction of time the object has already traveled. This value is divided by the total time allotted for the movement and must be between 0 and 1. This approach allows for precise control over the object's movement animation, ensuring smooth and natural movements in gameplay.
If the movement takes 3 seconds, and the cube has already traveled 1.5 seconds, then the remaining time is 0.5 seconds, which indicates that the cube has covered 50% of its path. If 2.5 seconds have passed, the remaining time is 0.86, which means that the cube has completed 86% of its path. This way, you can easily track the cube's progress as it moves.
These values allow you to accurately determine the object's current position in space. The timeElapsed time parameter is updated every frame based on Time.deltaTime, which allows for changes in the frame rate. This ensures smooth movement and precision in calculations, which is especially important for dynamic scenes and animations in games. Using Time.deltaTime ensures that the object's movement is consistent regardless of device performance, which is critical to creating a quality gaming experience.
An example of how these functions can be used effectively is to move an object to a location on the screen where you click with the mouse. This approach is especially useful when you want an item to smoothly return to the inventory after use. This improves user interaction with the interface and makes the process more intuitive.
Creating an intuitive character control system in Unity is a complex task that requires a deep understanding of game mechanics. In this article, we covered the basics of object movement, a key element of player interaction with the game. In future publications, we plan to delve into more complex aspects, such as object rotation and developing complex movement paths, which will create a more dynamic and engaging gameplay experience. These topics will help developers improve user experience and enhance the quality of game projects, creating unforgettable moments for players.
Game designer from scratch: 5 steps to a career in the gaming industry
Want to become a game designer? Learn the 5 principles of successful game design and start a career in gaming! Read the article.
Find out more