
Contents:

Learn: The profession of Game Developer on Unreal Engine from scratch to Middle
LearnSkillbox Media's Gamedev team continues its series of tutorials on Unreal Engine 5. In previous articles, we covered the UE Editor installation process in detail, as well as introduced the program's updated interface and asset management in the resource catalog. In this tutorial, we'll focus on one of the key pillars of Unreal Engine—creating and editing materials. Proper use of materials is an essential aspect of game development, as it directly impacts the visual perception of a project. We'll explore the basic principles of working with materials, their properties and capabilities, and provide practical recommendations for their effective use in your projects.
This guide is based on version 5.0.2. It provides users with comprehensive information about the system's functionality and capabilities. Please note that all recommendations and instructions are current for the specified version, ensuring optimal use of the software. It is important to follow the directions for best results.

Read also:
Unreal Engine is used not only in the gaming industry, but also in many other areas. This powerful platform is used to create realistic visualizations in architecture and interior design, allowing architects and designers to present their projects in an interactive format. In the film industry, Unreal Engine is used to create visual effects and animations, significantly speeding up the production process and improving the quality of the final product.
Unreal Engine is also widely used in education. Schools use it to develop interactive training courses and simulations, allowing students to learn complex concepts in a visually engaging way. In medicine, this engine is used to create simulators that help doctors and nurses practice skills in a safe environment.
Unreal Engine is also used in the automotive industry, where it is used to create virtual prototypes and vehicle demonstrations. This allows manufacturers to test the design and functionality of vehicles before they are physically produced. In the arts and entertainment space, Unreal Engine serves as a platform for creating interactive installations and exhibitions, giving artists new opportunities for expression. Unreal Engine is thus a versatile tool that significantly expands the horizons of not only the gaming industry but also many other sectors, enabling innovative solutions and high-quality visualization. Materials play a key role in shaping the appearance and surface characteristics of objects in a scene. This applies to both static meshes, which are standard objects with fixed geometry, and skeletal meshes, which include rigged objects. Materials also influence terrain, user interface, and visual effects, ensuring their realism and aesthetic appeal. Proper use of materials allows you to achieve a high level of detail and believability in 3D scenes, which is essential in game development and visualization.
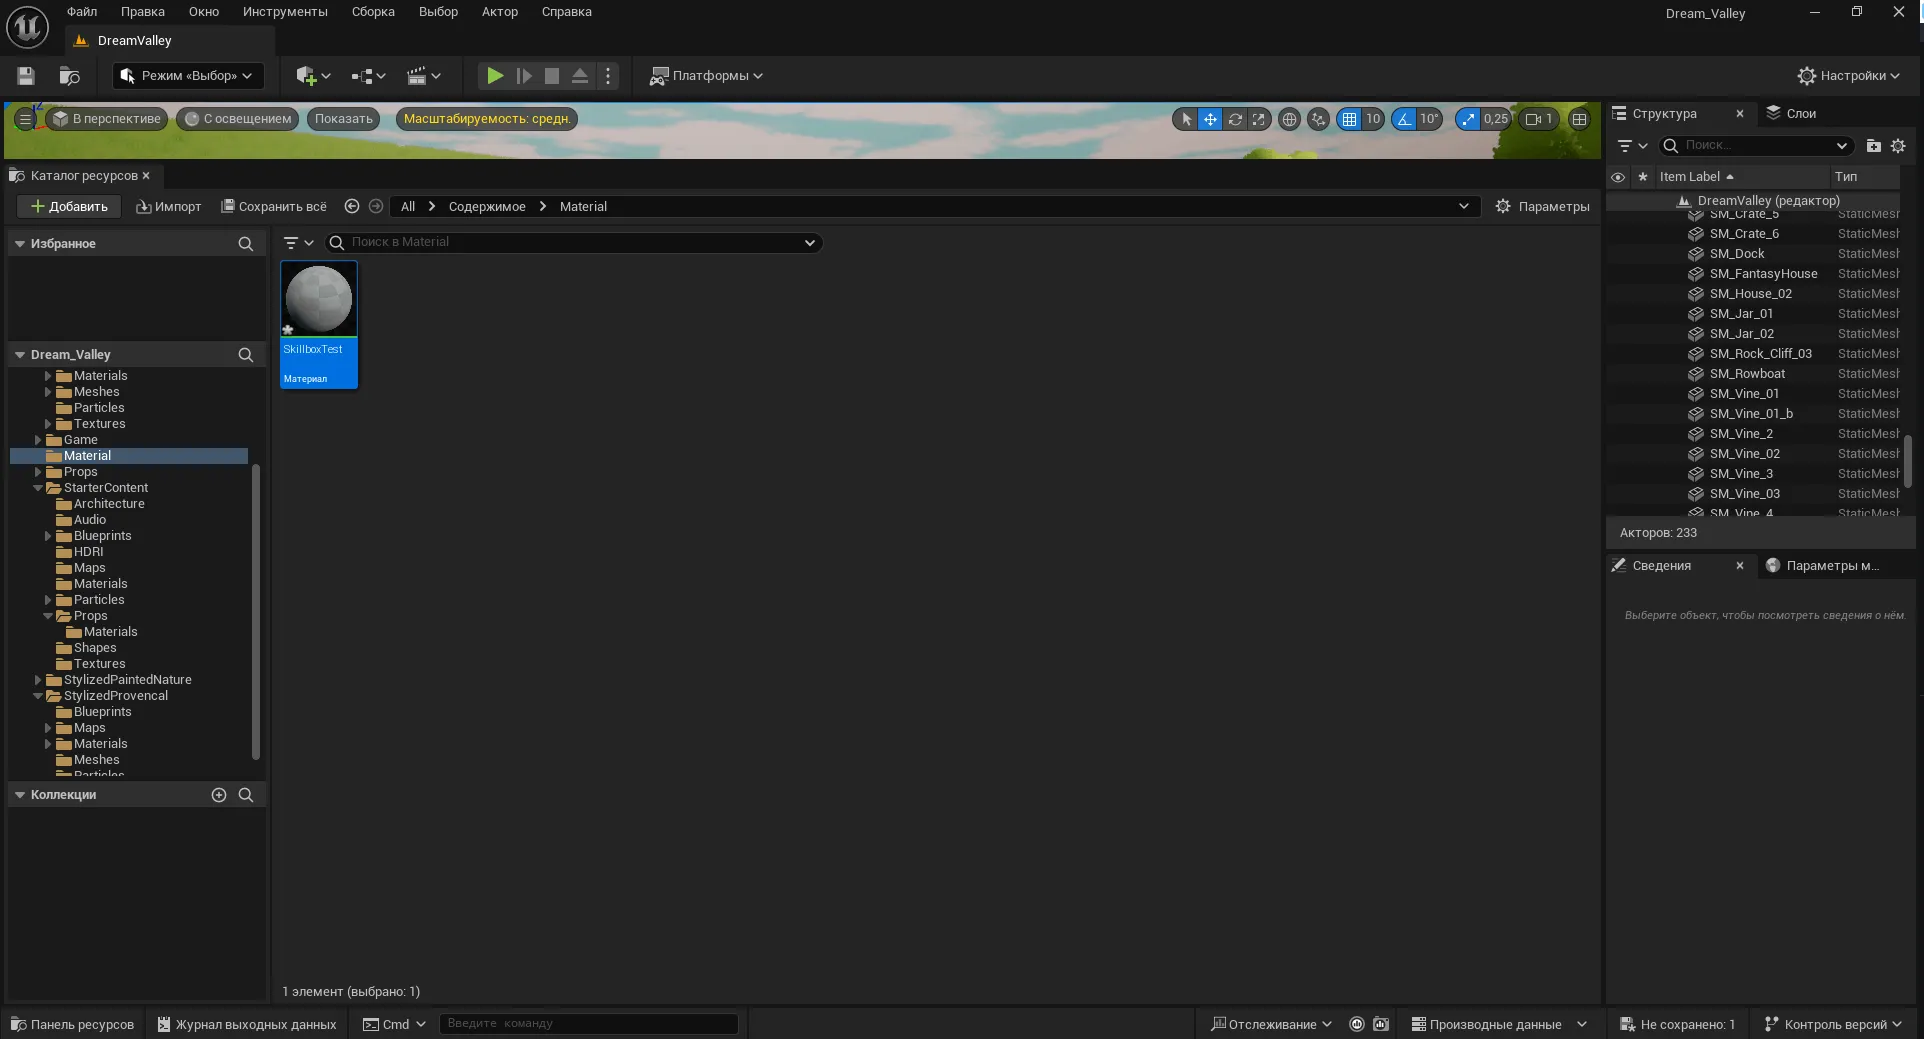
First, let's analyze the structure of the Unreal Engine 5 editor used to create materials. As an example, let's consider the Starter Content set, which includes the basic elements for Unreal Engine projects. This set can be loaded into any project simply by calling the context menu in the Content Browser, which we discussed in an earlier lesson. Loading Starter Content allows you to quickly get started and significantly simplifies the development process by providing access to ready-made textures, models, and materials.
Open the Resource Catalog and expand the Starter Content folder. Go to the Materials subcategory and select any material. Double-clicking the material icon will open a separate editor window where you can create and edit materials. If necessary, it can be integrated into the main editor interface for ease of use.
Content Editor Interface
The Content Editor is a specialized window that uses a node-based system for creating and editing content. The connections between nodes shape the final appearance of the content, allowing users to easily manage its structure and design. This approach provides flexibility and convenience in working with different types of content, which makes the editing process more intuitive and efficient.
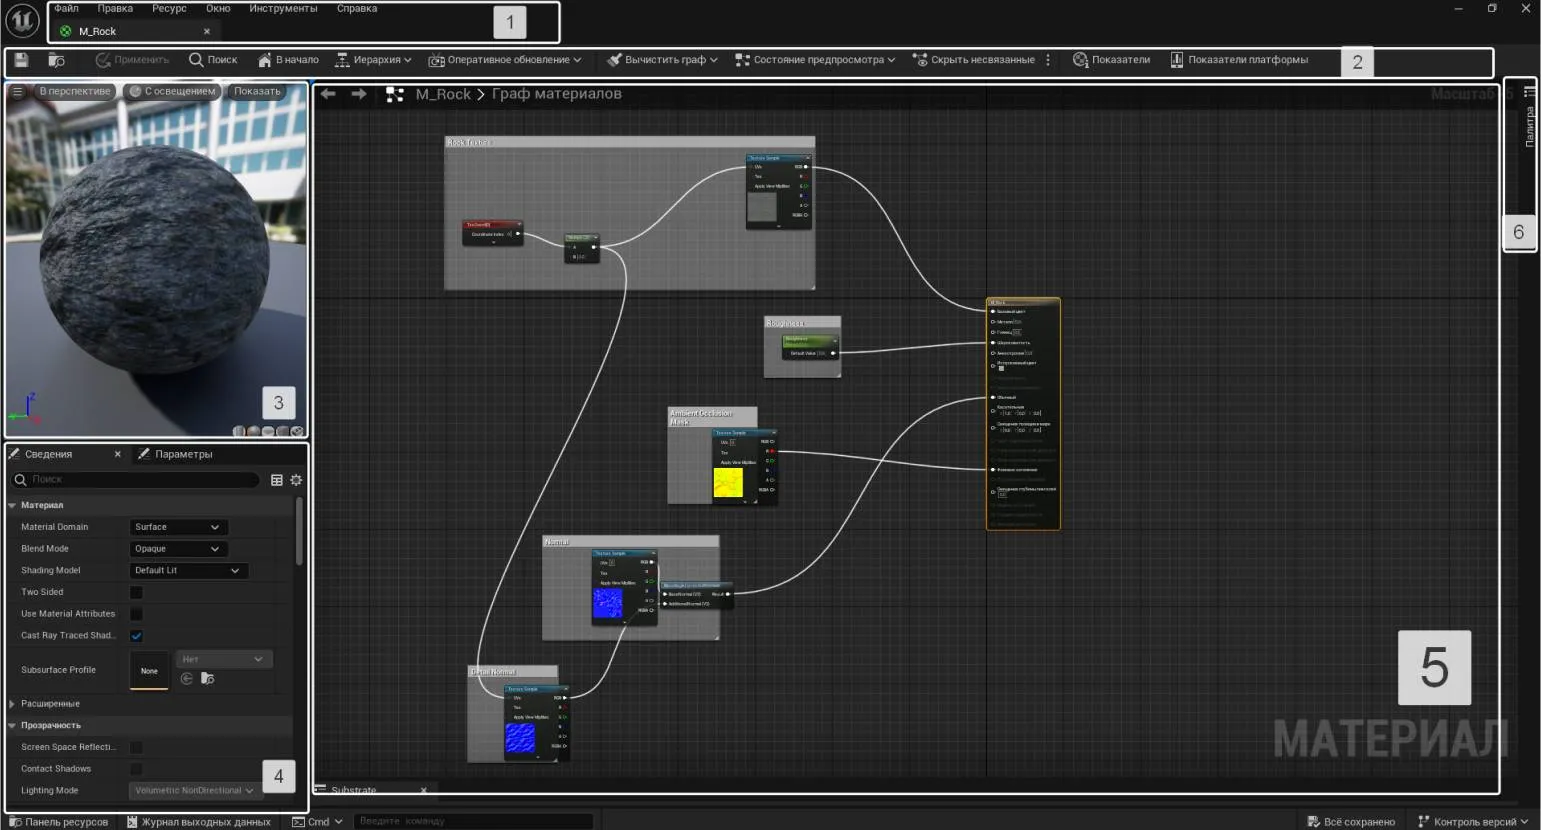
Main menu (No. 1) Includes core features that partially replicate the capabilities of the Unreal Editor interface and the Content Browser. This menu provides access to key tools and settings, allowing users to effectively manage projects and resources in Unreal Engine.
The shortcut bar contains buttons that provide access to the main functions of the material editor and graph.
- Floppy disk icon — save the current asset.
- Folder with a magnifying glass — find and select the current asset in the Content Browser.
- Apply — compiles shaders: saves all changes made to the material structure. If this material is applied to any actor in the scene, the changes will also appear in the viewport after compilation.
- Search — search for material nodes by name.
- Home — switches to the main material node. Convenient when creating complex diagrams.
- Hierarchy — displays a list of all child nodes in relation to the selected node.
- Live Update — settings for displaying materials in real time.
- Clean Graph — removes nodes not related to the material structure.
- Preview State — settings for displaying the 3D viewport.
- Hide Unrelated — hides all unselected nodes.
- Stats — displays/hides statistics on material data. Displayed as an additional tab at the bottom of the material editor.
- Platform Stats — displays information about compilation and errors, if any, in the material structure.
The viewport window is an interface for displaying materials in three-dimensional space. At the top of the window are tabs with additional settings that allow users to optimize their work with the viewport. The menu, represented by a button with three stripes, includes basic viewport parameters, such as activating and deactivating real-time changes, viewing statistics, and displaying the frames per second counter using the "Show FPS" function. Additionally, this menu contains sliders that allow you to adjust the viewing angle, which improves interaction with the 3D model and increases work efficiency.
The "Perspective" and "Lit" tabs are similar to the options in the main viewport in Unreal Editor. These features allow users to effectively manage the visualization of scenes, providing the ability to view objects in 3D space with various light sources. Using these tabs significantly facilitates the development and editing process, allowing you to more precisely adjust lighting and perspective to achieve the desired result in your project.
Show includes additional features such as real-time Stats, a Grid for displaying a preview panel, and an environment Background. These tools allow users to manage content and visualize data more effectively. Real-time Stats provide up-to-date information, the Grid helps organize interface elements, and the Background adds aesthetic and functional options to improve the user experience.
In the lower right corner of the 3D viewport are buttons depicting a cylinder, sphere, plane, and cube. These buttons are used to preview materials on various types of geometry. The last button, depicted by a brick, applies the material to an object belonging to the Static Mesh category that was previously selected in the asset catalog. If you try to click this button without first selecting an object, the editor will notify the user that they must first select an object for material projection.
The Details panel (No. 4) displays the properties of the currently selected node. If no element is selected in the graph, the panel displays the main parameters of the material being edited. This allows the user to quickly obtain information about the characteristics of the selected object and make any necessary changes.
Operations in the Material Editor are primarily performed in the Material Graph window. This space is designed for assembling component nodes. In the standard configuration, the graph includes only one main node, which has many property slots. The user can "connect" additional nodes to this main node, which allows for the formation of a material surface. This process is key to creating and customizing materials, making understanding the graph an essential step in achieving high-quality design results.
To the right of the graph window is the Palette panel, which displays all node types. By default, the Palette is hidden. To activate it, click the pushpin icon, which will lock the tab while you work. To add the desired component to the graph, simply drag it from the list while holding the left mouse button.
A footnote is an important element in any text, as it helps clarify information, provide additional details, or emphasize important aspects. Including footnotes in your content can improve its quality and make it more informative for readers. Footnotes can be used to explain terms, cite sources, or add context, which in turn contributes to a better perception of information. Properly formatted footnotes also have a positive impact on SEO, as it can increase the time a user spends on a page and reduce the bounce rate. Including keywords and phrases in footnotes will help increase the visibility of the text in search engines, which, in turn, will attract a larger target audience. Thus, footnotes not only complement the content but also play an important role in optimizing the text for search engines.
In addition to the search bar, suitable nodes can be found manually using the categories in the «Category» drop-down list. (Category), which is located at the top of the Palette. In addition, the list of components can be opened by right-clicking on an empty area of the graph. This allows you to quickly and easily find the elements you need to work.
Basics of Navigation in the Material Editor
Navigation in the 3D viewport is accomplished with the mouse, allowing users to efficiently move around and inspect 3D objects. Various combinations of mouse clicks and keyboard keys can be used to manipulate the scene. For example, panning around the scene is accomplished by holding down the middle mouse button, while rotating an object is possible by right-clicking. These navigation methods provide a comfortable experience and allow for detailed exploration of 3D models, which is especially useful for designers and developers. Proper navigation in the 3D viewport significantly improves the modeling and visualization process.
- LMB and hold — rotate around the mesh;
- RMB and hold + mouse wheel — zoom in/out;
- MMB and hold — move around the scene.
Navigating the Material Graph window is intuitive and resembles working with node editors in other software solutions, such as Blender. Users easily navigate the interface and can quickly create and edit materials. Due to the similarity with other tools, it will be easier for new users to master the functionality and apply it effectively in their projects.
- LMB and hold and move the cursor sideways - select an area;
- RMB and hold - move around the area;
- mouse wheel - zoom in/out.
Creating Materials
Let's create a new material from scratch. To do this, create a separate folder in the resource catalog: right-click and select "New Folder". Name the folder, then open it. Inside the folder, right-click on an empty area of the window to open the asset menu, and select "Material". This will create a new material asset, which needs to be named. This process allows you to organize your materials and makes them easier to use later in the project.
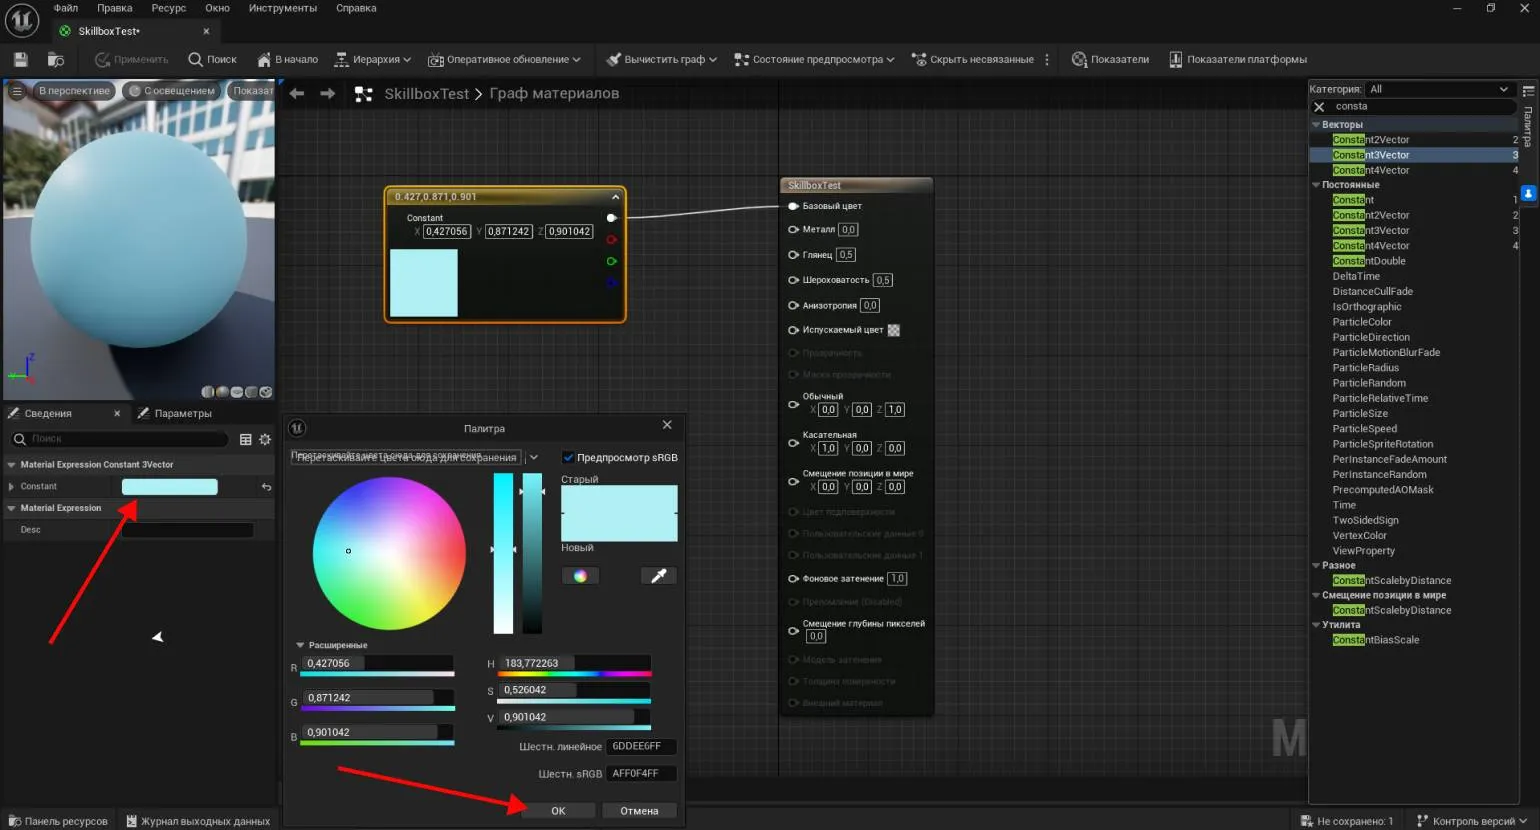
Double-click the asset with the left mouse button to open the Material Editor. Let's start by creating a colored material. In Unreal Engine, color is specified using the Constant3Vector node. Find this node in the palette and drag it to the graph area.
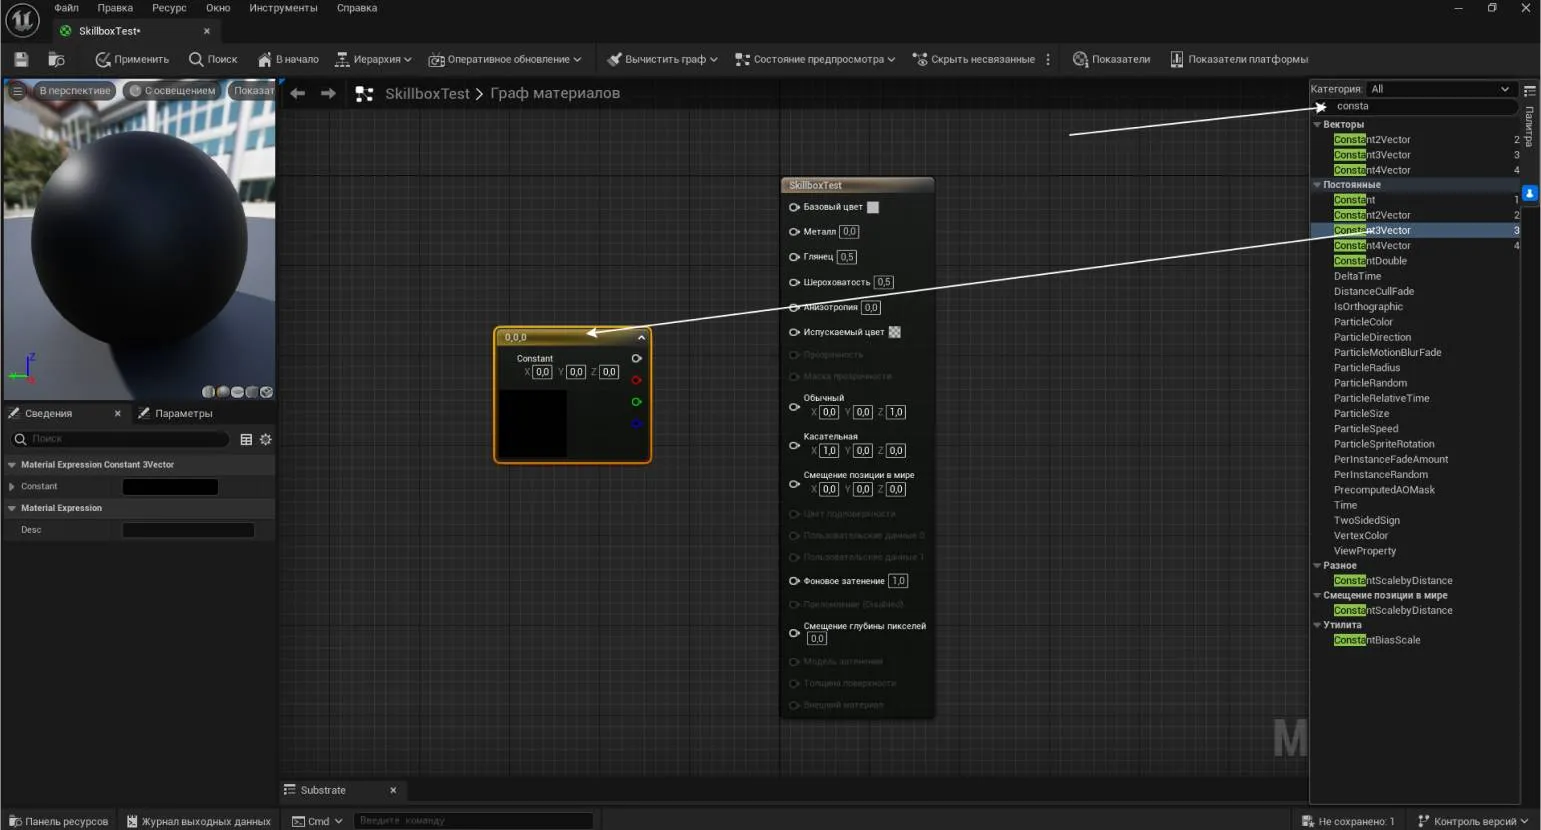
Double-clicking on the created node opens a window for selecting a color. In previous versions of the engine, the value (Value), located in the second column to the right of the color wheel, was zero by default. This resulted in the node preview remaining black even when selecting a color, requiring the user to manually adjust it. Since version 5.4, the value is automatically set to maximum and can be adjusted if color saturation needs to be changed.
After choosing a color, you need to establish a connection with the main element, namely, with the Base Color slot of the main node. This will ensure the correct display and application of the selected color in the further process.
Note: This text is intended to improve SEO and increase its visibility in search engines.
Before writing materials, it is important to keep in mind that high-quality content should be unique and informative. Optimizing text for SEO includes using keywords that are relevant to the topic, as well as creating an easy-to-read structure.
It is important to avoid redundancy and maintain clarity of presentation. Each paragraph should contain useful information that meets user queries. Pay attention to meta tags, headings, and descriptions, as they affect the ranking of web pages.
Proper use of internal and external links also helps improve visibility in search engines. When creating content, focus on the needs of your audience to ensure their interest and engagement.
Therefore, a competent approach to creating and optimizing texts helps attract the target audience and improve the site's position in search engines.
To break the link between nodes, simply right-click on a cell and select "Break This Link" from the menu that appears. This process allows you to effectively manage links in your model, providing flexibility and control over the data structure.
After applying the material, it will acquire a color. However, its use in the scene is currently impossible, since the shaders have not yet been compiled. Click the "Apply" button to save the changes. You can then test the material on any object in the scene.
Changing the material color is done directly in the Details panel in the Constant section. To do this, select the desired node in the corresponding column. After making changes, be sure to compile the resource by clicking the Apply button. If you need to revert to the previous color, use the keyboard shortcut Ctrl + Z, then compile and save the resource again by clicking the floppy disk icon. This approach allows you to easily manage the colors of materials and avoid errors when editing.
To complicate the task, we will add a property to the material that affects Surface expression—Roughness. This parameter is determined by a numerical value set using a Constant node. Find it in the Palette list and drag it into the Graph window. When you select the Constant node, the Material Expression Constant tab will appear in the Details panel on the left, where you can enter the desired value. In version 5.4, you can enter the value directly in the node itself, simplifying the material setup process. Enter a value between 0 and 1, where 1 corresponds to a matte and velvety surface, 0.5 creates a soft highlight, and 0 provides a mirror-like surface. Then connect the Constant slot to the Roughness parameter and analyze the result. This approach allows you to precisely control the texture of materials in your projects.
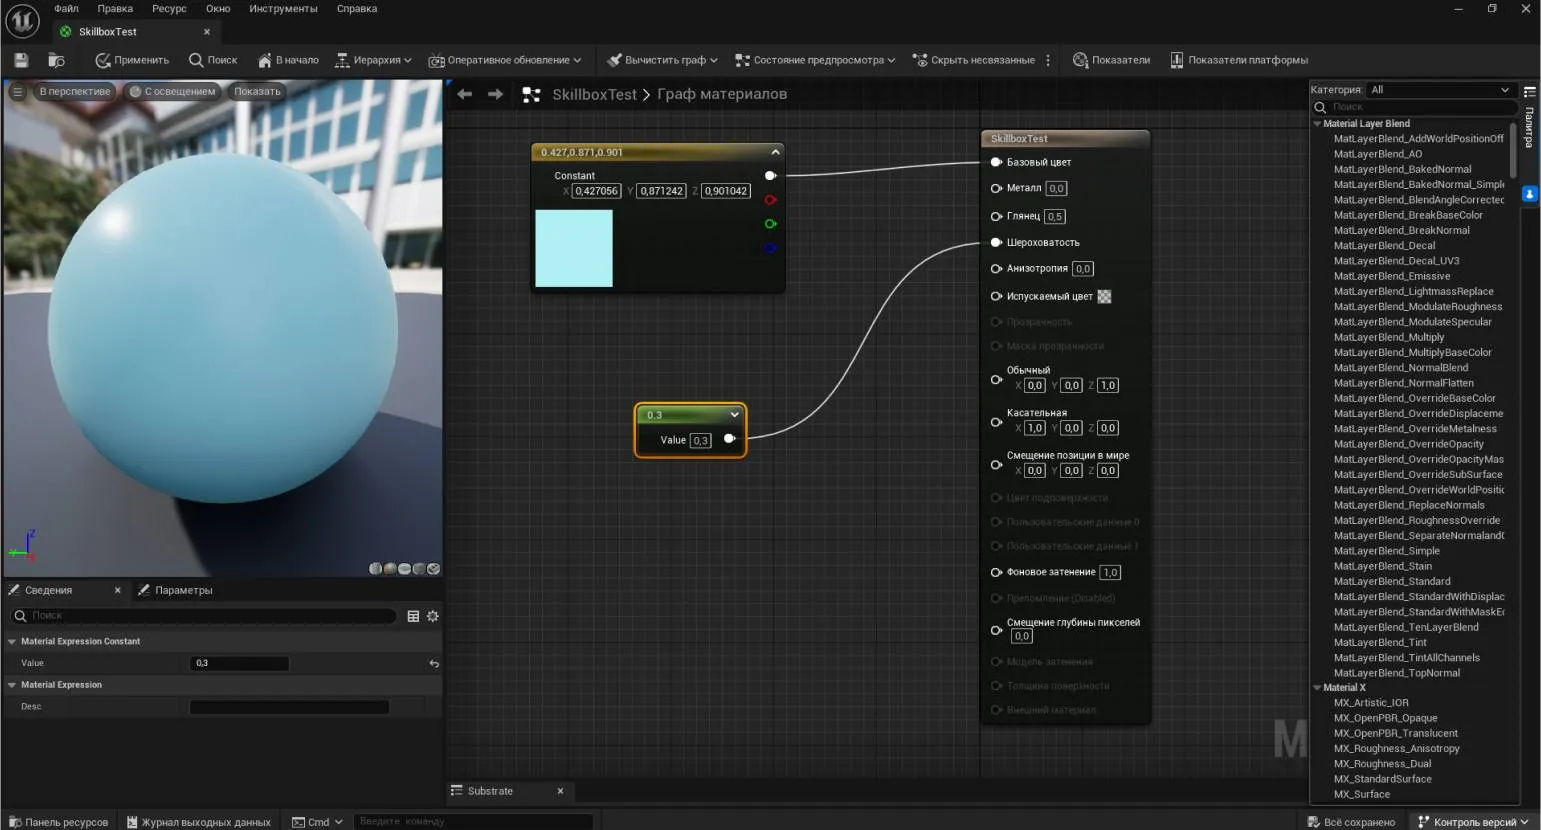
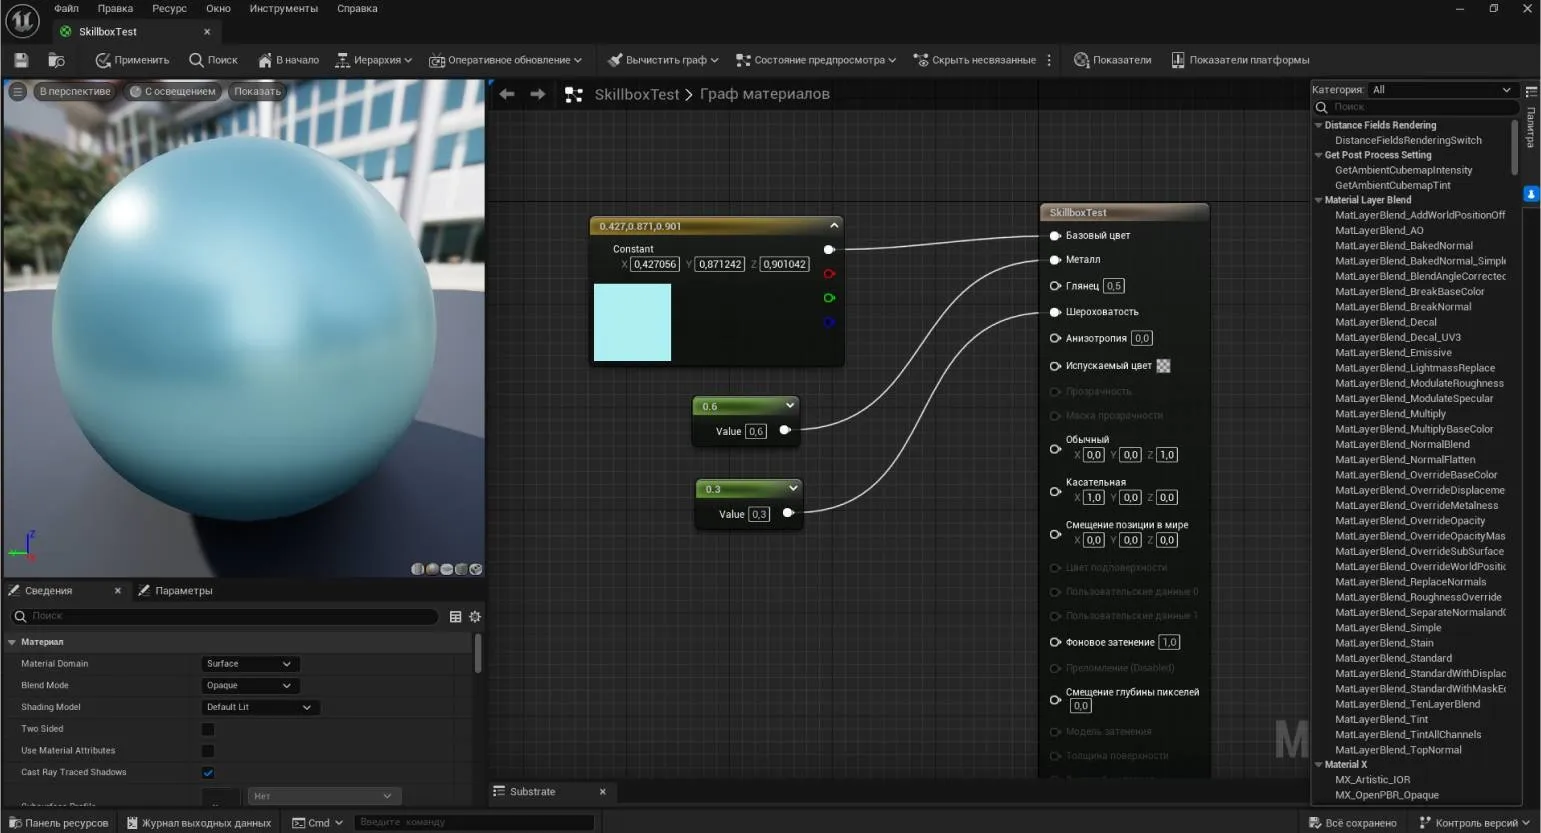
To create a metallic effect in the material, you need to use the Metallic slot. To do this, add a new Constant node, duplicating the existing one. To duplicate, select the first Constant node and press Ctrl + C, then Ctrl + V. Set the new value to your liking, connect the nodes and evaluate the final result.
A note is an important element in a document that helps emphasize the significance of certain information. It's important to consider that notes can serve to clarify complex points or provide additional information that may be useful to the reader. Effective use of notes not only improves comprehension but also promotes deeper understanding of the data presented. When creating notes, avoid unnecessary complexity to avoid distracting from the main topic. Proper structure and clarity of presentation make notes a valuable tool for enhancing the informativeness and readability of material.
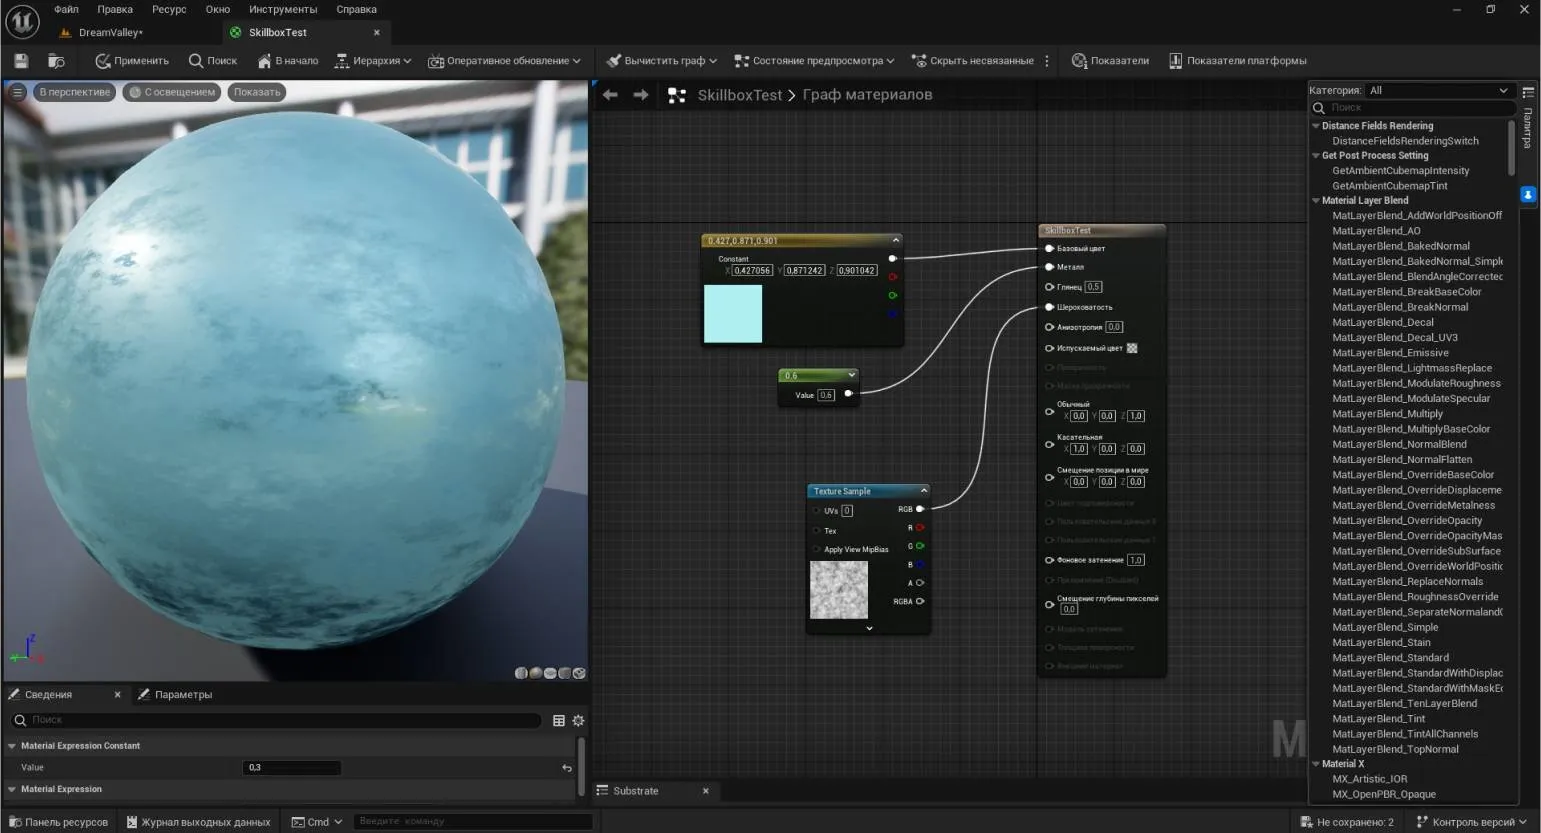
Unreal Engine uses PBR (Physically Based Rendering) technology for rendering and shader mapping, which significantly impacts lighting and the realistic appearance of objects. This approach utilizes the Metallic and Roughness parameters, which take into account the physical properties of materials. By varying these parameters, you can create a variety of textures. For example, to achieve a mirrored surface, set Metallic to 1 and Roughness to 0. For a glossy finish, both Metallic and Roughness should be set to 0. A pearlescent effect can be achieved by setting Metallic to 0.5–0.6 and Roughness to 0.3. Thus, PBR in Unreal Engine allows developers to create high-quality and believable visual effects, making it an ideal tool for creating games and interactive applications.Creating a distressed effect on a new material requires a black and white texture with a noise or stain effect. You can load such a texture from the Starter Content set or from your personal collections on your hard drive. This tutorial uses the T_Perlin_Noise_M texture from the Starter Content set as an example. To begin, open the Content Browser or activate the Content Drawer using the keyboard shortcut Ctrl + Space. Then, drag the desired texture into the graph area. This can be done without having to switch windows: when you drag files, the Material Editor window opens automatically, greatly simplifying the workflow. Using textures with a worn effect will add depth and realism to your material.
The Texture Sample node has been added to the graph window. If the texture is black and white, as in our example, its RGB properties can be linked to the Roughness parameter, allowing you to change the mesh's surface characteristics. Black areas on a monochrome texture create highlights, while light areas create a matte effect. This gives the surface a more realistic appearance due to the uneven reflection of light. Using such textures in graphics significantly improves the visual perception of objects and makes them more alive.
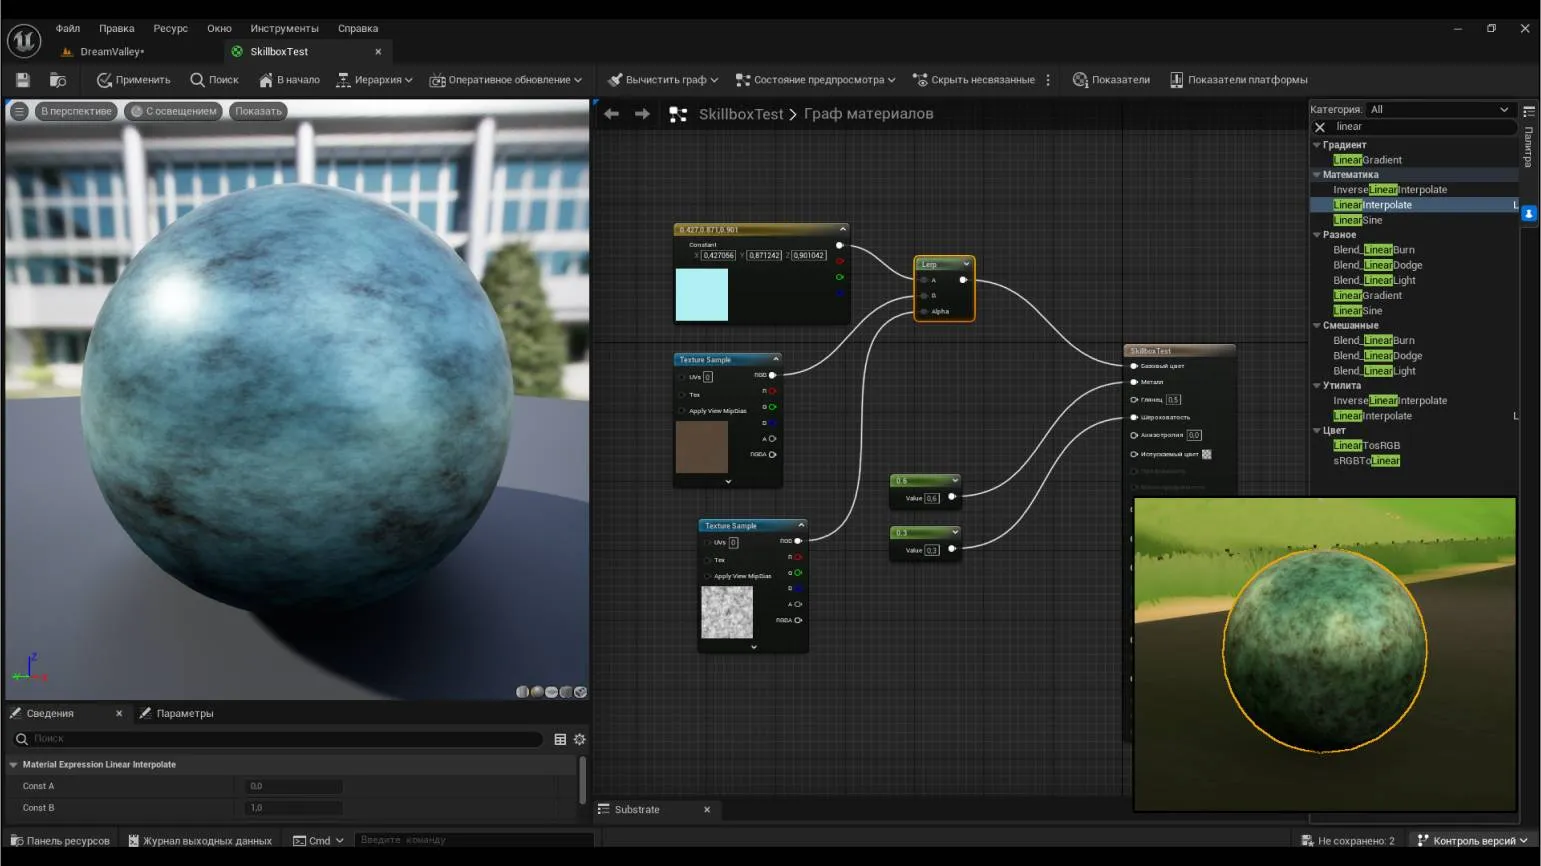
Now Let's restore the original properties by deactivating the texture node and returning the previous roughness value. Next, let's try adding dirt to the material, using the T_Metal_Rust_D texture from the Starter Content as an example. This process will help us achieve a more realistic and detailed surface appearance.
Drag the texture into the graph window. If you directly connect the RGB slot of the new node to the Base Color node, the texture will fill the entire surface of the material. However, in this case, we need the texture to be partially visible and in specific areas. To achieve this effect, we'll use the LinearInterpolate (Lerp) node, which allows you to blend multiple nodes together, providing flexibility in texturing control.
Find the desired element in the Palette and drag it into the graph area. Connect the base color to slot A, and the rust texture node to slot B. Use the previously applied black and white noise texture as the alpha layer. Connect its RGB output to the Alpha channel of the LinearInterpolate node and connect it to the Base Color. After that, we check the obtained result.
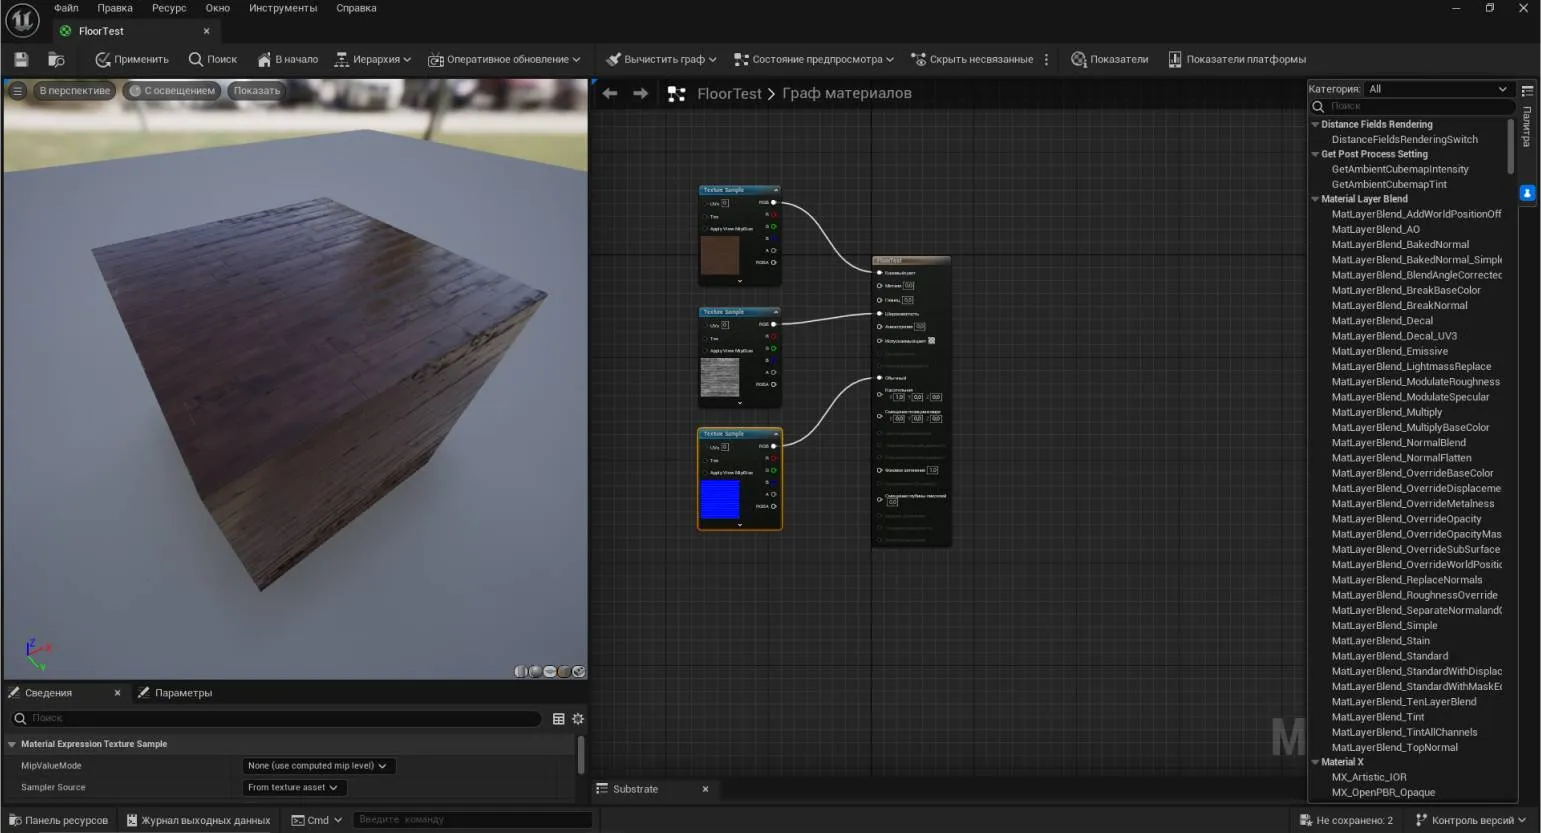
Modifying materials based on textures
Let's create a new material using three textures. This process involves mixing various visual elements to achieve a unique final result. The choice of textures plays a key role, as they determine not only the appearance but also the tactile sensation of the material. The optimal combination of textures can significantly improve the quality and appeal of the final product. It is important to consider how each element interacts with one another to achieve a harmonious and balanced result. Experimenting with different texture combinations will help you find the perfect option that meets your requirements and aesthetic preferences.
- base - Base Color slot;
- normal map to emphasize the texture - Normal slot;
- black and white option for realistic highlights and scuffs - Roughness slot.
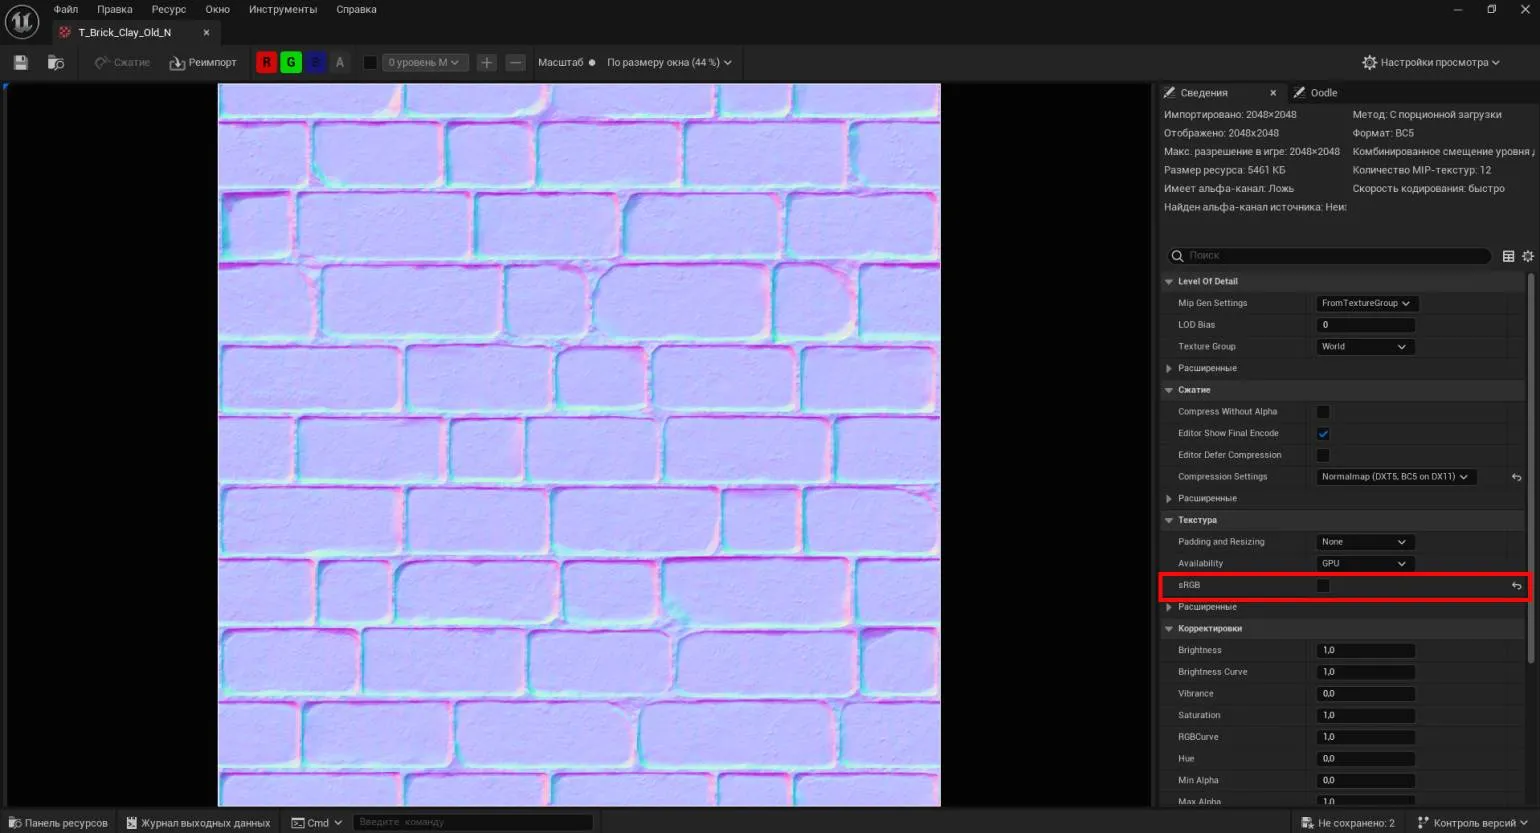
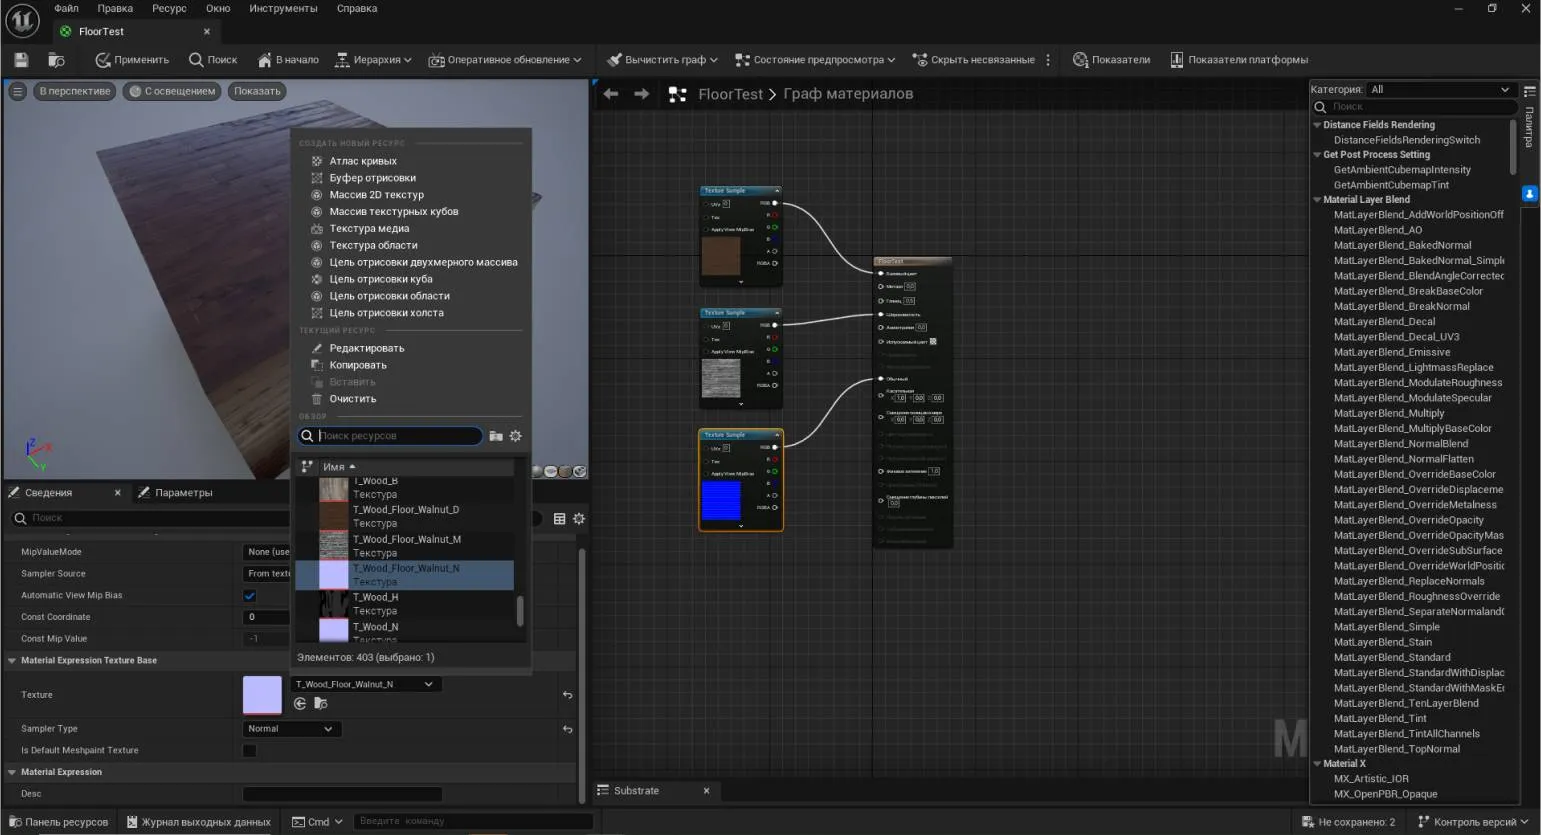
In this example, we will look at using content from the Starter Content, focusing on the T_Wood_Floor_Walnut textures. If you want to upload your own textures, you can place them in a new folder or drag them into an existing one from your file manager. Before you begin, make sure the sRGB checkbox is unchecked for the normal texture. This will allow the engine to correctly recognize the texture as an additional mask, and not as a color image.
Transfer all three textures to the material editor and combine them. Experiment with texture and slot combinations to achieve different effects. This allows you to create unique visual solutions and improve the appearance of the project.
Note:
This text contains important information that should be considered. Make sure you read the content carefully and take into account all the details. Pay attention to key points that may affect your understanding of the topic. Correct comprehension will help you avoid misunderstandings and make the process more efficient. Remember that all recommendations and tips provided are aimed at improving your experience and achieving your goals.
To replace a material texture, simply click the tab located next to the image preview in the Details panel. This will open a drop-down list containing all the textures used in the project. This allows you to quickly and easily change textures, providing flexibility and individuality to your design.
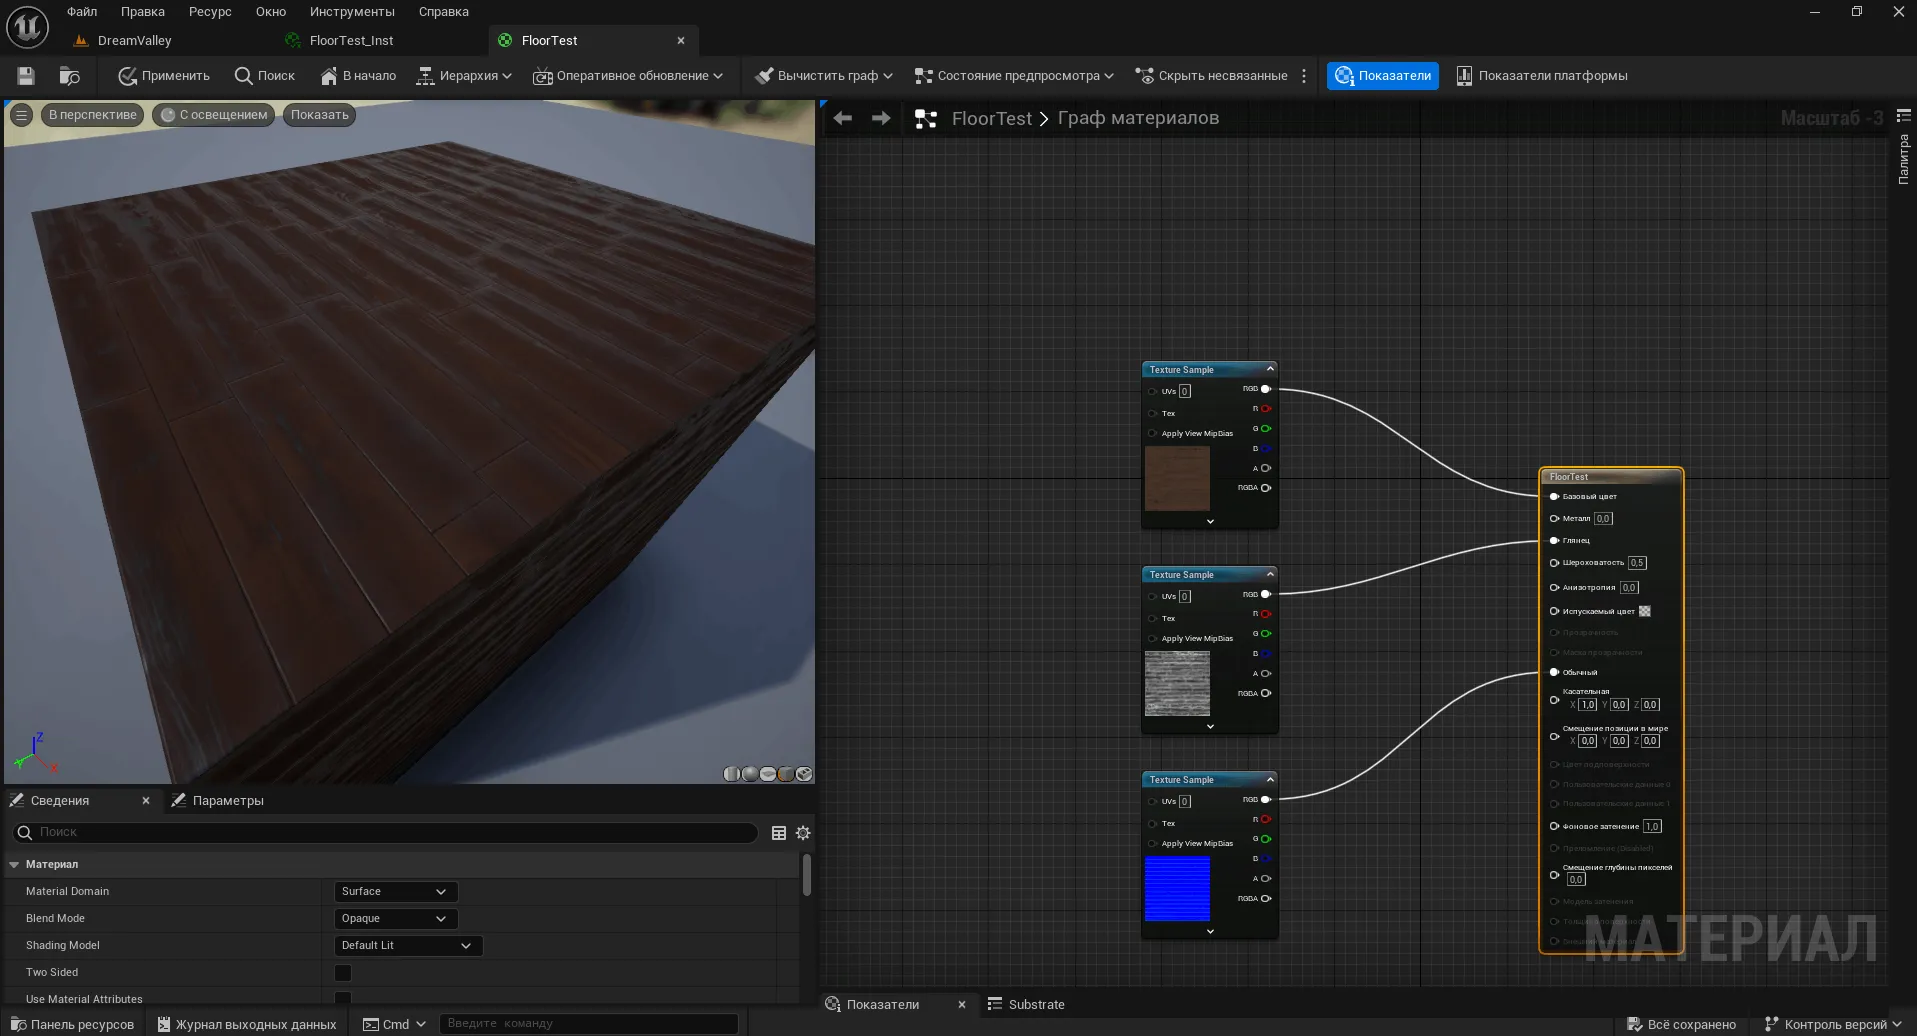
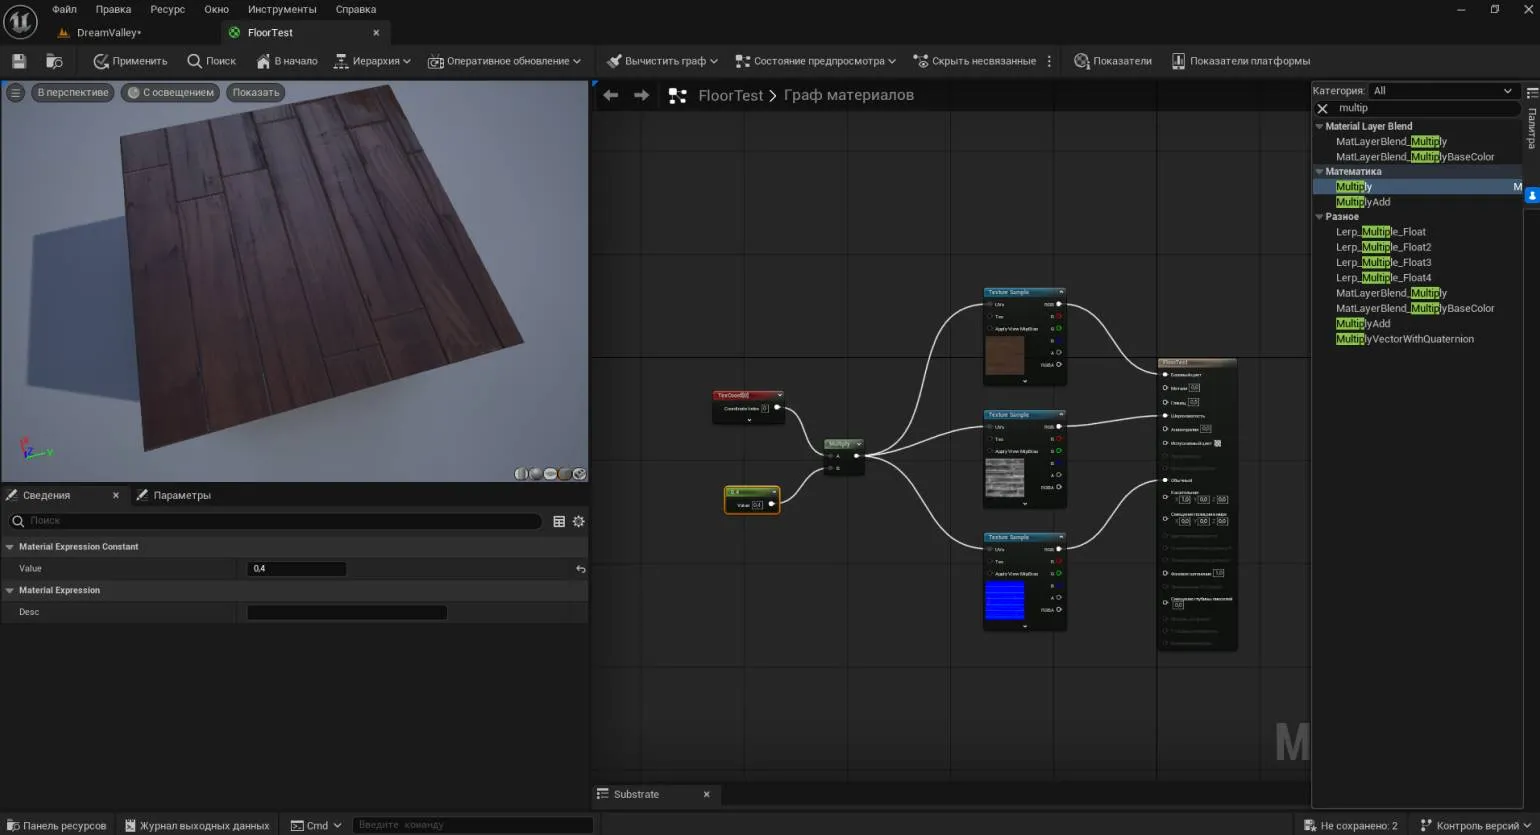
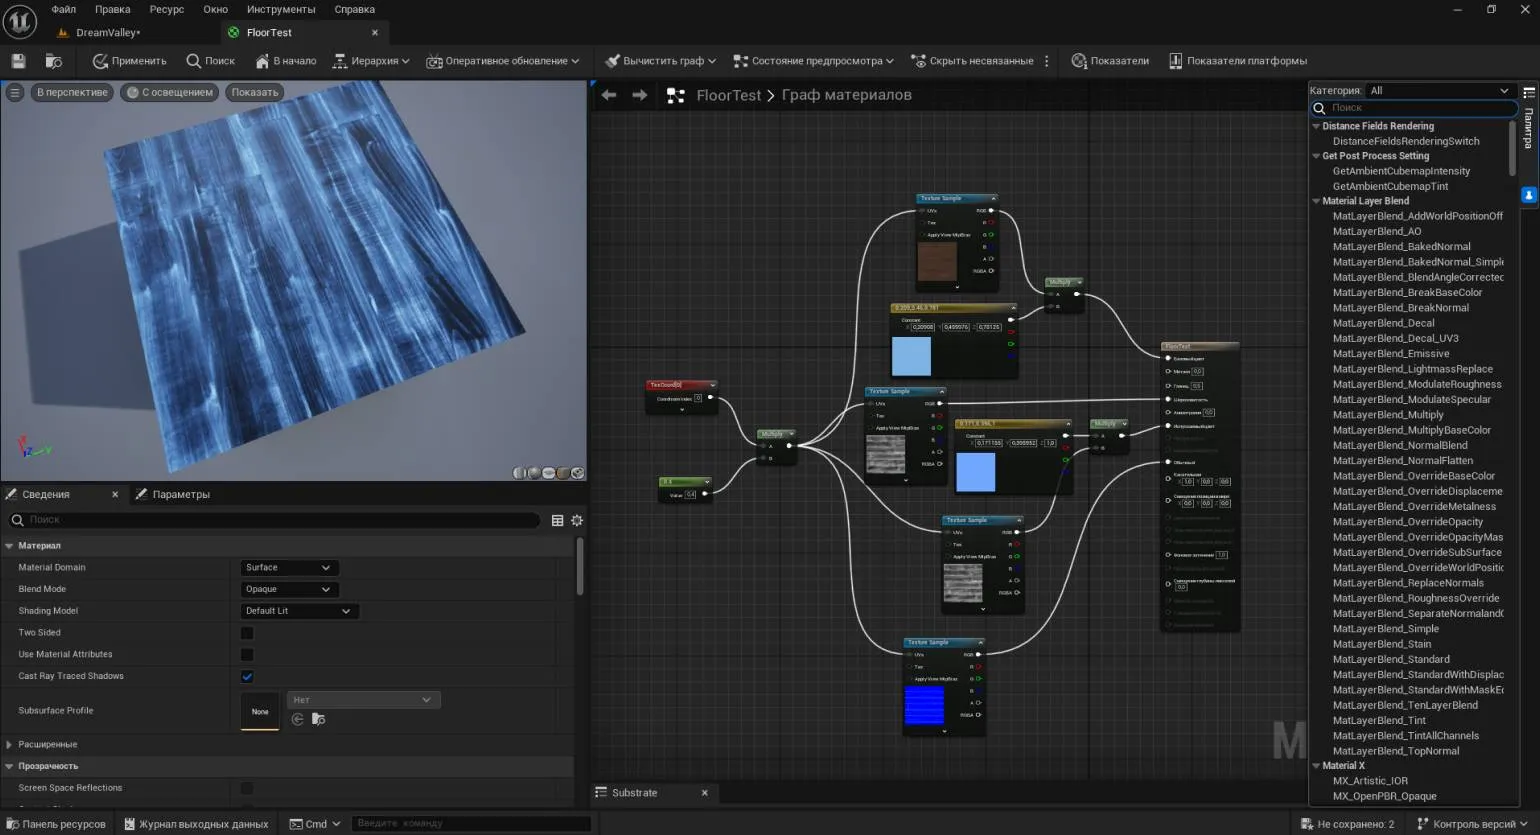
The screenshot shows nodes connected according to a simple scheme. Now we will compile the material and transfer it to an object in the scene, in this case to the conditional floor of the scene. This will allow you to visualize the material in the context of the overall design and evaluate its interaction with the environment.
If you need to change the scale of the pattern on the surface, the TextureCoordinate node is responsible for this. This node allows you to control texture parameters, including its scale, which is important for achieving the desired visual effect on the modeled object. Proper use of TextureCoordinate allows for more precise texturing adjustments and improves the overall aesthetics of 3D models. Create a node that needs to be applied to all three textures. To avoid duplication, add an additional Multiply node, which will affect the display of all textures by reducing the density of texture coordinates. To do this, connect it to the UVs slots. Also, add a Constant vector to the graph, since the scaling operation depends on the specified value. In the Constant settings, specify the desired value (the default is 1.0). Values above 1 reduce the image size, while values below 1 increase it. Connect the nodes as shown in the screenshot.
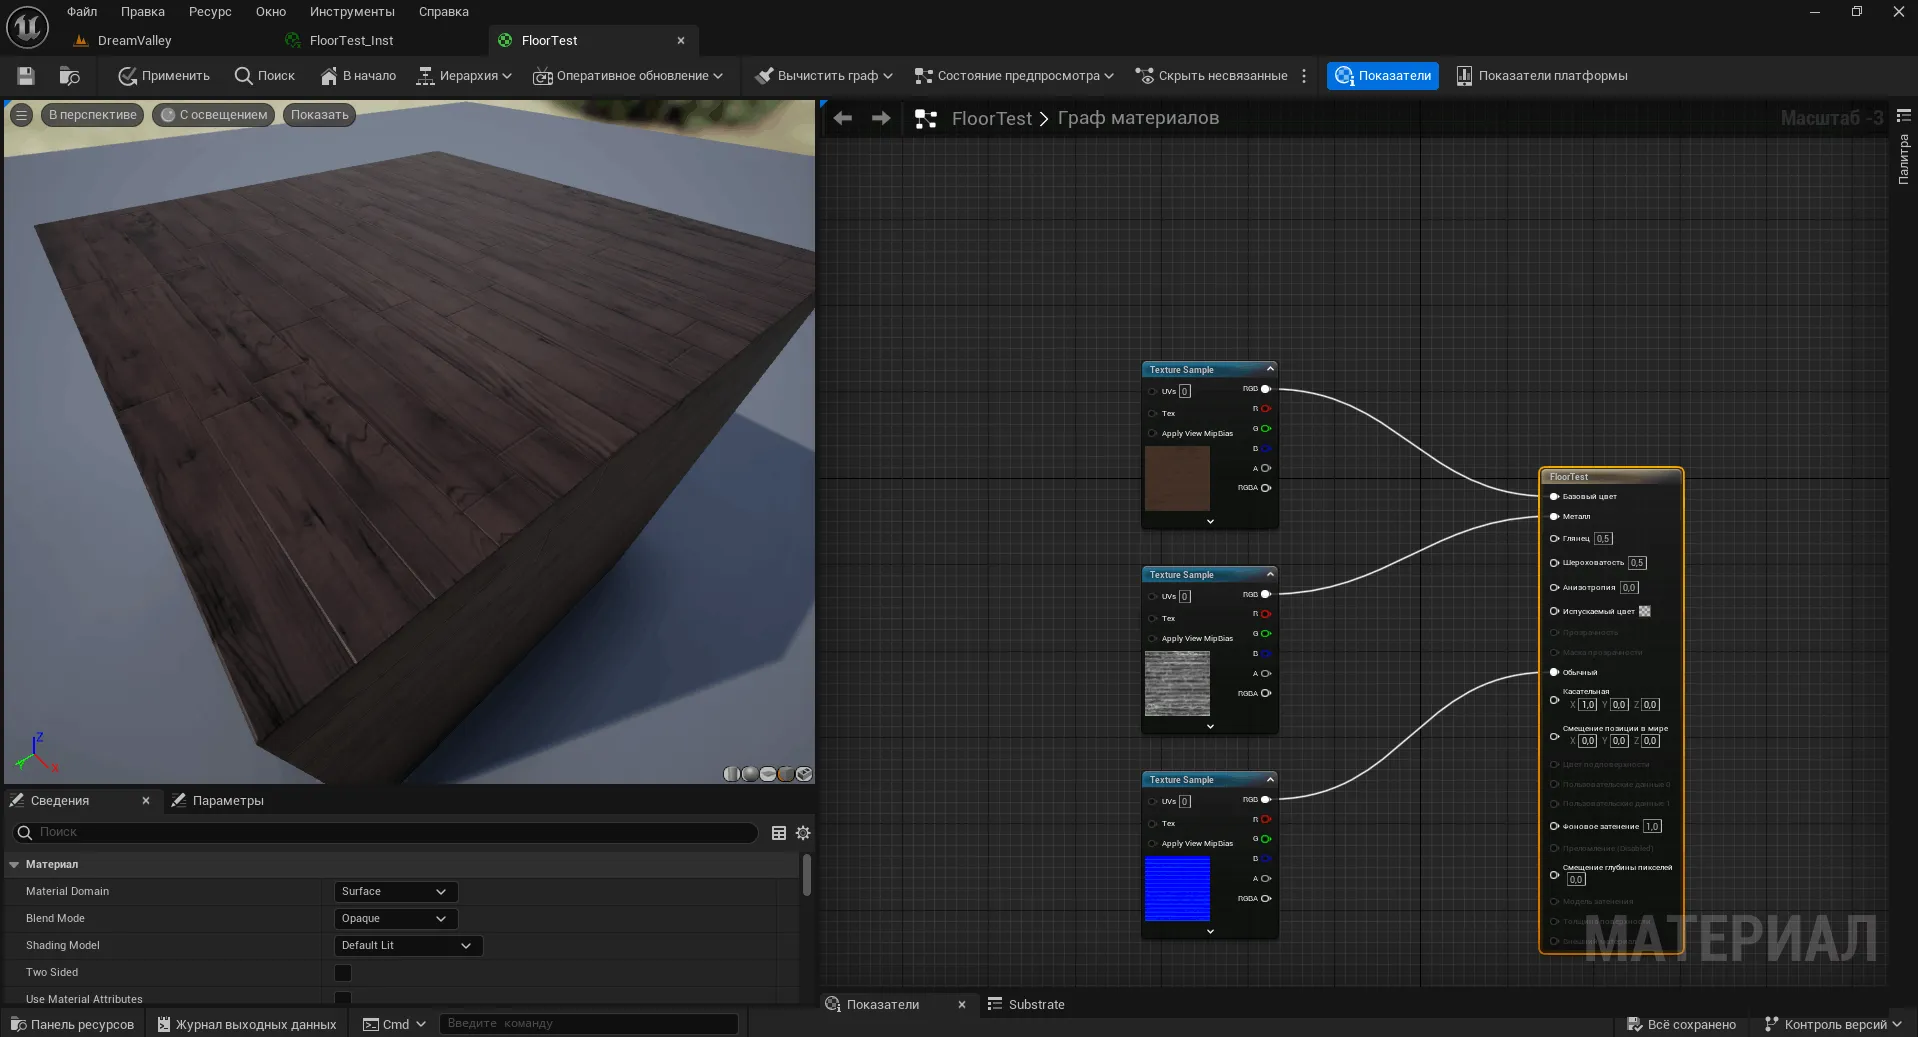
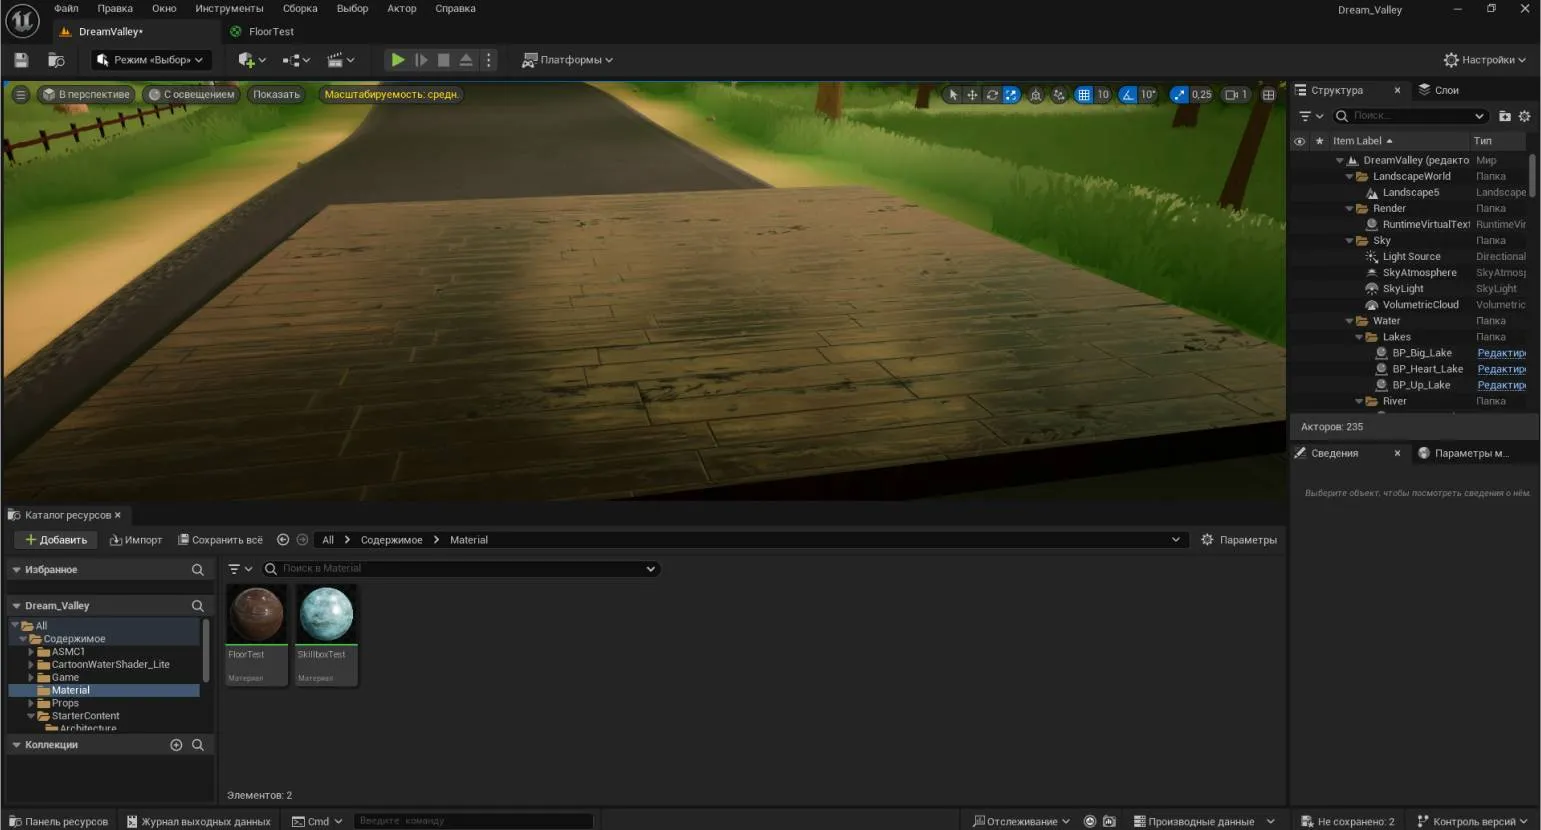
Compile the final result and save the material. Now, back in the scene, we see that the texture pattern has become much larger compared to the original sample. This change allows you to better appreciate the details and quality of the texture, and also improves the visual perception of the scene.
Now we will change the shade of the parquet using the Constant3Vector node. The setup process is similar to that described for the first material. To do this, we link a regular texture to a new Constant3Vector node via a Multiply node. After compilation, we'll be able to see the resulting image in the scene. This method allows you to easily experiment with colors and textures, creating unique visual effects for your project.

A note is an important element that helps clarify or Supplement the information in the text. It can contain additional explanations, references, or recommendations. Notes enhance understanding of the material and make it more informative for the reader. Properly formatted notes help improve the structure of the text and increase its value in terms of search engine optimization. Using notes can also improve the user experience, allowing readers to easily find the information they need and delve deeper into the topic.
Complex connections can be created on the fly. When pulling a "thread" from a node slot, simply release the left mouse button, and a list of available nodes will open. This feature allows you to quickly and easily form complex connections, improving the efficiency of working with data.
By mastering the basic techniques of working with nodes, you can create unique combinations with a variety of characteristics. For example, you can add dirt or rust effects to realistically display materials. It is also possible to connect additional slots, such as Emission, which is responsible for the glow of certain parts of the material, which significantly enriches the visual effects and improves the overall aesthetics of the model.
It's important to remember that all changes you make must be compiled. To do this, use the "Apply" button. Keep in mind that the more complex the material structure, the longer this process will take.
Configuring Materials in Real Time
Finally, let's look at materials that can be configured in real time without the need for constant compilations. These are dependent copies of materials, known as Material Instances, or instanced materials. Their use significantly simplifies the development process and helps improve overall productivity. Using instanced materials allows developers to quickly make changes, which is especially useful in large projects where flexibility and responsiveness are required.
In the Content Browser, we find the last material we worked with. To do this, right-click (RMB) on the asset icon and select the first item in the menu that appears - Create Material Instance. This will allow us to effectively create a material instance that can be used later.

A copy of the asset with the _Inst. If we apply this asset to any mesh, it will look just like the original material, preserving all its properties. Now we can set a parameter that will allow us to adjust the texture scale in real time. To do this, return to the original material's graph, find the Constant node responsible for texture size, right-click it, and select Convert to Parameter. This will allow us to more flexibly manage the display of the texture during the work process.
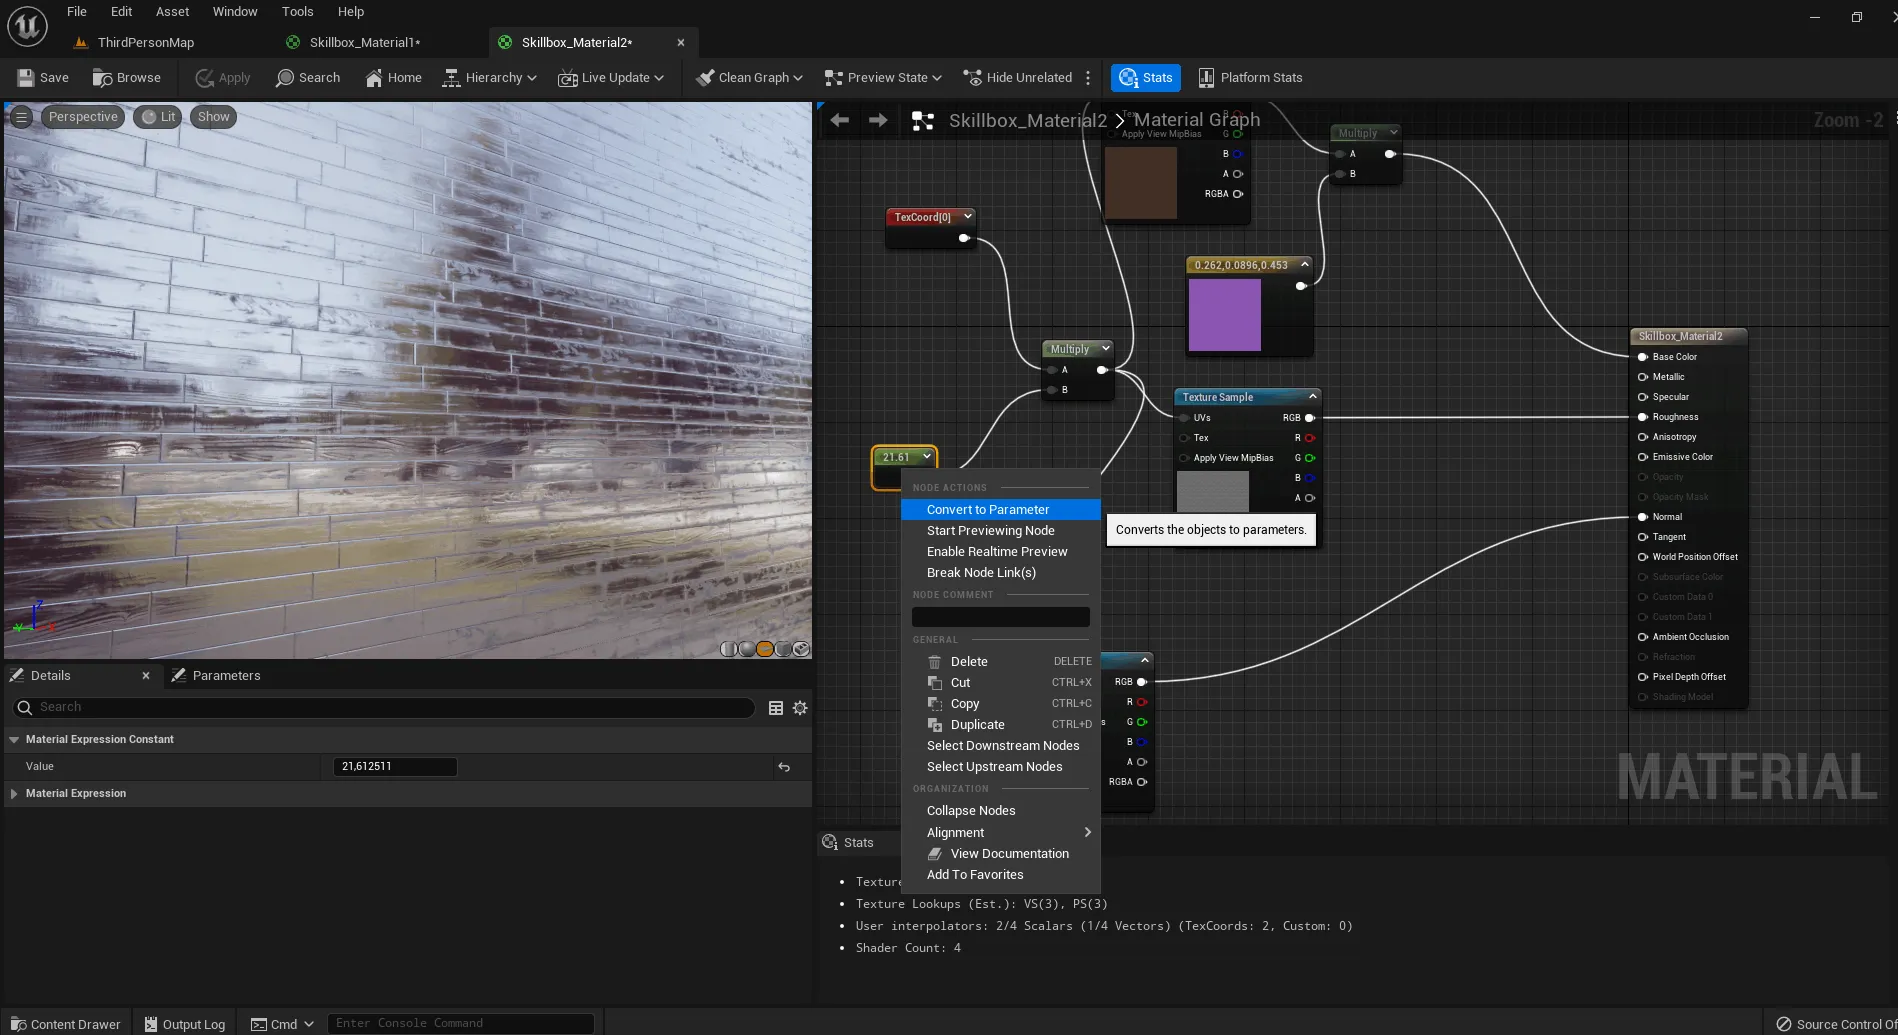
After the conversion is complete, the editor will offer to rename the node. Let's call it Size. Click "Apply" and open the material instance editor by double-clicking the left mouse button on the created instance material icon. In the "Details" panel, under the "Global Scalar Parameter Values" tab, the Size parameter will appear with the previously set texture coordinates. Make sure it's checked. For better visibility, move the window to the side so you can see the scene, and change the Size slider value. The scale of the material texture will begin to change in real time, which will allow you to visually evaluate the result.
You can also convert other properties, such as color, reflectance, or normals, without the need for additional material manipulation and recompilation after each change. When creating a new parameter, a new group of settings opens in the Details section of the instance. Expand and check the box, similar to how we checked the Size option. This approach simplifies the setup process and allows you to quickly make changes to the object's properties.
For developing more complex node schemes, it is highly recommended to study the materials from the Starter Pack content. It is also important to familiarize yourself with the functionality of the Palette components, as described in the official documentation. This will allow you to better understand the capabilities of the system and effectively use the tools to create high-quality content.
Read also:
MetaHuman Creator: Everything you need to know about the new tool for creating realistic 3D characters
MetaHuman Creator is a modern tool from Epic Games that allows users to create High-quality 3D characters with minimal effort. This tool offers a wide range of options for customizing appearance, including facial details, hairstyles, and clothing. Thanks to its intuitive interface, even beginners can easily create unique characters for games and animations.
One of the key features of MetaHuman Creator is its ability to generate realistic skin textures and facial animations, greatly simplifying the development process. Integration with Unreal Engine makes it easy to integrate created characters into game worlds, making it an ideal choice for developers.
Furthermore, MetaHuman Creator provides access to a library of ready-made models, saving time on creating characters from scratch. Users can also export their characters in various formats, providing flexibility in use.
In conclusion, MetaHuman Creator is a powerful tool for game developers and animators looking to create realistic 3D characters. Customization options, a high degree of detail, and integration with Unreal Engine make it indispensable in the modern development process.
Profession: Game Developer on Unreal Engine from scratch to Middle
You will master the Unreal Engine game engine and the C++ language. Build a portfolio and apply your skills in game development, the film industry, architecture, manufacturing, medicine, and many other fields.
Learn more