Table of Contents:
- What is UV Unwrapping?
- Practical Tips for Beginners
- Additional Resources for Study
- What is UV and Its Importance in 3D Graphics
- UV Unwrapping and Texturing Basics
- Why Are Seams Necessary in UV Unwrapping?
- Seam Marking Technologies for 3D Models
- The Efficiency of Automatic UV Unwrapping: Advantages and Disadvantages
- Key Aspects for Successful UV Unwrapping
- Frequently Asked Questions about UV Unwrapping
- The Importance of UV Unwrapping in 3D Modeling
3D Modeling in Blender: A Free Course for Beginners
Learn MoreUV unwrapping plays a key role in 3D modeling, as it directly affects the visual quality of textures. For beginners in this field, mastering UV unwrapping is not only useful, but also a prerequisite for success. Proper UV mapping allows for more efficient use of textures, ensuring realism and detail in your models. This skill opens up new possibilities for creativity and professional growth in 3D design.
What is UV mapping?
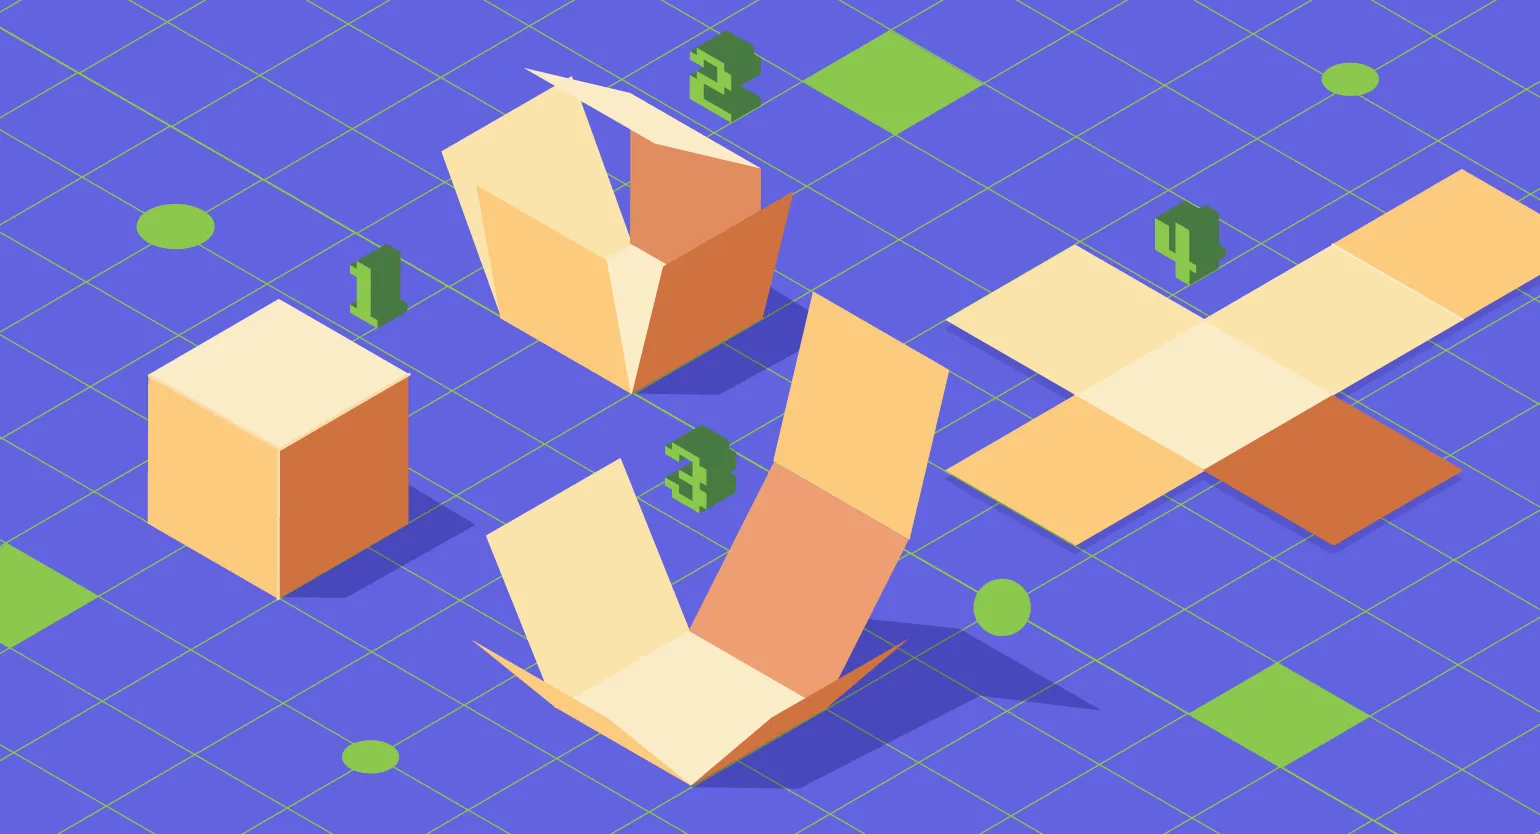
UV mapping is the process of projecting 2D images onto 3D models, similar to creating paper models by cutting and laying out flat pieces. Texture quality is directly dependent on the accuracy of the placement, scale, and orientation of UV maps. Understanding these principles is key to achieving high-quality renders in 3D graphics. Proper UV mapping contributes to a more realistic display of materials and textures, which is an important aspect in game development, animation, and visualization.
To achieve optimal results in UV mapping, several key aspects must be considered. Proper placement of UV chevrons is crucial, as it helps minimize texture distortion. UV channel sizes should also be considered to avoid overlapping and ensure high rendering quality. Proper use of automatic unwrapping tools can significantly speed up the process, but manual refinement is often necessary to achieve a perfect result. Finally, regularly checking the UV unwrapping for errors and artifacts will help avoid problems during the rendering stage. These guidelines will help you create high-quality and efficient UV maps, which in turn will improve the visual characteristics of your project.
- Optimal use of UV map space to minimize texture distortion.
- Avoid overlapping UV chevrons to prevent textures from clashing with each other.
- Maintaining proportions to avoid stretching or compressing textures on the model.
Practical Tips for Beginners
Beginning 3D modelers should keep in mind several key guidelines to improve their UV map skills. First, it is important to understand the basics of UV maps and their role in the texturing process of models. Practice in creating high-quality maps will allow you to achieve more realistic texture display on 3D objects. Secondly, it's worth learning about various UV unwrapping tools and software, such as Blender, Autodesk Maya, or 3ds Max, as each offers unique features. It's also recommended to focus on optimizing UV unwrapping to avoid texture distortions and maintain high model quality. It's also helpful to review the work of more experienced colleagues to learn best practices and avoid common mistakes. Regular practice and experimentation with different techniques will help you develop confidence and mastery of UV unwrapping, which will ultimately improve the quality of your 3D models.
- Learn different unwrapping methods, such as automatic and manual UV unwrapping.
- Practice on simple models, gradually increasing the complexity of tasks.
- Use specialized tools and plugins to optimize the process.
Additional Resources for Study
There are many online courses and video tutorials that can help you deepen your knowledge of UV unwrapping. We recommend checking out platforms like Coursera, Udemy, and Skillbox. These resources offer courses developed by experienced instructors, allowing you to obtain a high-quality education in this field. Studying on these platforms will give you access to practical tasks and modern methods of working with UV unwrapping, which will significantly improve your skills and competitiveness in the market.
What is UV and its importance in 3D graphics
In 3D graphics, where objects exist in three dimensions, it is critical to understand how textures are projected onto the surfaces of models. UV unwrapping is a key process that allows 2D textures to be correctly applied to 3D objects. This method allows artists to create realistic surfaces such as leather, metal, and textiles, significantly improving the quality of rendering. Proper UV mapping not only improves the appearance of models but also optimizes rendering performance, making it an indispensable tool in a 3D artist's arsenal.
Textures in 3D games are flat images known as texture maps. Unlike 2D games, which operate on a plane with X and Y axes, 3D models add a Z axis, allowing for the creation of volumetric objects. To eliminate confusion between texture coordinates and the 3D scene, the X and Y axes in a texture map are replaced with U and V axes. This approach simplifies the process of applying textures to model surfaces, ensuring higher-quality rendering and realism. Using textures allows game developers to create detailed and attractive visuals, which significantly improves the overall perception of the game world.

For a deeper understanding of UV unwrapping and its application in 3D modeling, it is important to study the Blender tutorials. These tutorials cover the fundamental principles of creating textures and applying them to models in detail. Mastering UV mapping in Blender will allow you to effectively work with textures, improving the quality of your 3D objects and enhancing the realism of your renderings.
Read also:
Blender Tutorials: Modeling and Texturing Basics
Blender is a powerful 3D modeling tool that allows you to create amazing visual effects and animations. In this tutorial, we'll cover the basics of modeling and texturing in Blender, which are key skills for any 3D artist.
Let's start with modeling. Blender offers a variety of tools for creating 3D objects. You'll learn how to use primitives such as cubes, spheres, and cylinders, and master object editing techniques such as extrusion, merging, and splitting vertices. These techniques will help you create complex shapes and details.
The next important aspect is texturing. Textures give models a realistic look. You'll learn how to apply different textures to objects using UV mapping and materials. We'll also cover how to set up shaders and lighting to achieve the desired effect.
During the training, you'll receive practical tips and examples to help you consolidate your acquired knowledge. Having mastered the basics of modeling and texturing in Blender, you'll be able to create your own 3D projects and develop your skills in the world of computer graphics.
UV Unwrapping and Texturing Basics
UV unwrapping is a crucial step in 3D modeling, significantly affecting the quality of object texturing. Choosing the right UV unwrapping method depends on the types of textures you plan to use. Effective UV unwrapping minimizes distortion and achieves realistic material display on the surface of models. This is especially important for gaming and animation projects, where visual quality is key. Optimizing UV mapping also improves performance, as properly distributed textures reduce rendering times and improve overall graphics efficiency.
Tile mapping is one of the most popular methods in 3D graphics. In this process, a UV plane is completely filled with a continuous texture, called a tile. This method is ideal for texturing large-scale objects such as buildings, bridges, and natural landscapes. Using tiles allows for high detail at close range and also provides the ability to fine-tune texture density, significantly improving the visual quality of models. Tile-based texturing helps optimize performance by allowing textures to be reused across multiple objects, which is essential in modern games and visualizations.
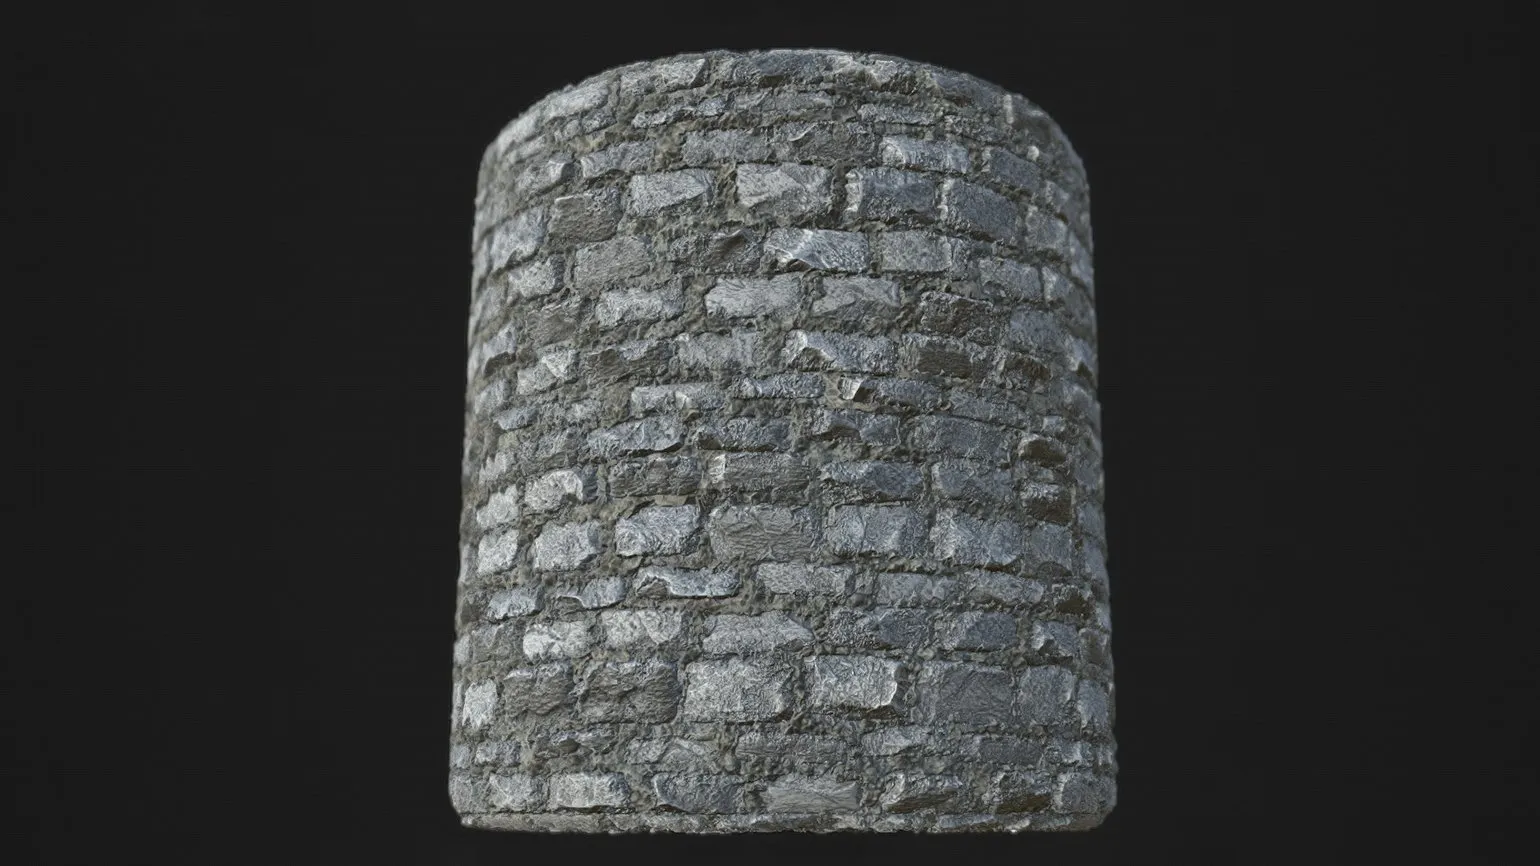
To control texture density in 3D programs, it is recommended to use specialized textures that allow you to fine-tune the parameters. This ensures higher quality display of objects and their realism. Examples of such textures include various maps, such as normal, bump, and stretch maps, which help achieve the necessary detail and volume effect. Using these tools, you can effectively manage texture density and improve the visual perception of your 3D models.
- Autodesk Maya: use the settings in the UV texture editor (UV Toolkit);
- 3ds Max: use the Texel Density Tool script;
- Blender: use the Texel Density Checker add-on or enable the Color Grid via shaders.
Tiled texturing has its advantages, but also disadvantages. One of the main drawbacks is that repeating patterns become too noticeable when viewed from a distance. This can negatively impact the visual perception of a game or 3D scene. However, modern 3D editors and game engines offer effective tools for procedural texture blending, which significantly reduce this effect. Using such methods allows you to create more natural and varied textures, improving the overall aesthetic and realism.
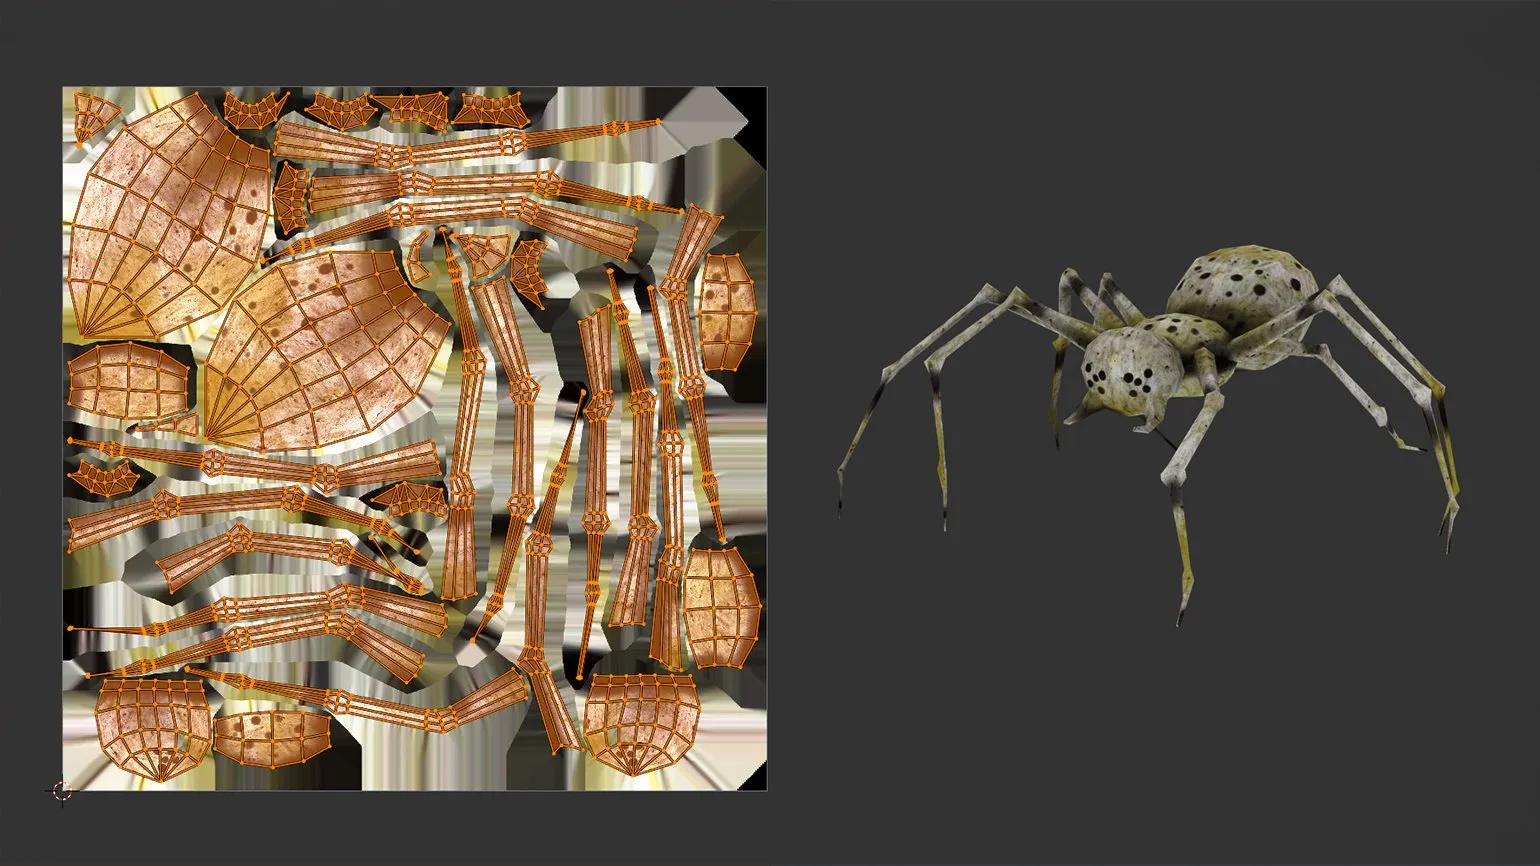
Unique textures for models such as characters, vehicles, and environment objects require a more careful and detailed approach compared to tiled textures. It is important that these textures strictly adhere to UV coordinates, as violating this rule can lead to distortions and a decrease in visual quality. Creating an original UV map for such textures requires high standards, which makes the process more challenging, but at the same time necessary to achieve realism and artistic expression in the models.
Why are seams necessary in UV unwrapping?
Seams are an important element of the UV unwrapping process, as they divide the 3D model into distinct segments. Within each of these segments, the location of edges is determined and the boundaries of the proposed cuts are established. This approach allows for more accurate and efficient texturing of 3D models, which contributes to improved visual quality and detail of objects. Proper use of seams in UV mapping helps avoid texture distortion and ensures a more realistic display of models in various visual applications.
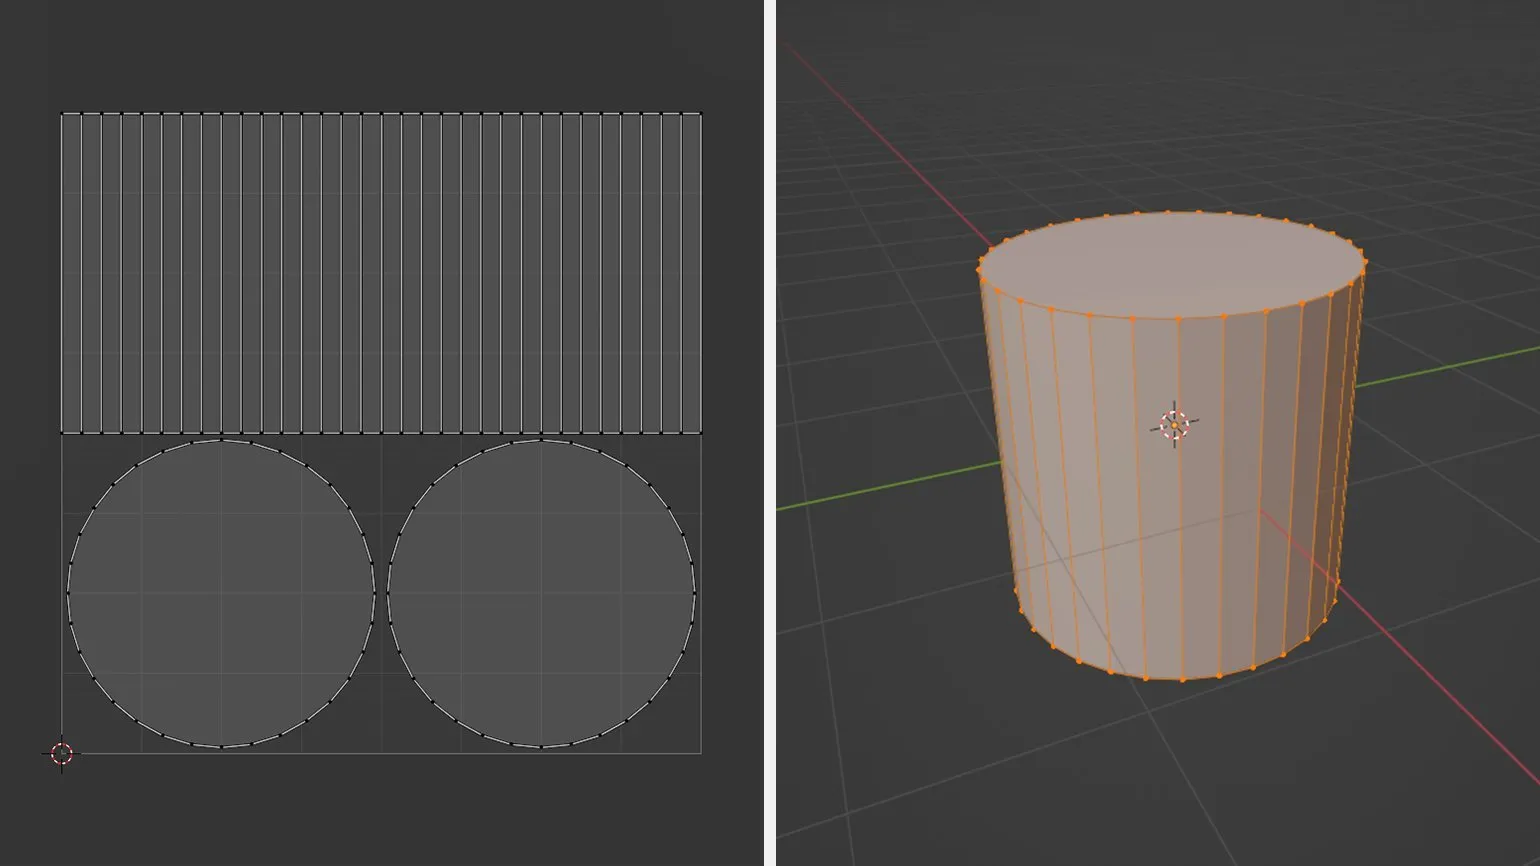
After marking the seams and projecting them into UV space, a "pattern" is created, consisting of individual parts known in 3D modeling as islands or shells. These elements serve as areas to which the texture will be applied. Correct distribution of these parts, based on the model's geometry, plays a key role in achieving a high-quality visual result. Correct division avoids texture distortion and ensures its natural display on the model.
When using a single image for the entire model, it is important to consider that the texture may be interrupted at seams. This phenomenon is especially noticeable and can lead to the appearance of visual artifacts, which negatively affects the overall quality of the graphics. To achieve a higher level of detail and realism in models, it is recommended to use methods that minimize such distortions, such as using multiple textures or adjusting seams.
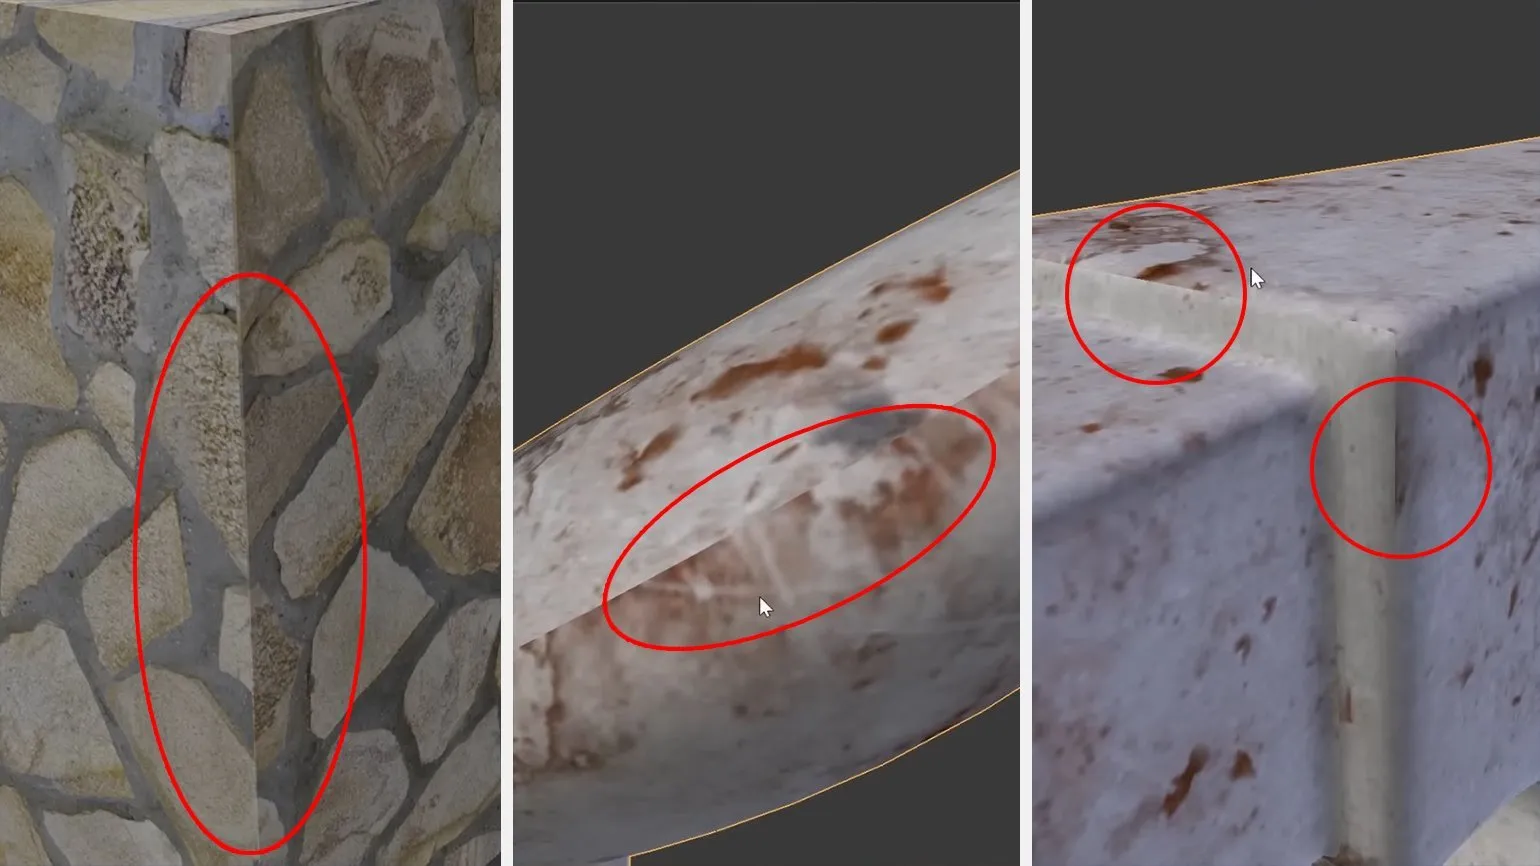
When using original image texturing, breaks may appear on the model surface. This often occurs due to errors in the texture baking process, where 3D geometry properties are incorrectly transferred to texture maps. As a result, such defects can create an unnatural appearance. To avoid such issues, it's important to carefully inspect and adjust textures, as well as use optimized baking methods, which will help achieve higher-quality and more realistic results.
In modern 3D design, minimizing distortion is crucial for creating realistic objects. Understanding and properly using seams in UV mapping plays a key role in achieving high-quality rendering. Effective UV mapping allows textures to be evenly distributed across the model's surface, significantly improving its appearance and avoiding unwanted artifacts. It's important to consider how seams can affect the perception of a model and to place them correctly to preserve texture integrity and achieve maximum realism.
Seam Marking Techniques for 3D Models
Mastering the art of seam marking on models requires practice and careful observation. To achieve optimal results, it's crucial to carefully analyze the structure of the object and divide it into logical segments. Emphasize cuts on sharp-angled edges to create clear transitions between faces. This approach is especially important for seams that will be out of the viewer's line of sight, preserving the aesthetic appeal of the model. Proper seam marking not only improves appearance but also affects the durability of the product, making this process an integral part of modeling.
For a deeper understanding of seam marking principles, it's worth considering everyday objects. For example, tables are composed of several elements: legs are securely attached to the tabletop, and clothing is made from various fabrics stitched together. Car bodies often combine metal and plastic. These examples are helpful when creating 3D models because they take into account the texture and joints characteristic of real-world objects. Understanding these principles can significantly improve the quality of your models and make them more realistic.
The Efficiency of Automatic UV Unwrapping: Advantages and Disadvantages
Automatic UV unwrapping is an important feature available in most modern 3D modeling programs, including Blender, 3ds Max, and Maya. This method allows you to efficiently and quickly create UV maps for objects, which is especially useful when working with simple shapes and tileable textures. Using automatic UV unwrapping significantly speeds up the process of preparing models for texturing and rendering, making it an indispensable tool for 3D artists and designers. This feature allows you to optimize your workflow and achieve high-quality results quickly.
Despite their advantages, automatic algorithms have certain limitations. In particular, they may struggle to handle detailed, complex geometry. When using such tools, the UV space is often filled with numerous randomly placed shells, leading to texture overlap and unwanted artifacts. These issues primarily arise from excessive seams and deformed segments, which ultimately negatively impact the visual quality of the model. For best results, manual UV correction is required to eliminate imperfections and improve the overall texturing quality.
Visible defects and stretch marks may appear on the mesh surface, as well as small islands that create voids in the UV map. It is advisable to avoid these problems during 3D modeling, as they can negatively impact texturing quality. For optimal results, it is recommended to combine manual unwrapping methods with automatic ones, especially for more complex models. This approach will ensure more accurate distribution of UV coordinates and improve the appearance of the finished product.
Key Aspects for Successful UV Unwrapping
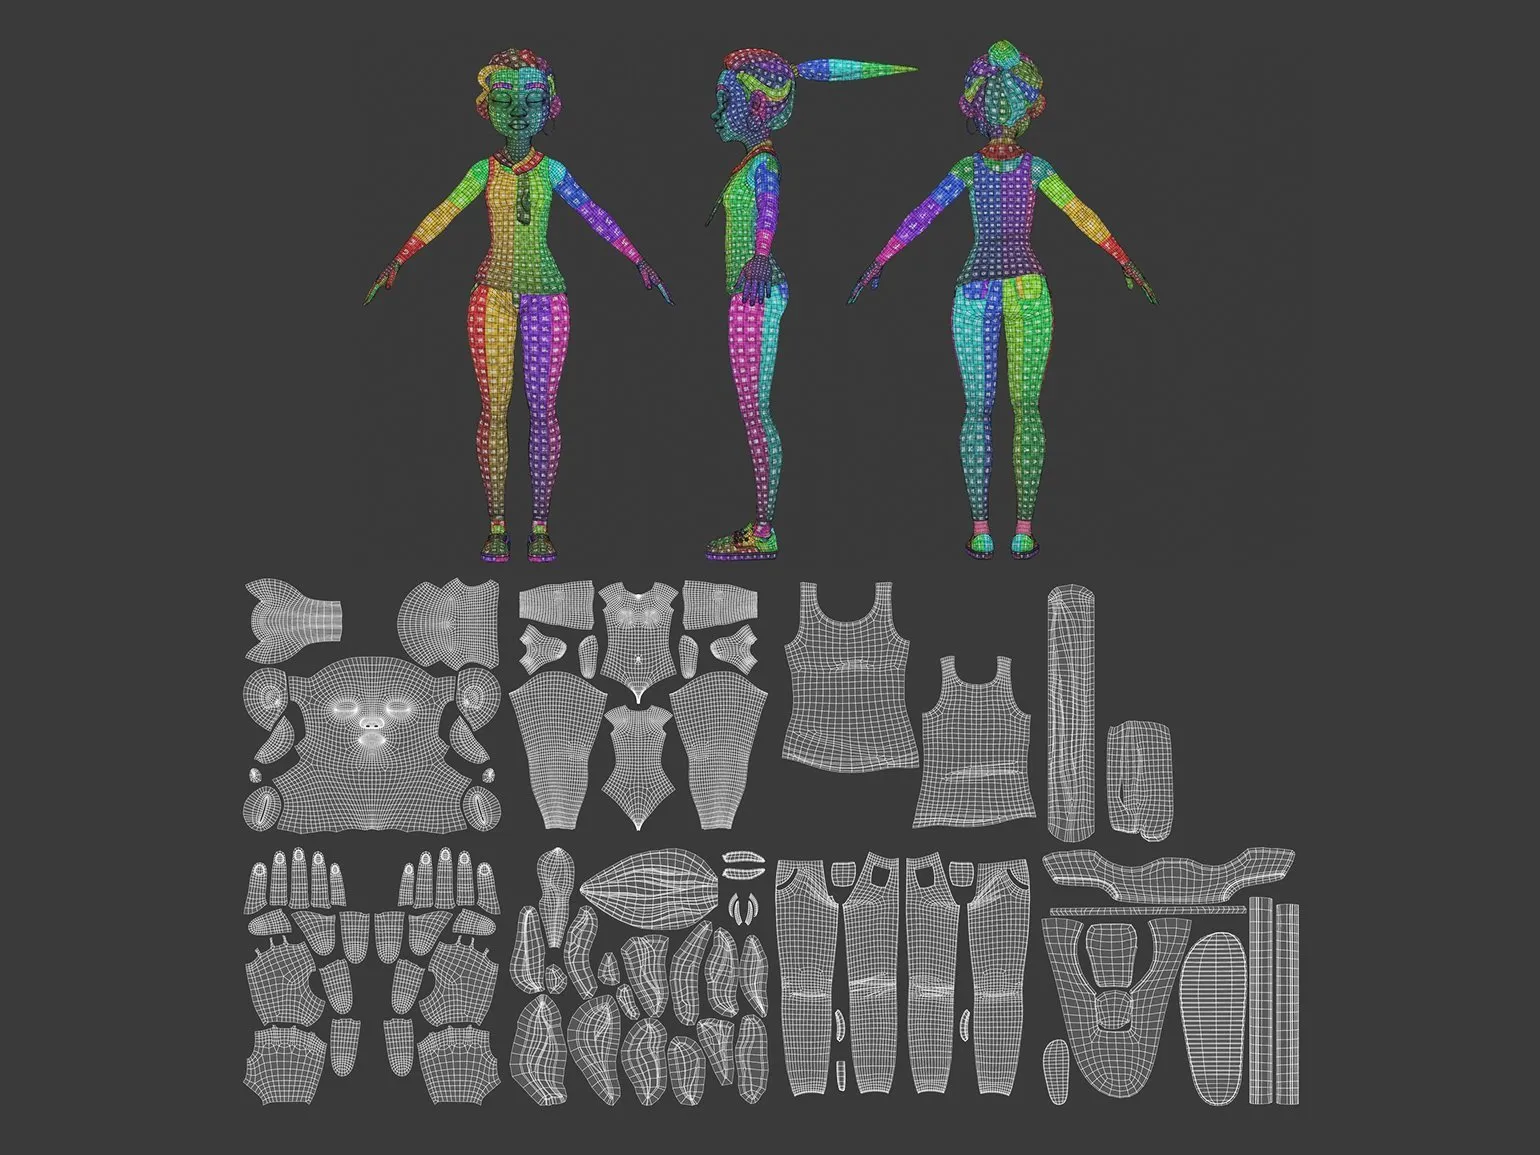
UV unwrapping is a key step in 3D modeling that requires careful consideration. Correct UV unwrapping ensures high-quality texturing and reduces the likelihood of visual artifacts. To successfully complete this task, it is important to consider several recommendations that will help achieve the best results. Carefully approach the placement of UV chevrons to avoid texture overlap and optimize the use of texture space. Also, try to maintain an even distribution of UV coordinates to prevent distortion during texture mapping. By following these tips, you can significantly improve the quality of your 3D models.
- Depend on texture resolution based on the model's importance in the project. For example, for minor objects like candlesticks, 4K textures may be overkill. Meanwhile, models like characters are best broken down into logical UV spaces.
- Maximize UV space utilization. The higher the fill, the better for optimization. If you're working with 4K textures, ensure that UV shells occupy at least 70-80% of the space. To do this, use specialized programs such as RizomUV, which allow you to quickly adjust the size and shape of the islands.
When creating UV maps, it's important to consider the specifics of a specific project. Animation and film emphasize a high level of detail to achieve realistic images. Meanwhile, game development prioritizes performance to ensure smooth execution and interaction. A proper approach to UV maps helps optimize textures and improve visual perception, which is key to success in both animation and gaming.
- Avoid stretching and ensure uniform texture density across all islands. Use checkerboard textures to identify imperfections.
- Make sure shells don't overlap to avoid artifacts on the model.
If an object contains similar structures, such as table legs, it's a good idea to use the overlay method. However, this method is not recommended for texture baking, as it can distort details and reduce rendering quality. For optimal texturing results, it's better to use more appropriate methods that ensure image accuracy and clarity.
- Leave gaps between UV shells to prevent seams during rendering. This is important because mipmapping can degrade texture quality at boundaries.
- Follow the padding rules: for example, 1024×1024 textures require 8 pixels of padding.
Most programs calculate padding automatically, but in Blender you may need to enter it manually. For better visual quality, we recommend using padding with blurred boundaries. This will help create smoother transitions and improve the overall aesthetics of the graphics.
Kirill Reznicenko, CEO of Rainstyle Games and an expert in 3D modeling, advises not to limit yourself to one software for UV unwrapping. He emphasizes the importance of combining different tools to achieve optimal results, depending on specific tasks. This approach not only improves the quality of work but also increases the efficiency of the modeling process. By using different tools, you can adapt your methods to the requirements of the project, which significantly expands creative possibilities.
UV unwrapping tools in 3ds Max and Maya can seem complicated for beginners. However, with time and practice comes not only understanding but also high efficiency of working with these tools. Mastering UV unwrapping is a key step in 3D modeling, significantly impacting the quality of texturing and rendering models. With experience, users become better at this task, which allows them to create higher quality and more detailed objects.
Frequently Asked Questions about UV Unwrapping
- Which software is best for UV unwrapping?
- How can I ensure that my textures are stretch-free?
- How can I optimize the UV space for highly detailed models?
The Importance of UV Unwrapping in 3D Modeling
UV unwrapping is a critical step in creating 3D models that cannot be ignored. While this process may seem technical, its successful execution is a crucial indicator of a 3D modeler's professionalism. Employers carefully evaluate the quality of UV mapping in candidates' portfolios, as it directly impacts the final texture quality after baking. The better the UV mapping, the more realistic and detailed the textures in the final project will be. Proper UV mapping allows for the efficient use of texture maps, minimizing distortion and ensuring high-quality rendering. Therefore, mastering UV unwrapping skills is crucial for success in 3D modeling.

It is important to remember the importance of this process, as it significantly affects the performance and visual quality of the final products. Attention to every detail is key to achieving the optimal result. Each stage requires careful consideration to ensure high standards and meet user expectations.
Our blog features helpful resources and up-to-date tips on a variety of topics. We strive to provide readers with quality content that answers their questions and helps them solve everyday problems. Don't miss our latest articles, which cover a wide range of topics and areas. We update regularly to ensure you always receive the latest and most relevant information. Read us and stay up-to-date with news and trends.
Blender, although a powerful tool for 3D modeling and animation, does not always meet established industry standards. One reason for this is the lack of support for some commercial file formats commonly used in professional studios. This can complicate the exchange of data between different programs and lead to additional conversion efforts.
Furthermore, Blender's interface, although more intuitive in recent versions, can still seem complex to beginners, which may put off potential users. Also, not all program features are optimized for teamwork, which is important in large projects.
Furthermore, despite an active community and numerous available training materials, Blender does not always offer the same level of support and documentation as commercial solutions. This can lead to difficulties in learning and mastering the program, especially for professionals accustomed to other tools.
As a result, despite its many advantages, Blender faces challenges that may prevent it from taking a leading position in the 3D design and animation industry.
3D Generalist: 7 Skills for Success Careers
Want to become a 3D generalist? Learn 7 key skills for working in the industry! Read the article.
Find out more